
RAW Image Capture

RAW Image Capture Is Only the Beginning
Here’s a 100% true statement that may surprise you: JPEG images look better than RAW images. I swear that’s true! True, that is, if you compare a straight-out-of-the-camera JPEG file to a RAW file. That’s because the camera’s image processor processes a JPEG file so that it looks colorful and crisp—just what most consumers are looking for—without making a lot of image adjustments. A RAW file isn’t processed; it needs processing, just like a film negative, which is why a RAW file is often referred to as a digital negative.
Pros are familiar with the tremendous creative and corrective possibilities of Adobe Photoshop’s Camera Raw and with the standard enhancements of Adobe Photoshop CS2. They also know that RAW files contain more information than JPEG files, especially when saved as 16-bit files, because JPEG files throw away pixel information that we think we don’t need (how dare they!). Another example of their superior quality is that RAW files have a slightly wider exposure latitude than JPEG files, which is a plus when photographing a scene with a broad contrast range or one with strong highlights, such as a beach scene.
In this column, we’ll take a look at just one of the cool enhancements that await us in Adobe Camera Raw: fixing chromatic aberrations. It’s an enhancement that we can also make on a JPEG file by using the Lens Correction filter (Filter>Distort>Lens Correction) in Photoshop CS2. But why not start with the best possible image? We’ll also take a look at some Photoshop CS2 enhancements that can transform a seemingly dull RAW file into a much more dramatic image.
Fixing chromatic aberration
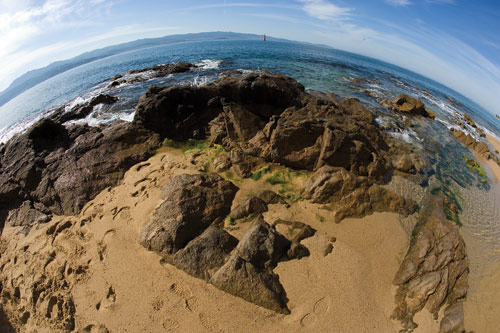
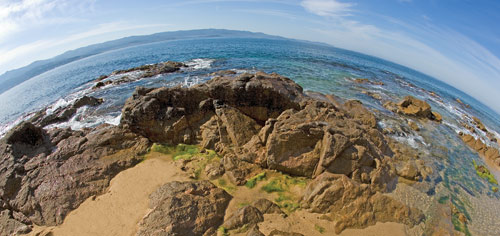
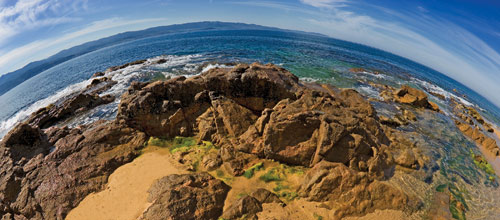
I photographed this beach scene on the picturesque Mediterranean island of Corsica with my Canon EOS-1Ds Mark II set in the RAW mode and my ISO set at 100 for the cleanest possible image, one with virtually no digital noise. I used a 15mm fisheye lens (that I borrowed from one of the students on the workshop I was leading in Corsica) to bend the horizon line. I knew the photograph was only the beginning of a much-improved image.
We can make dozens of enhancements in the Camera Raw window, including adjusting the white balance, exposure, shadows, brightness, contrast, and saturation. I make most of these adjustments in Photoshop, although I do adjust the white balance in Camera Raw. However, you may want to play around with these controls to see what they can do for your images.
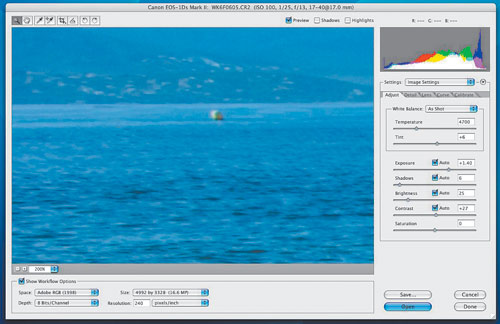
One of the invaluable enhancements in Camera Raw is fixing the chromatic aberration, revealed by clicking on the Lens tab in the Camera Raw window. Check out this screen shot of my picture (enlarged 200%) in the Camera Raw window. The purple fringe you see between the land and sea at the top left of the window is one example of chromatic aberration, and the purple fringe between the blue water and white foamy water at the bottom right of the window is another.
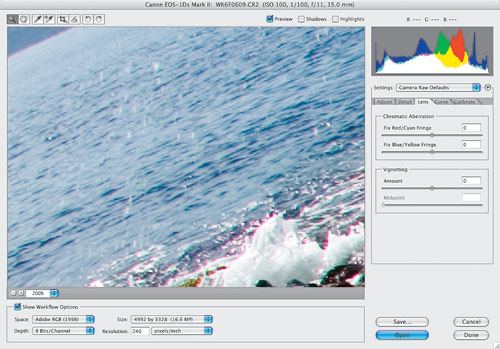
Chromatic aberrations can be found in images with strong contrast. They’re more common in consumer and prosumer digital cameras than in pro cameras. (Yup, chromatic aberrations are also found in 35mm film images.) Chromatic aberrations occur because some lenses don’t focus the different wavelengths of light onto the same focal plane. Getting all the different colors to focus on one focal plane is a tricky job for lens designers, because different colors of light have different wavelengths.
Chromatic aberration can also be exaggerated by what’s called “blooming” in digital cameras. Blooming, in nontechnical terms, is the spillover of a color from one pixel to another.
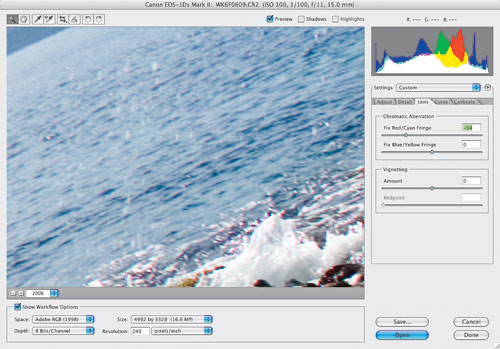
Presto! As you can see from this screen shot, adjusting the Fix Red/Cyan Fringe slider in the Chromatic Aberration control has eliminated the purple fringe. How cool is that? As cool as that is, if you were to make a 5×7″ print from a JPEG file of the same scene, you might not notice any difference between a print made from a RAW file. However, you’d surely notice it in a big print.
Fine-tuning the image
Enough of Camera Raw for now. Let’s take a look at a few other enhancements I made to my Corsica beach shot in Photoshop.
I’m a big believer in cropping. In fact, most photographers don’t take advantage of the Crop tool (C) as much as they could. In this image, I cropped my picture so it looked more like a panorama. I also used the Clone Stamp tool (S) to remove the man-made objects from the sea and to remove the footprints on the beach. You see, I like the natural look.
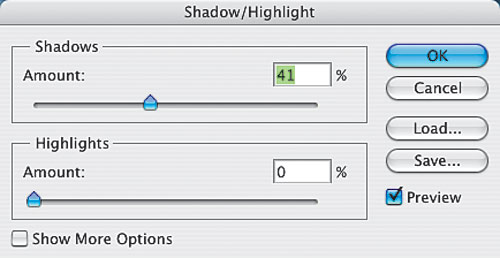
When I was walking barefoot at the beach (those weren’t my footprints), I could see into the shadow areas of the rocks, but the straight-out-of-the-camera shot didn’t show the shadow details. Shadow/Highlight to the rescue!
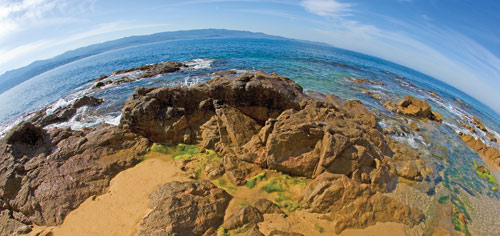
Here is the result of boosting the Shadow/Highlight sliders (Image>Adjustments>Shadow/Highlight). Now you can see into the shadows. The image is getting back to how I saw it, and getting to the point where I envisioned it.
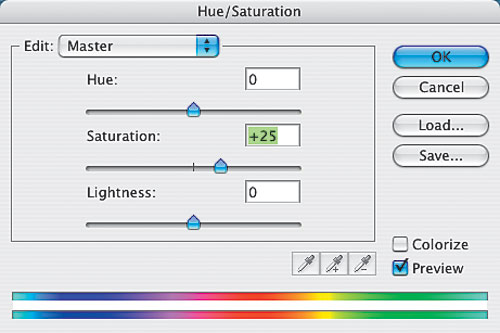
The picture was taken in the later morning when the colors were cool. To warm up the picture, I increased the Saturation (Image>Adjustments>Hue/Saturation). I liked the more saturated image but felt that there was more I could do with it.
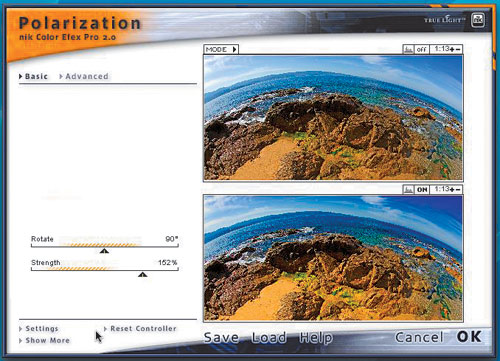
I use a polarizing filter for most of my landscape and seascape pictures because I like the way it darkens a blue sky, brightens white clouds, and reduces reflections on water. However, I couldn’t use a polarizing filter on the 15mm lens because the rounded front element of the lens doesn’t allow for screw-on filters. No fear, using nik Multimedia’s Color Efex Pro 2.0 plug-in (www.nikmultimedia.com), I applied the Polarization filter, which created exactly the effect for which I was looking.
Well, after all that hard work (actually a ton of fun) in Photoshop, I was pleased with my final image—the image I saw in my mind’s eye when I snapped the shutter. So keep in mind that image capture is only the beginning of your photograph, especially if you shoot RAW files. There are endless corrective and creative possibilities that await you in Photoshop. What’s more, if you don’t shoot RAW, you may open a JPEG file and find something like a chromatic aberration and, well, be up the creek!
Analyze This
One of the wonderful things about working and playing in Photoshop is that we can analyze our pictures to the point where we may need some analysis ourselves! Actually, analyzing our images makes us better photographers, better image-makers, and better printers by showing us the information that’s contained in a digital file—and sometimes questioning that information.
For example, I was wondering how much chromatic aberration I’d see in a picture of the same scene photographed with my favorite travel lens, the Canon 17–40mm zoom. As you can see in the screen shot of the Camera Raw window, there is no chromatic aberration in the area of the scene that had it in the picture taken with the 15mm lens.
Hey, if you think looking for chromatic aberrations will drive you nuts, fear not. You can distract yourself by thinking about image sharpness, luminance noise (which makes an image look grainy), and chroma noise (which shows up as colored artifacts in an image). If those topics make your mind spin, set some time aside for a private session with the Sharpness, Luminance Smoothing, and Color Noise Reduction sliders under the Detail tab in Camera Raw.
