J.R. Maddox on Monday Motivation
For this article I wanted to do something fun for everyone. It can be a great challenge to do really well but at the end of the day this is to have some fun. So lets have some fun. Lets get started.
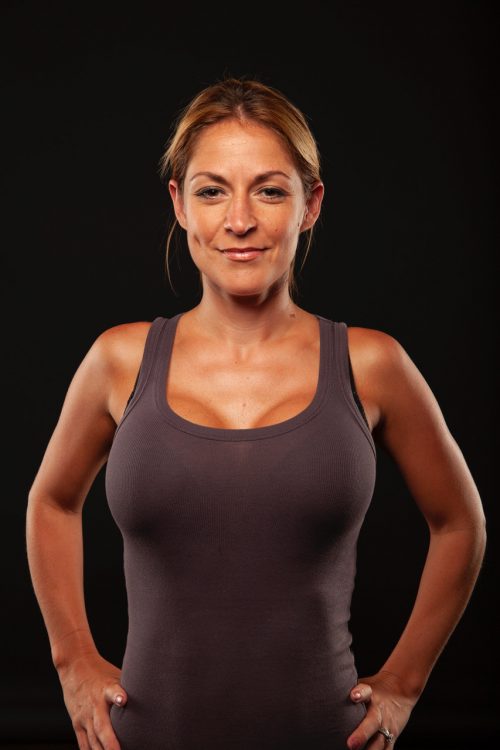
This is something I won a Guru Award with at Photoshop World back in 2013… Wow! Time flies. First, lets take a photo of two people on a clean background so you can cut them out really easy. In this example I used a black background and for the lights I used one Alien Bee with a 20 inch beauty dish with two Alien Bees for the rim lights (which are not needed). Keep the light centred to the camera and the subject, straight on with the subject to keep the shadows the same in each photo to make editing much easier.
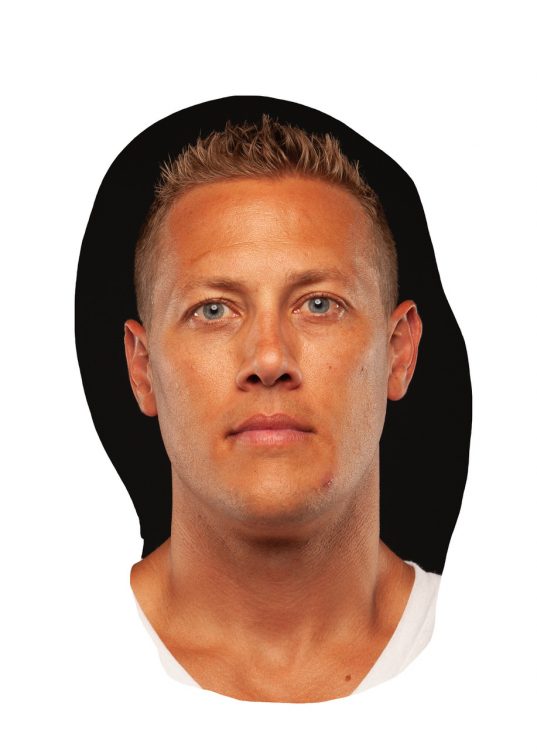
I took both subjects and shot them individually in the same lighting as mentioned before to make the end result easier to edit. I’ve found that taking a few different shots of the subject smiling, not smiling but keeping his/her face straight on with the camera to make for a good result in the end. Again, this makes it easier in the end to edit.
I take the female and start shooting here with the same lighting setup. Here I like to have the female subject pull her hair back to help with editing. At this point I don’t know if I’m going to use the female face or the male face. So having options helps. To help with having options I will shoot the female subject with her hair down as well if she happens to have long hair. Same goes for the male subject. If he has long hair do both, hair back and hair down.
Once I have both subjects shot, I bring the photos into Lightroom. I check to see which ones look the best. Sometimes I like more than one photo. It might be that I like the eyes in one photo but I like the smile in another. So grab all your photos that you like and bring them into Photoshop.
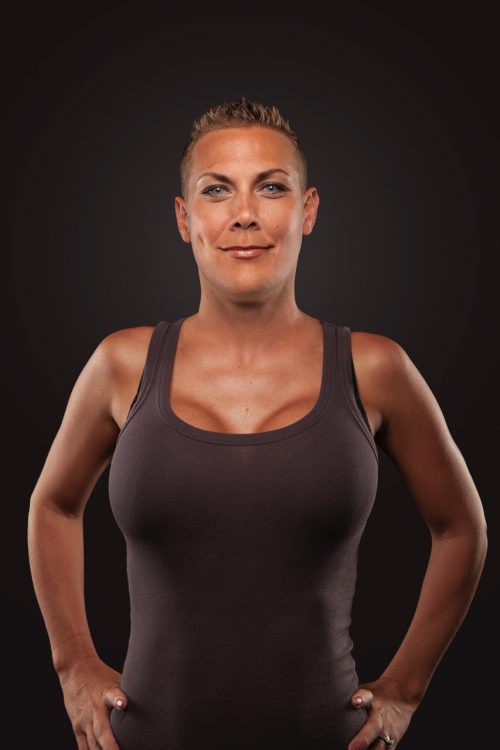
I spend a great deal of time looking over my photos to see which one is going to give me the biggest wow factor. This is why I usually always go with a female body and parts of both subjects for the face. It looks the funniest when you see a women’s body and see a mans head but really cant tell what is what. Have you ever seen Mr Potato head? Well that’s what this is kind of like!
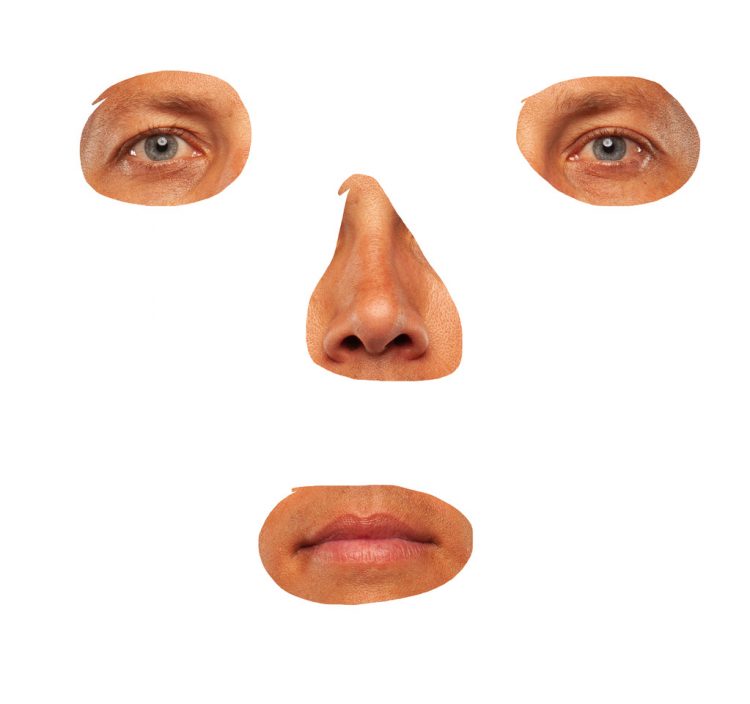
I take the Lasso tool and cut out the eyes (separately) along with the nose and mouth. This way makes it easier as peoples eyes are wider than others and it just makes it easier to have each part separate. In this example I have the male subject cut into pieces. I try them on the female face and start moving them around. At this point is where I really just start laughing as I am having fun and really it does look hilarious. For this final picture, I ended up liking the males head and hair and ears. I cut the women’s eyes and mouth and nose out and tried it on his face. There really is no right or wrong way of doing this. It comes down to whatever looks good to you.
For this example I liked his eyes but really just cutting out his eyes and slapping them on her face were not really doing it for me. I liked her eyebrows and eye lashes. So what I did was cut out his eyeballs and placed them over her eyeballs. I used his nose and her mouth and I kept her dimple. This was all play time for me as I tried different things on each face until I got this final image.
Once I found what I liked, just playing around and not really masking anything at this point as I really don’t have a clue what’s staying and what’s going. Nothing like taking all that time to mask out stuff to find that you are just going to change it. So now that I know what is going where, I take the males head and cut it out.
I use the free transform to get his head to fit just right. Normally I will cut out the bottom (layer) subject’s head so it doesn’t peak through if there is a size difference. So once its sized just right, I now try and blend the images together using the Warp Tool in Free Transform. Don’t worry about the color as we are going to take care of that as well right now. If you notice that the colors are not spot on take a Curves Adjustment Brush. Here you will need to really be patient if you are not good with color. There is a lot of red and yellow in skin so start off with these two colors. Sliding the Red Channel back and forth will help you a lot to see which direction you need to go. Do the same thing for yellow. Its not going to be very far off if you have two people with the same skin type. Once the color is spot on and you cant tell the difference, make sure your mask is super clean as this is where I spend a great deal of time as well. A bad mask can make or break your image. I still have troubles telling apart each person skin in the end. I do this for each part I put on the subjects face. Making sure not to be able to tell whose eyes are who’s, or nose or mouth.
Once you have the majority of the work done you can start retouching any facial issues you may see. You can do this in the beginning but really you don’t know what part you are going to keep so you may just be retouching stuff that you may not use.
Once im happy with the image I like to start with my background color and playing around with that. I normally will put a white soft brush right behind my subject to try and pull them away from the background a little. This of course I put behind the subject and turn the opacity down until it is barley noticeable. Then I will put a color cast with selective color or whatever you prefer, over the entire image. I feel this helps with bringing everything together in the image.
That, in a nutshell, is how I make these fun images… If you have any questions please feel free to contact me, as I would be more than happy to help you.
Now go out and have fun with Photography!
You can find J.R. Maddox on Twitter, Instagram, and Facebook.