
Lighting Recipes: Fashion Shoot with One Light
Fashion Shoot Using One Flash and One Softbox
For this post we’re doing a fashion shoot using a very simple setup: just one flash (in this case, an Elinchrom Ranger Quadra, but it could’ve just as easily been any studio strobe or even a hot shoe flash) and a very large (72″) Octa lightbank from Elinchrom. We’re going to do four different looks using just this one softbox, but for the last look, we’ll use it as a kicker light and add a large 22″ beauty dish.
Figure One
Here’s one of the final images of our model, Reggie (with styling by Shelley Giard). Since this is a fashion shoot, I wanted to make sure that the clothing was well-lit (when you’re shooting fashion, you don’t want the fall-off you normally would with portrait work—you really want to see the clothing), so I went with a large softbox. That way, I could easily light even full-length shots without having to add extra lighting.

In the behind-the-scenes shot, where you can see it’s a really simple lighting setup. I put the softbox to his right, and while I would normally place the light at a 45° angle for a regular portrait, I wanted to have some really strong shadows on the side of his face that’s away from the light. So, I moved it to where it was just about right beside him, rather than in front of him (though the softbox is so large, part of it still sticks out a bit in front of him).

Even though I wanted some nice, dark shadows on the far side of his face, I had to keep some light on his dark clothes, as well. So, I put up a large V-flat reflector (these are 8′ tall reflectors that are black on one side and white on the other) and positioned it so the white side was facing Reggie—that way it sends some of the light from that big Octa back onto his clothes. The closer you have the reflector to the Octa, the more light it reflects, so I moved it quite a bit back so just a little bit bounced back without over-lighting his face.
Also, notice where my shooting position is. I’m not standing right in front of him, I’m a little off to the left side and shooting back at him. That gives me the angle you see back in Figure One.
Figure Two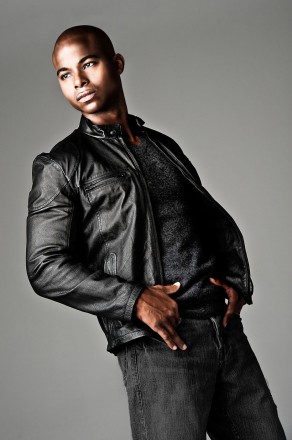

I wanted to shoot some full-length and 2/3-length shots and I used the same lighting setup (although he did a quick change of clothing to a black leather jacket). To get the right perspective for full-length shots, the trick is to shoot from a really low perspective, so I’ll usually either sit or, ideally, lie down on the floor (like I am in this shot). I’m also tethered to my laptop—as I shoot, the images go directly into Lightroom 4. I try to position the screen so I can see it from my position down on the floor.

Camera Settings
I’m shooting in Manual mode with my shutter speed set to 1/125 (my go-to default shutter speed setting for studio work), and for studio shots where I want everything in focus, I try to stay at an f-stop around f/11. I put my focus point directly on my subject’s eye, press the shutter button halfway down to lock in that focus, and then I recompose the shot the way I want it (in this case, a tilted look).
Figure Three
Since our subject had such a strong profile, I thought we’d just reposition him to create a silhouette look like you see here.

In the production shot below you can see that it’s, again, pretty much the same setup (except that I didn’t want any light spilling back onto my subject, so I turned the reflector around to the black side, which absorbs and subtracts from the light).

However, the real trick here is to not have the subject stand directly in front of the softbox, or the light would just wrap around and light the side of his face—we only want a rim-light that outlines his face. So, here’s what you do: Have your subject stand right in the center of the softbox, facing directly toward it, and then have him take a few steps sideways, directly toward your camera (so he’s stepping sideways). Then, have him keep going past the edge of the softbox, so now he’s a foot or two past it (and he’s facing into nothing). That way, he only catches the edge of the light on the side of his face that’s still facing the softbox (because now the shadow side of his face is facing you at your camera position).
Figure Four
Here’s our final look. It’s a version of the popular blown-out look, where you position a light so it intentionally spills into the lens and creates a washed out, lens-flare kind of look.

To get this look, I positioned the large Octa directly behind my subject (who’s now lying on a couch) and aimed it upward at about a 45° angle, so it would just turn everything solid white. What I wanted to get from this light (besides the blown-out look) are the bright white highlights on the left and right sides of his head and face. Next, I added a 22″ beauty dish in front of him (since all the light is coming from behind, the center of his face would be completely dark) and positioned it up high, directly in front of him. Then, I lowered the power of the strobe as low as it could go, so there would just be a hint of light on his face (besides the bright white highlights coming from behind, of course).

After the shoot, I decided that having the beauty dish light powered all the way down left his face still a little bit too dark, but that’s an easy fix in Photoshop. First, I opened the image and duplicated the Background layer. Then, I switched the layer blend mode of the duplicate layer from Normal to Screen. This made everything much brighter, but I only wanted part of his face brighter. So, I pressed-and-held the Option (PC: Alt) key and clicked on the Add Layer Mask icon at the bottom of the Layers panel to hide this brighter layer behind a black layer mask (the layer is still there, but you can’t see it because it’s hidden behind that mask). Now, with the Brush tool (B) selected, I chose a large, soft-edged brush from the Brush Picker, made sure my Foreground color was set to white, and then I clicked once right in the center of his face to reveal just that part of the brighter layer (the one hidden with the black mask). Finally, I lowered the Opacity of this layer (at the top of the Layers panel) to add just the right amount of light to that part of his face (in this case, I lowered it to 50% and it looks about right).

Here’s the final image, again, after lightening the center of his face a bit using that Screen layer trick. So, there ya have it. A number of different looks using mostly just that one large Octa.

For more training and information on Fashion Photography, check out this course by Lindsey Adler. We also have this free video tutorial in Lightroom on how to Edit a Color Photo with Black-and-White Values in Lightroom.
