
The Digital Creation of Fabric
Fabrication
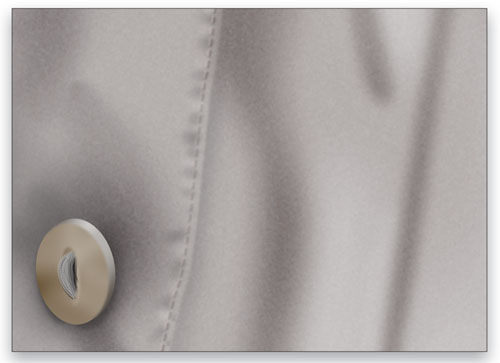
In the seemingly never-ending saga of my painting, Times Square, I have yet another little tidbit to share with you from that piece of work—the creation of fabric. There’s a large billboard in the scene that shows a model wearing a soft, white blouse. The blouse is loosely draped over her body. The billboard is quite large, and when viewed within the parameters of the painting, it will be almost life-size. That’s why rather than just making a collection of tones as shown in Step One below, it’s necessary to make the texture of the blouse look more natural.
To achieve this realism, the texture or weave of the fabric needs to be more visible in areas where the folds bend toward the viewer. The texture of the fabric has to encompass the entire area of the blouse, so it’s best to create the texture as a pattern. In this tutorial you’ll see how to create this patterned weave and distort it to make the cloth appear realistic.
STEP ONE:
You’ll need to start with an image similar to the one shown here that contains the various tones that simulate the folds in a fabric. These folds are nothing more than a series of soft, dark shapes. You might want to take an actual piece of cloth and use it as a model. Position the cloth to simulate how the folds flow through a garment. To create the tones, use a large, black soft-edged Brush (B) set to a low Opacity in the Options Bar. Soften the folds further by applying the Gaussian Blur filter (Filter>Blur>Gaussian Blur).
STEP TWO:
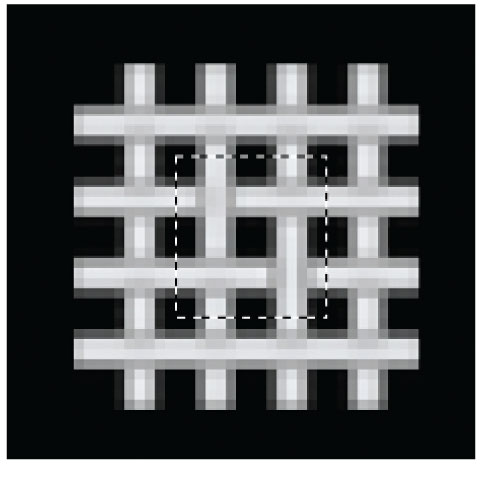
In a separate document, click the Create a New Layer icon at the bottom of the Layers panel. In this layer, draw a long, thin rectangle with the Rectangular Marquee tool (M). Click on the Foreground color, select a light-gray color (R:221, B:221, and G:221) in the Color Picker, and click OK. Press Option-Delete (PC: Alt-Backspace) to fill the rectangle with the light-gray color. With the Move tool (V) active, press-and-hold Shift-Option (PC: Shift-Alt) and click-and-drag the rectangle to the right to duplicate it. Repeat this three times to produce four, equidistant vertical lines to represent the vertical threads of the fabric. Press Command-D (PC: Ctrl-D) to deselect.
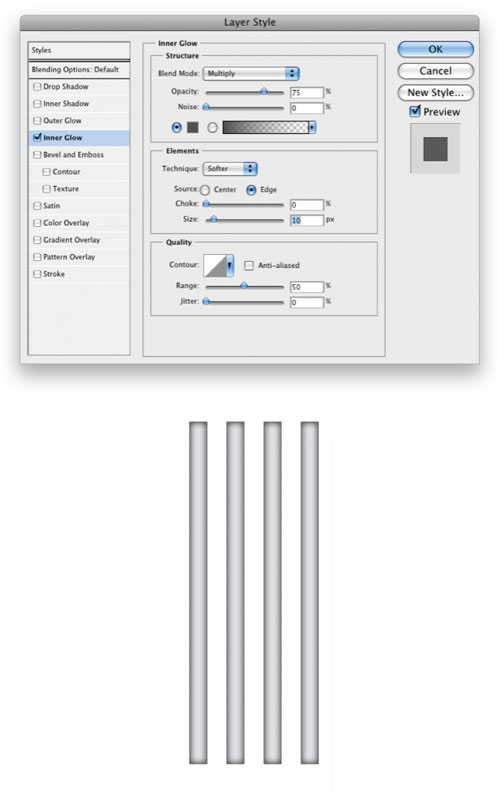
STEP THREE: Double-click on the layer in the Layers panel to summon up the Layer Style dialog. We need to create a dark, even tone on both sides of each line. The only layer style that will produce an even tone on all sides of a layer’s content is Inner Glow. Click on the color swatch and choose a dark gray for the color. Changing the color of the Inner Glow from its default yellow to a color that’s darker than the color in the layer makes the effect disappear from the four lines. This is due to the fact that the Blend Mode is set to Screen to produce a glow effect. Change the Blend Mode to Multiply—the mode used for shadows. The dark tones along the edges will now appear. You can adjust the Size of the effect to fit your needs. Click OK to close the dialog. Note: Always study what a feature can do rather than what it’s called—slight adjustment of the controls for any of the filters or layer styles can create some unexpected effects.
STEP FOUR:
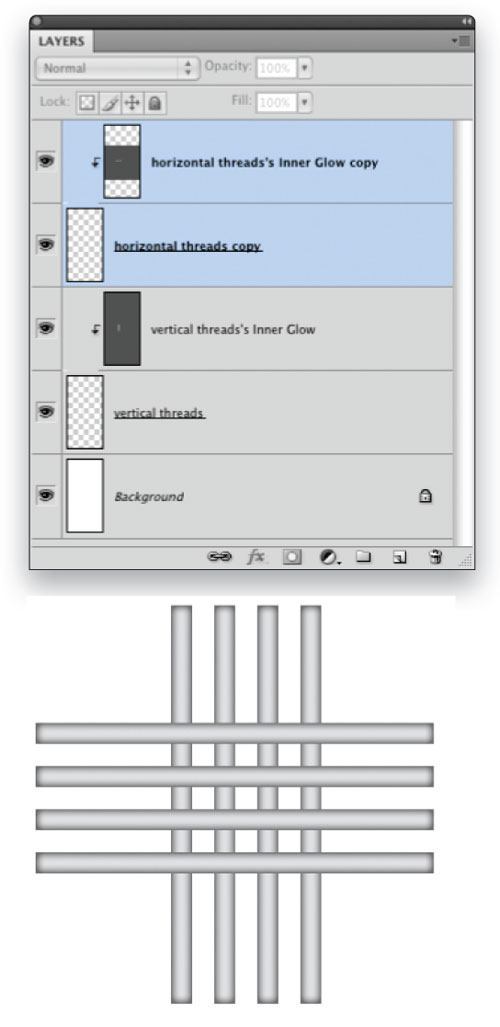
In a later step, you’ll be erasing portions of the lines to create the woven effect of the threads intertwining through each other. Since the layer style will automatically conform to the edges of the contents in the layer, it’s necessary to separate the layer style into its own layer; otherwise, the dark tones will appear at the edges where the threads overlap. With the layer selected, choose Layer>Layer Style>Create Layer. This will put the dark edges into their own layer and clip them with the layer containing the lines so that the dark tones are visible only along the outside edges.
STEP FIVE:
Select both layers and drag them to the Create a New Layer icon at the bottom of the Layers panel. This will duplicate both layers while maintaining the clipping group. With the two new duplicate layers still selected, choose Edit>Transform>Rotate 90° CW to rotate the layers so they are perpendicular to the four original vertical lines. Use the Move tool to position them in place. These lines represent the horizontal threads of the fabric.
STEP SIX:
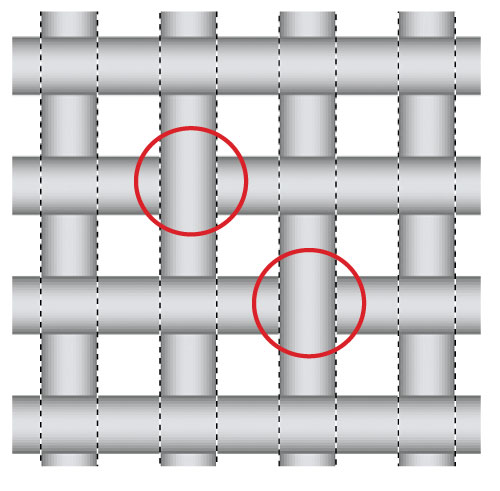
In the Layers panel, Command-click (PC: Ctrl-click) on the thumbnail preview for the layer containing the vertical lines to select them. Click on the layer containing the horizontal lines to target that layer. Use the Eraser tool (E) to erase the portions of the two central horizontal lines (as indicated here by red circles) to make them appear to be interweaving between the vertical lines. Only the two central lines in either direction are necessary to create the pattern. The additional lines on the outer edges were created to aid in the precise selection of the pattern shape in the next step. Press Command-D (PC: Ctrl-D) to deselect.
STEP SEVEN:
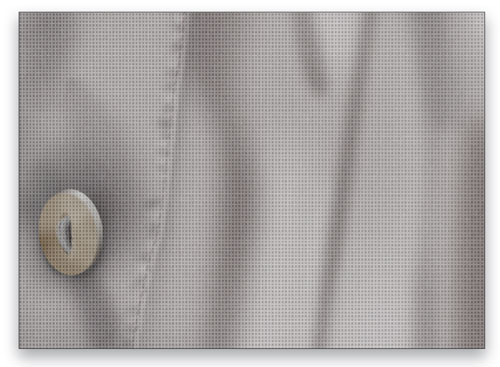
Click on the Background layer and press Command-I (PC: Ctrl-I) to Invert it so that the spaces between the threads are black. Flatten the image (Layer>Flatten Image). Drag-and-drop the image over to the image where the texture will be applied. It will fall into its own layer. Scale it down (Edit>Transform>Scale) to match the size you want the threads to be. Use the Zoom tool (Z) to zoom into the threads. Select the central portion of the threads as shown here, making sure the selection is centered within the black spaces between the threads.
STEP EIGHT:
Choose Edit>Define Pattern. Name your pattern and click OK to save it. Press Command-D (PC: Ctrl-D) to deselect. The layer containing the original scaled threads used to create the pattern can now be dragged to the Trash icon at the bottom of the Layers panel to delete it.
Create a new layer. Choose Edit>Fill (a shortcut for this action is to press Shift-Delete [PC: Shift-Backspace]). Choose Pattern from the Use drop-down menu. Click on the Custom Pattern thumbnail to open the Pattern Picker, choose the fabric pattern you created, and click OK. The layer will be filled with that pattern. Lower the opacity of the pattern layer in the Layers panel to around 15%.
STEP NINE:
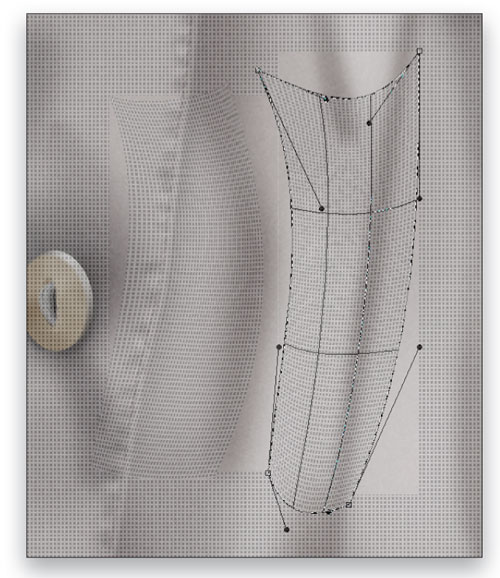
Select portions of the layer that fall within the areas where the texture will be visible and using the Warp tool (Edit>Transform>Warp), distort the texture to follow the contours of the folds in the fabric. In the example shown here, you see one area in the process of being warped while the area to the left of it has already gone through the warp function.
STEP TEN:
The final step needed to make it all look perfect is to apply a layer mask to the layer containing the pattern (click the Add Layer Mask icon at the bottom of the Layers panel). Using a soft-edged Brush with the Opacity set to 50% in the Options Bar and the Foreground color set to black, apply strokes along the edges of the texture where you want it to be hidden. Note: The lowered opacity will allow you to softly control the edges of the mask.
When all the masking is complete (including the button on the blouse), lower the opacity for the layer. The effect will be a soft hint of the fabric texture along the folds of the fabric.
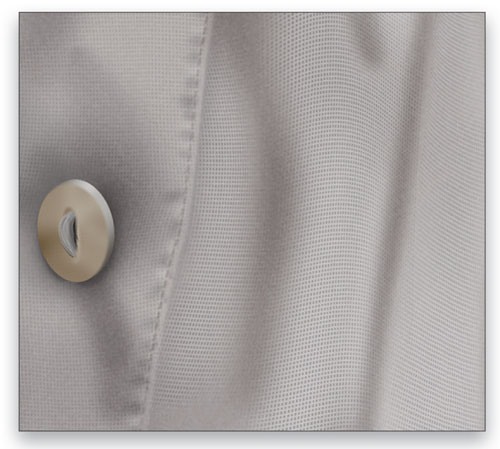
It might seem like a lot of work, but the end result will be a faithful representation of cloth. Without the woven pattern and shading, the fabric would appear to be made of plastic. It’s that extra 10% that makes an image stand out from the rest. It’s that extra 10% that makes an image come to life!
Remember that all these steps are subject to your interpretation and the particular needs of the image you’re creating. Your image might require a different color or the material you’re trying to create might be that of a coarser fabric. The appropriate alteration to any of the steps will give you the effect you’re trying to achieve. The point is to have fun and be creative.
ALL IMAGES BY BERT MONROY UNLESS OTHERWISE NOTED
