Protecting What’s Yours
The Worldwide Web is awash in images and I expect that some are yours, as there’s probably not a digital camera owner out there who hasn’t shared a photo with a friend, family member, or the world via the Web. Whether uploading to your own website, a blog, a stock agency, or one of the many sites dedicated to sharing photos, once your digital photo leaves your computer, it becomes part of the vast growing sea of intellectual property that is the Internet. I couldn’t guess how many photos are out there, but if you want to start counting, I can tell you that the 2-billionth photo was uploaded to Flickr last November. Let’s just call it billions and billions (to misquote Carl Sagan).
The ultimate honor system
We put our photos online for many reasons, from simply sharing moments of our lives to earning our livelihoods. The problem is that the very nature of making a photo viewable on the Internet involves putting it into the digital possession of the viewer. Imagine a shopping experience where instead of going to a store to pick what you want to buy, you could have every item delivered right to your house for free, but with the understanding that you’d pay for the items you keep and throw everything else in the trash. That’s an extreme example of the “ultimate honor system,” but kind of how the Internet works.
Even the act of displaying a photo on a monitor puts it a screen capture away from being saved by the viewer, and a digital file can be reproduced an infinite number of times without loss of quality. All the files you view in a webpage are saved into a special file on your computer (the browser’s cache), which is periodically cleared out.
In trying to get a handle on how much of a problem unauthorized image usage is, I spoke to Niran Amir, the Director of Marketing & Sales for PicScout (www.picscout.com), a company that specializes in using its proprietary image-recognition technology for finding its client’s rights-managed images being used online in commercial projects. (Their client list reads like a who’s who of stock photo agencies.) All matches found by their Image Tracker technology are passed on to the client, and if a use is determined to be unlicensed, PicScout will assist in recovering financial compensation for that use. According to Niran, 80–90% of the matches they’ve found were illegitimate uses. (I expected the percentage of unauthorized uses to be high, but that’s a staggering figure.) Reasons for unauthorized uses by image consumers include ignorance of copyright, mistakes in the image acquisition and approval chain, and plain old bad decisions.
While it may be impossible to prevent a determined person from using your work without your permission, there are a couple of things you should do to protect your work: Establish yourself as the copyright owner; make it harder for the wrong people to use your work; and make it easier for the right people to find and contact you when they want to use your work with your permission. Compromises may have to be made and costs considered, and although not every solution will be suited for every place you upload images, it’s best to focus your attention on the areas that are within your control—right before you click the Upload button.
Register your copyright
According to U.S. Copyright law, you own the copyright to your original work the moment it’s created (assuming it’s not a “work for hire”) without having to register it and without having to affix a copyright notice on the work. Registering your work with the U.S. Copyright Office creates a public record stating that you’re the copyright owner. In this digital age, everything you can do to cement the connections between you and your work is in your best interest.
While this won’t prevent your photos from being misused, it’s a required legal formality before you can file a copyright infringement suit. If you register your work within three months of publication, or prior to an infringement, and a court decides an infringement took place, you’ll be able to recoup legal fees and punitive damages in addition to actual damages. If you register your copyright after an infringement has taken place, your award is limited to actual damages, which means your legal fees come out of your pocket!
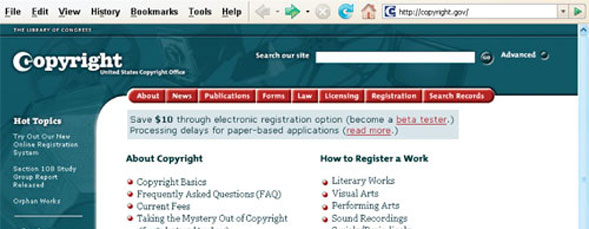
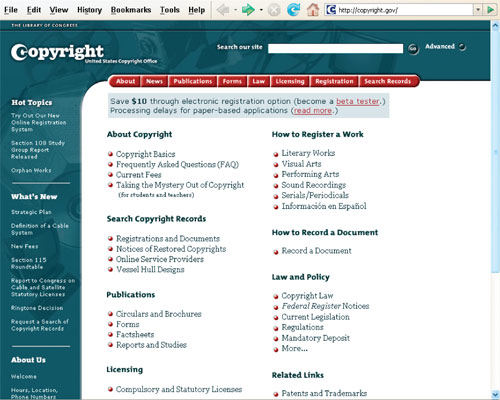
You can register both published and unpublished work through the U.S. Copyright office (http://copyright.gov) by mail for a fee of $45 per registration. With an eye to the future, the Copyright office is now offering an online registration service called eCO (electronic Copyright Office), which is intended to be faster and cheaper ($35) than the traditional paper-based method. Go to http://copyright
.gov/eco if you’d like to give this new service a try. Keep in mind, however, that you’re limited to a 30-minute upload session, so your connection speed will determine the number of photos you can upload per $35 fee.
Pros: Creates a legal public record of your copyright ownership, required before filing a lawsuit, and increases amount of award
when infringement is determined.
Cons: Costs a nominal fee and takes some time.
Verdict: So, what are you waiting for?
Embedding metadata
Okay, I’ll be the first to admit that it’s all too easy for the end user to strip out the metadata, but just because someone could remove it, shouldn’t prevent you from including your copyright notice and contact information in every photo that leaves your computer. Plus if you’re using Adobe Photoshop, Bridge, or Lightroom to manage your photos, you already have the means to add this to your workflow at no additional cost.
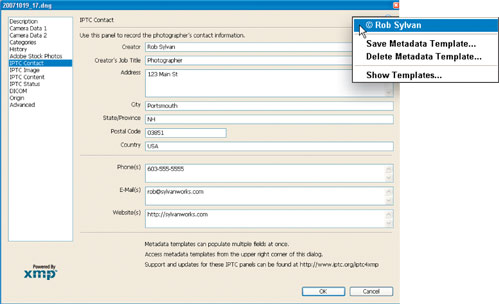
With Bridge and Photoshop, here’s how to create a metadata template that contains your essential copyright and contact information (feel free to add more information) and easily apply it to all your photos:
1.
Open a photo in Photoshop, or select one in Bridge, and go to File>File Info to open that dialog.
2.
Choose Copyrighted from the Copyright Status drop-down menu and then enter your Copyright Notice and Copyright Info URL.
3.
Select IPTC Contact from the list on the left side of the dialog and fill out all fields.
4.
Select IPTC Status and fill out the Rights Usage Terms.
5.
Click the flyout menu arrow at the top of the dialog, choose Save Metadata Template, give it a name, and click Save. Then click OK to close the File Info dialog.
In the future you can easily apply this metadata template to all your work via that same flyout menu.
If you’re using Lightroom, it’s just as easy to create a similar metadata template that you can apply to every photo as part of the Import process. Here’s how to do that from the Import Photos dialog:
1.
Click the Metadata drop-down menu and choose New,
which will launch the New Metadata Preset dialog.
2.
Complete all the fields in the IPTC Copyright and IPTC
Creator sections.
3.
Enter a name in the Preset Name field and click Create.
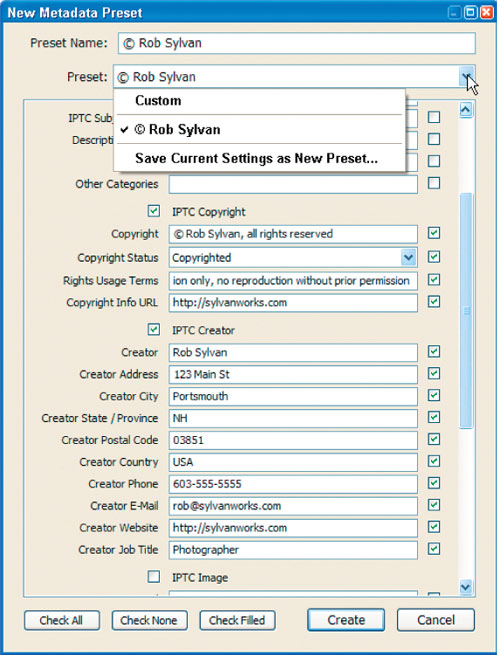
You’ll see that your preset name appears in the Metadata field back on the Import dialog, which means that information will be applied to the metadata of all your imported files. Just make sure that you always select that preset on future imports as well.
Of course, the key here is not to strip this data out when saving your JPEG file destined for the Web. In Photoshop, if you choose File>Save
As, then all the metadata is preserved, but if you choose File>Save for Web & Devices, only your copyright notice and copyright URL are left in the metadata, unless you check Include XMP from the Save for Web & Devices flyout menu. In Lightroom, just remember to leave Minimize Embedded Metadata unchecked on the Export dialog, or it will leave only your copyright notice, usage terms, and copyright URL in the exported copies. Tip: If you do need to strip out all but the copyright notice and copyright URL for certain uploads, make sure there’s adequate contact information for you at the copyright URL you designate.
Pros: Embeds your name and detailed contact information into the photo, no cost involved, and easy to incorporate into your workflow.
Cons: It’s not permanent and easily removed after it leaves your control.
Verdict: Make it part of your workflow now.
Adding a visible watermark
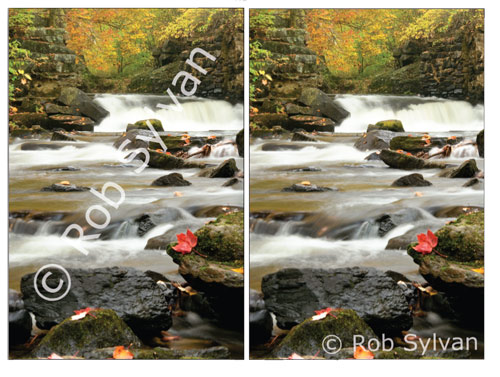
With the legal formalities out of the way, the next consideration is the application of a visible watermark, which can be anything (name, logo, copyright symbol, etc.) that’s placed somewhere on the photo and “burned” right into the pixels. Ideally, adding a watermark should serve three purposes: making the photo less useful to those who may download it; stating that it’s copyrighted; and identifying the copyright owner. According to Carolyn E. Wright (a.k.a. the Photo Attorney), a simple watermark that includes the copyright symbol and your name works great to achieve those ends. Think of it as digitally “signing” your work. With that kind of visible notification embedded in the image, it reduces the number of people who can claim they didn’t know it was copyrighted; it further cements the connection between you and your work; and it may facilitate the right people making contact with you for legitimate uses.
Three key variables to consider when applying a watermark are: size, location, and opacity. While you want to deter people from stealing your photos, you don’t want to turn off your paying customers, so finding that sweet spot between just enough and too much is a subjective decision that we each have to make.
There are a slew of free watermarking tutorials for Photoshop out there (including some at www.layersmagazine.com). Just do a search for “watermark.” But the simplest way is to use the Type tool (T) to enter the © symbol and your name. (To create the copyright symbol, just press Option-G [PC: hold the Alt key and enter 0169 using the numeric keypad]).
When exporting photos from Lightroom, you can leverage the copyright metadata you already entered and check the Add Copyright Watermark box on the Export dialog. This pulls the data you entered in the Copyright field and displays it as a small white watermark on each exported photo. For a more configurable watermark option from Lightroom, I highly recommend the LR/Mogrify Export plug-in (donationware) at http://timothyarmes.com/lrmogrify.php. And there are also low-cost watermark applications for both Mac and Windows, such as iWatermark (http://scriptsoftware.com/iwatermark) and Dropwatermark (http://dropwatermark
.com) that are great for batch watermarking large groups of photos.
Pros: Literally puts your name on your work where people can see it, and there are lots of options for how it looks.
Cons: Can detract from the eye appeal of the photo; may not be appropriate for every place you upload photos to; and can be digitally cropped or removed.
Verdict: Do it when you can, and as appropriate for that outlet.
Diminish usefulness with diminished sizes
People can only use what you make available. The usefulness of a photo decreases as its pixel dimensions decrease, and of course the eye appeal decreases at the same time. The sweet spot you’re looking for is just large enough to meet the needs for which you’re uploading the image—and no larger. Whether you’re making comps available to potential customers, posting photos to Flickr, or uploading them to your blog, the reason you’re uploading the image is the determining factor in how big is big enough.
Before we go any further, there’s a huge point of confusion around the word “resolution” that often enters this type of discussion. On the Web, the resolution of a photo is simply a function of its pixel dimensions (that is, x pixels long by y pixels wide). You may often hear people say, “Only put photos at 72 ppi on the Web,” but the term “ppi” (pixels per inch) is meaningless in regards to Web display; it’s just a metadata tag that tells a printer how large to print a given photo. Onscreen, however, it’s pixel dimensions that determine the size (and usefulness) of the photo.
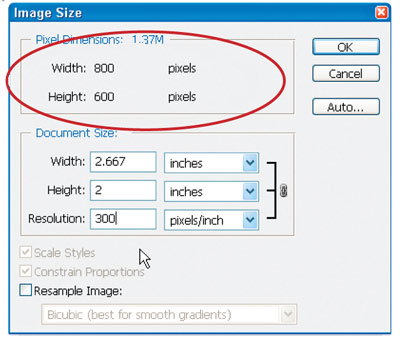
For example, if you take a photo that’s 800×600 pixels into Photoshop and open the Image Size dialog (Image>Image Size), you can uncheck the Resample Image box and set the Resolution field to any number you desire. Let’s say we set it to 300. All we’ve done is set the document size to print that photo at 300 ppi—the photo’s still 800×600 pixels.
Now, keep Resample Image unchecked and change the Resolution to 72 to set the document size to print that photo at 72 ppi. But it’s still the same 800×600-pixel image we had before. Nothing about the pixels has changed.
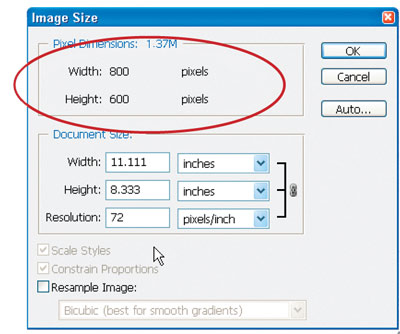
If you saved a copy of that photo at 300 ppi and another copy at 72 ppi and put them both in a webpage, they’d both take up exactly 800×600 pixels onscreen. There would be absolutely no difference in the quality of the two photos and anyone who downloaded either one could just as simply set the resolution to any value just as we did.
So, how large is large enough will vary with your needs. After polling some of the staff at Digital Web magazine (thanks to Nick Fink and Matthew Pennel), a slew of photographers, and the Photo Attorney, the dimensions of 800×800 pixels seemed to emerge as the upper limit you should consider making images available for display purposes.
Pros: Easy to implement, resulting in smaller file size, which leads to faster upload time and less storage requirements.
Cons: Too small size can reduce visual impact.
Verdict: Err on the side of being a little too small.
JPEG over-compression
While I’m not a big fan of this method, it’s used often enough that we’ll address it here. Some people use the lossy nature of the JPEG-compression algorithm as a means to slightly degrade the photo in an attempt to decrease its usefulness to others. While this can be effective to a certain extent, I find that degrading the photo quality usually runs counter to most reasons for why you’d put the photo online in the first place. It may also give the impression that the quality of the original file is poor, which is the last thing you’d want people to think.
Saving images as JPEGs is part and parcel of putting them online, so choosing a compression level will always come into play. Generally speaking, you always want to use as much compression as possible to reduce file size (which has ramifications for file storage and bandwidth), but without introducing visible JPEG compression artifacting. If you want to use artifacting as a theft deterrent, then you’d add a little more. This is very subjective and you, as the artist, need to be satisfied with how your work is displayed.
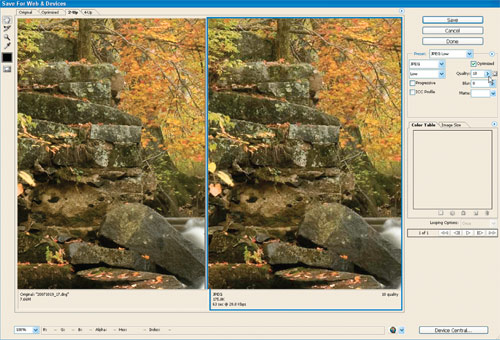
The Save for Web & Devices dialog in Photoshop is great for getting a visual on the effect of the amount of JPEG compression being applied. It even has five JPEG presets (Low, Medium, High, Very High, and Maximum) that correspond to the Quality setting being used. The High preset uses a Quality setting of 60, which is often a good starting point, as it reduces file size quite a bit with minimal artifacting. You can then adjust the Quality slider as needed. Here’s an example at the Low setting that works as advertised. Note: I’m referring specifically to settings used for displaying your work, not for delivering to a client or stock agency where high quality trumps file size and minimal compression is desired.
Lightroom doesn’t offer a visual during export, but it does use the same 0–100 quality scale, so start with 60 and check your results.
Pros: Reduced file size, speeds upload time, and decreases storage demands.
Cons: Too much compression can degrade visual impact.
Verdict: Use with caution, as you don’t want to give the wrong impression.
Finding your photos in use
Okay, so you’ve registered your copyright, embedded your metadata, applied a conspicuous (but not too obtrusive) watermark, resized the photo to a size you feel will get the job done, applied a suitable amount of JPEG compression, and released your photo to the wilds of the Internet. Now what? How will you know if they’re used without your permission? Admittedly this isn’t an easy task but there are some interesting technology solutions available.
We already mentioned PicScout and if you’re a photographer dealing with rights-managed work and not already using the service (or not submitting work to an agency that is), you might want to consider giving it a test drive. There are fees involved but there’s also great potential to recoup losses on unauthorized usages. Go to www.picscout.com to learn more.
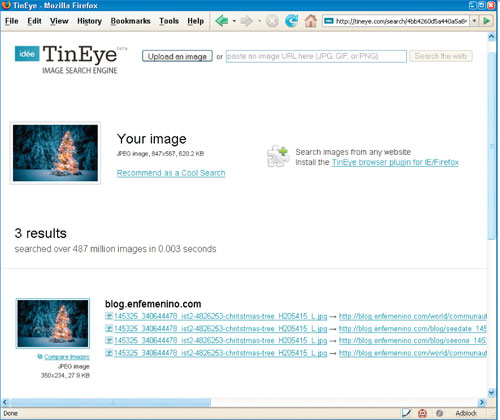
For the rest of us, there’s an interesting alternative called TinEye that’s currently in private beta release. This image search engine uses its own proprietary image-recognition technology to compare your photos against its (growing) search index of images found on the Web. TinEye is constantly building its search index by crawling the Web and analyzing each image it encounters. With more than 1 billion images already indexed, Leila Boujnane (the co-founder and CEO of TinEye’s parent company Idée) expects to have tens of billions of images indexed by 2009. To use this technology, you just upload a photo, paste in a link, or use a browser plug-in to quickly search the Web to see if your image is found. Head over to http://tineye.com to learn more and request an invite. The days of wondering where your images are used online will soon be over.
Putting your photos on the Web involves a series of decisions and compromises, but there’s a lot to be gained. While you should never put any work on the Web that you absolutely wouldn’t want to see used without your permission, you shouldn’t be afraid to share your work with the world. Just remember that the power to protect your copyright starts with you.