
Almost everyone uses PDF for saving and sharing entire documents, such as InDesign files. You can also save graphic images—and in particular, commercial print-bound graphics—as PDF images. This allows you to take advantage of the PDF’s inclusiveness, editability, printability, and inherent Internet compatibility. Here are some tips for creating and working with high-quality PDF graphic images.
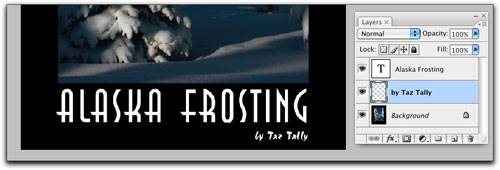
1 CREATE LAYERED PHOTOSHOP IMAGE
Open an RGB image in Photoshop and set two type layers (preferably PostScript or OpenType). We’ll be keeping one layer of type editable, which means it will be linked to active font files external to your image. Typically, we’d save this image as a PSD, TIFF, or EPS. In each case, the font files will either remain external to the image (PSD and TIFF) or lack editability (EPS). We’ll also rasterize the other type layer and add a spot color. After we convert the file to a PDF, we’ll look at how these type layers and spot color translate into InDesign and back into Photoshop.

TAZ TALLY
2 CREATE A DUPLICATE IMAGE
Make a Duplicate copy of this image by choosing Image>Duplicate, and name this image with the suffix “CMYK” (here, “Alaska Frosting_Layered_CMYK”).
Tip: I label all my CMYK colors pace images with the CMYK suffix so I can tell at a glance these images have been converted to CMYK. In fact, I label any image in a color space other than RGB, such as Index color or LAB. That way, I can assume all images without a color space label are RGB.

3 DECIDE WHICH TYPE LAYER TO KEEP EDITABLE
Decide which text layer you want to rasterize (convert to pixels) and which you want to keep as editable. Rasterized type blends in nicely with its surroundings and takes on a softer blended edge and it will no longer be linked to any external font files, thereby simplifying the image. In contrast, editable type maintains a harder, sharper edge and will remain linked to its external font files. In our example, we rasterized the signature text layer: Just Control-click (PC: Right-click) on it in the Layers panel and choose Rasterize Type.
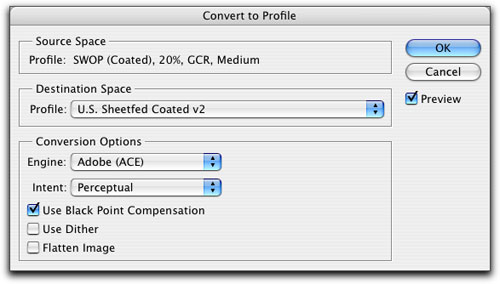
4 CONVERT DUPLICATE IMAGE TO CMYK
To convert your layered RGB image to a layered CMYK file, choose Edit>Convert to Profile. In the dialog, select a CMYK Destination Space Profile appropriate for the printing device on which you’ll be printing this image. In our example, we’ve selected U.S. Sheetfed Coated v2, one of the built-in CMYK profiles. Be sure to uncheck the Flatten Image checkbox to maintain the layers. Click OK and then click Don’t Flatten in the warning dialog that appears.
(Tip: If your printer hasn’t told you which custom profile to select, choose the type of press and paper on which you’ll be printing.)
5 CREATE A SPOT COLOR SELECTION
Click on the rasterized type layer in the Layers panel to make it active. Now Command-click (PC: Ctrl-click) on this layer’s thumbnail to select the type. This is the selection to which we’ll assign a spot color.
Note: Assign a spot color to print a very specific color not reproducible with CMYK inks and only add a spot color to an image bound for printing on a commercial printing press. Spot colors are separated from other print colors, such as process CMYK colors, and printed on separate cylinders on a commercial printing press.

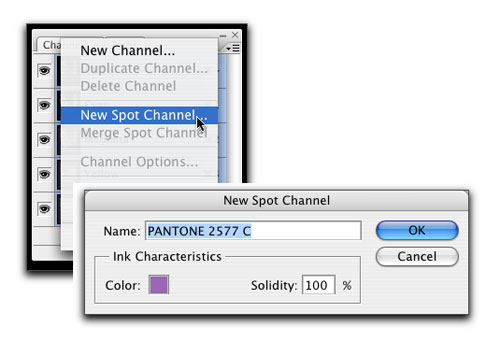
6 ASSIGN A SPOT COLOR
Activate the Channels panel (Window>Channels) and from the Channels panel flyout menu, choose New Spot Channel. In the dialog, click on the color swatch and select the spot color of your choice—here, PANTONE 2577 C. (Click on the Color Libraries button in the Color Picker to access the Pantone libraries.) Then click OK to create your new spot color channel. This adds a fifth building block (not Alpha) channel to your Channels panel.
Tip: Use a Pantone swatch book to select your spot color, not its appearance onscreen, which will only yield a simulation and often not a very good one!
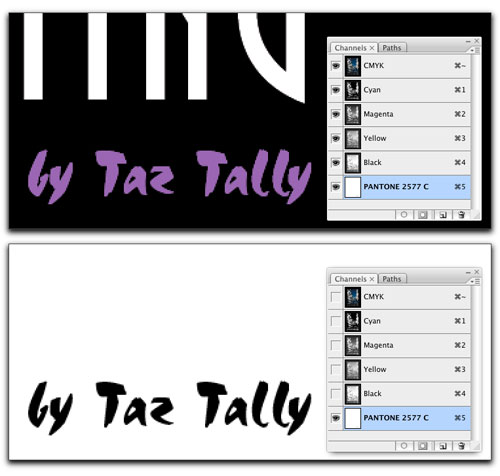
7 VIEW YOUR NEW SPOT COLOR
Photoshop will provide an onscreen simulation of the spot color you’ve assigned. To view your new spot color separation, click on the Eye icon next to the CMYK channel to turn off all the channels, leaving only your new spot color visible. Now you’ll see the true black-and-white nature of the separation. Remember, the spot color is only actually created when it’s printed on press.
Tip: To knock out, rather than overprint this spot color, reselect the type, turn off the spot color channel view, and delete the selection from the active CMYK channels.
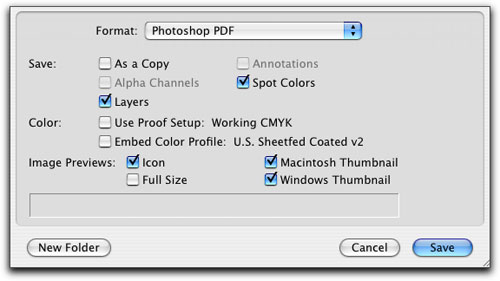
8 BEGIN THE PDF CREATION PROCESS
The traditional choice for saving an image containing a spot color that’s to be separated for printing would be to save it in Photoshop DCS2.0 format, a complex, pre-separated version of EPS. Instead, we’re going to use the Photoshop PDF format—a simpler and more flexible file. Choose File>Save As, then in the dialog, select Photoshop PDF from the Format pop-up menu. To maintain your text layers, check the Layers box. Check the Spot Colors box to make sure your spot color is included in the PDF as a separate color. Uncheck the Embed Color Profile box, and click Save.
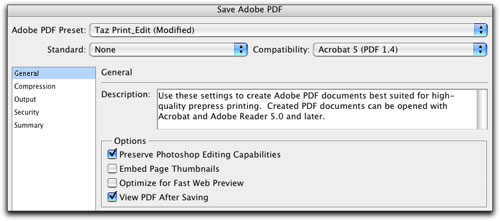
9 CONFIGURE PDF GENERAL SETTINGS
In the Save Adobe PDF dialog that appears, click on the General category on the left. Now choose Acrobat 5 (PDF 1.4) from the Compatibility pop-up menu (this is a very compatible and accepted version of PDF that also supports transparency). Also check the Preserve Photoshop Editing Capabilities box to ensure you can open and edit this PDF in Photoshop. You can also check the View PDF After Saving box to automatically view your PDF once its creation is complete—a nice timesaver!
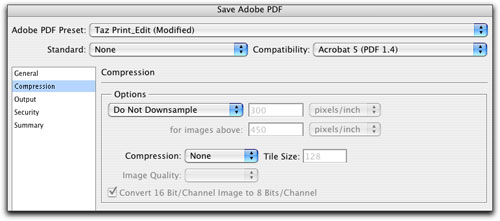
10 CONFIGURE PDF COMPRESSION SETTINGS
Next, click the Compression category on the left side of the dialog, which is where you control what happens to your image in terms of downsampling and compression when you click the Save PDF button to create the PDF—it’s a handy way to downsample and compress an image you might want to send across the Internet or view onscreen. But to maintain maximum image quality and sharpness, choose the Do Not Downsample option and None for Compression.
Note: You can also convert 16-bit images to printable 8-bit images on the fly here!
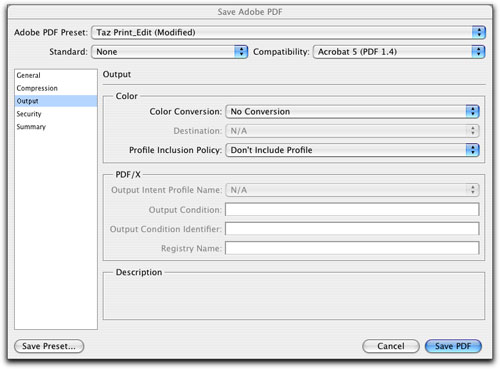
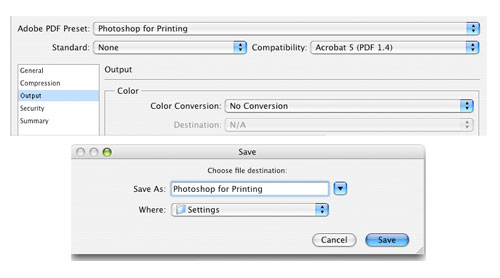
11 CONFIGURE PDF OUTPUT SETTINGS
In the Output category, select No Conversion from the Color Conversion pop-up menu and Don’t Include Profile from the Profile Inclusion Policy. This will allow colors in your image to pass through “unmolested” during PDF creation.
Again, this can be an easy way to configure your PDF for Web and screen use but to maintain the integrity of the color in your image, just pass the color pixels through as we did in Step 10.
PDF-X compliance can be established by assigning an Output Intent Profile Name, but this isn’t required for general commercial printing.
12 SAVE SETTINGS AND CREATE PDF
When you’re finished with your PDF settings, click the Save Preset button to save these settings for future use. This preset can then be selected via the Adobe PDF Preset pop-up menu located at the top of the Save Adobe PDF dialog. Then click the Save PDF button located in the lower-right corner to create your PDF.
Note that the linked font files associated with your editable type layer will be embedded in your PDF to guarantee the typesetting integrity of your PDF file, no matter where you send it.
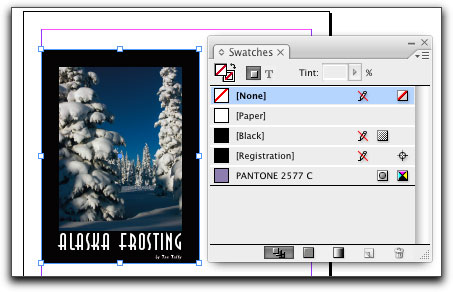
13 PLACE YOUR PDF IN INDESIGN
Now let’s run a test to see if the spot color you assigned will be recognized by InDesign, which will be critical if you intend to place the PDF and separate/print it from within an InDesign document. Create a new InDesign document. Choose Window>Swatches (or press F5) to activate the Swatches panel. Choose File>Place, then locate the PDF you just created. As soon as you place the PDF file, your spot color, Pantone 2577 C, is added to the Swatches panel as a spot color.
14 OPEN YOUR PDF IN PHOTOSHOP AND ACROBAT
Now to test your PDF file for editability, open your PDF in Photoshop. Note how all the layers you started with, including your editable type layer, are intact and indeed editable. Also note that your spot color channel is happily there as well!

Now open your PDF in Acrobat 8. Choose Advanced>Print Production>Ink Manager to see the process CMYK inks and the 2577 C spot color you assigned in Photoshop.
Other print- or press-oriented images, such as duotones and Photoshop images containing vectors, can also be saved as complete, editable, printable, and Internet-safe PDF files.
