
Pixel Perfect Tracing in Adobe Illustrator

With the introduction of Live Trace in Adobe Illustrator CS2, the process of converting pixel images into editable vectors has taken a huge leap forward. Using this amazing new feature, you can quickly and easily achieve the finest tracing results possible. I use Live Trace every week to convert scans of an outline cartoon caricature that an artist draws by hand into a finished, four-color piece of art for a newspaper advertising campaign.
In this tutorial, I will be taking you through the actual steps that were used to convert one of these hand-drawn cartoons into colorized vector art. I will discuss Placing the cleaned-up scan into Illustrator, using Live Trace Presets and Options, converting the Tracing object into a Live Paint Group, using Gap Detection, Expanding the Paint Group into vector, and adding color to finish up the cartoon.
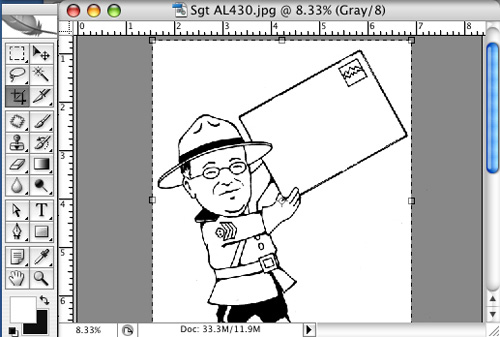
STEP 1: Clean Up and Crop.
Before bringing the scan of the cartoon into Illustrator, it’s always a good idea to clean and crop the pixel image in Photoshop. It’s much easier to get rid of any dirt or minor problems in the scan using Photoshop’s Selection and Retouching tools rather than later on in Illustrator. Cropping the scan to include only what is needed simplifies the entire clean-up and conversion process.
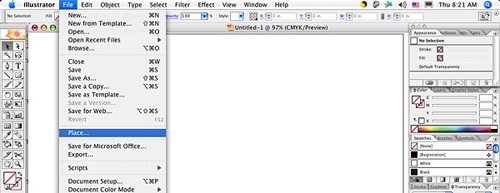
STEP 2: Place the Pixel Image.
To begin the pixel-to-vector conversion process, open a new document (File > New). Then go to File > Place, select your image, and click Place.
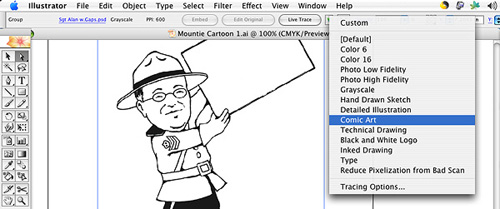
STEP 3: Jump Start Your Conversion with a Preset.
To begin, select your placed pixel image. By clicking the Live Trace button in the Control palette, the program will use the Default settings for Tracing, which will work fine for some black and white art.
A better choice is to click on the arrow just to the right of the Live Trace button, which reveals a long list of Presets. Select the Preset that most closely describes the art that you’re converting. This can save a lot of time and you’ll probably be a lot happier with the results. For my cartoon scans, I’ve been selecting the “Comic Art” Preset and have never had to alter any settings.
If you’re converting a high-resolution scan, you’ll get a warning – “Tracing may proceed slowly with this large image. Would you like to continue?” With a simple outline drawing, you can just click OK, because lowering the resolution will probably not make any noticeable difference in speed. When converting color photography, which will result in the creation of a lot more paths, you may want to resample the image before converting.
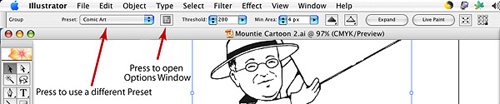
STEP 4: Why Is It Called “Live?”
The best thing about Live Trace objects is that their settings can be altered at any time. That’s where the “Live” part of Live Trace comes in. If a Preset is not resulting in the exact tracing you’d like, select the Live Trace object and in your Control palette, press the Preset button to choose a different Preset from the flyout menu listings. To make some minor tweaks, click on the Tracing Options Dialog button immediately to the left of the Presets button.
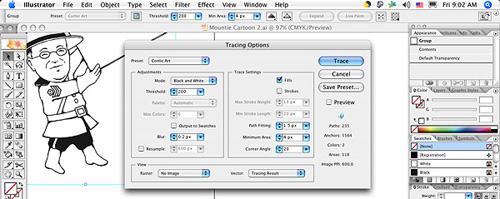
STEP 5: Opening Up Your Options.
If you do click the Options Window button in the Control palette, a dialog window will open with a wide range of Live Trace settings. With this in mind, it’s easy to understand the importance of using (or at least starting with) a Preset. That’s why the first choice in the upper left corner of the window is a Preset button to quickly change settings to another Preset. Depending on which Preset you choose, some options that do not apply will be grayed out.
STEP 6: Taking A Closer Look at Settings.
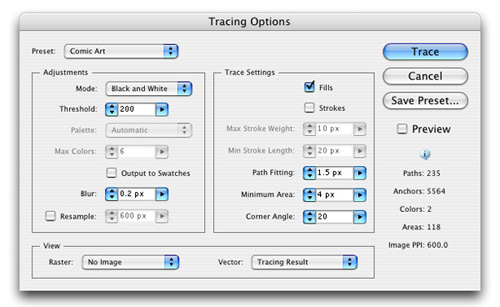
In the Mode area of the dialog, you can choose the color mode of the art. Threshold, which is only available for Black and White, determines at what value pixels will be white or black in the Tracing. A high number could result in black specs appearing in white areas. A low number could cause white specs in black areas.
The Palette option allows you to select an open Swatches palette, such as Earthtones or Harmonies, to use in the conversion. Max Colors determines the most number of colors (2-256) to be used in the tracing. Lower numbers will result in greater posterization. Choose Output to Swatches to save your Live Trace colors as Swatches. Blur will soften the scan to eliminate rough edges. Resample can speed up the process by lowering scan resolution.
Checking Fills will create filled vector shapes in the final tracing. Strokes will create stroked shapes within the Maximum Weight and Minimum Length specified. Minimum Area is the smallest pixel area that will be traced. If the amount is “4 px,” any area less than 4 square pixels will not be traced, which will simplify the results. Corner Angle specifies how sharp a turn needs to be in the scan before it is made into Corner Anchor Point as opposed to a Curve in the final vector.
You can preview results by checking Preview. If you have settings that you expect to be using again, it’s smart to save your own custom Preset. To apply your current settings, click the Trace button.
STEP 7: : Expand to Access Real Vector.
After you’re totally happy with your tracing, you can Expand the Live Trace object, then select and Fill individual paths to add color to the cartoon. Sometimes you need to add an extra step because there are Gaps between two or more areas of the drawing. In the sample above, two of these “Gaps” were easy to see when I added a color Fill the Mountie’s jacket. Luckily, there’s a simple solution to this problem.
STEP 8: Taking a Step Back.
The best way to proceed is to first take a step back. Press Command + Z (Control + Z on PC) as many times as it takes to get back to a Live Trace object. You’ll know you’re there when the Control palette contains the Cartoon Art Preset button to the right and other Live Trace controls.
One of these controls is the Live Paint button (right side of the palette). Press this button to convert your Live Trace cartoon into a Live Paint Group.
STEP 9: Simply Closing the Gaps.
Converting to a Live Paint Group allows to you to close Gaps with a simple breakthrough feature called Gap Detection. What makes this feature amazing is that it closes gaps in your scanned drawing in a way that will help maintain the imperfect look of the hand drawn lines.
It’s also easy to use. With your Paint Group selected, click on the Gap Options button in the Control palette to open a dialog window. To get started, click the Gap Detection check box in the upper right part of the window and click Preview to the right. All the Gaps detected will be highlighted in a Gap Preview Color.
In this sample cartoon, the Gaps that need to be closed are practically microscopic, so the default setting of “Small Gaps” for “Paint stops at” works beautifully. If the Gaps were larger, you could select “Medium Gaps,” or “Large Gaps” from the popup menu. Or, if you find that you need more control, check Custom and specify an exact number. If you click the “Close gaps with paths” button, the areas on either side of the Gap will be closed paths. Because the paths in this cartoon will not be Stroked, closing the paths isn’t necessary. So click OK to proceed.
STEP 10: Keep It Live or Expand?
Normally the next step would be to just start painting your Live Paint Group using the Live Paint Selection and Bucket tools. But there’s an added complication with this cartoon. It needs to be silhouetted, which is much simpler after expanding into ordinary vector. So go to Object > Live Paint > Expand.
STEP 11: Delete the Background.
With the cartoon expanded, you can easily select all shapes that make up the background (with your Group Selection tool) and delete them.
In this particular cartoon, there’s more than one background object to delete – a background object outside of the cartoon character plus two inside shapes, which would prevent whatever is behind our illustration from showing through.
STEP 12: Colorful Finishing Touches.
Now that your scan has been converted into vector, coloring it in is as easy as selecting shapes with the Group selection tool and choosing Swatches. Because the cartoon character has been “silhouetted” (by deleting the background), it’s easy to combine with other art and type in your layout application.
Jeff Witchel is an Adobe Certified Instructor for Adobe Illustrator CS2 and Adobe InDesign CS2 with training clients in New York, New Jersey, Pennsylvania and Maryland. He just completed two DVD training projects with Magnet Media in New York – “Inside Adobe Illustrator CS2” and “Inside Adobe InDesign CS2.” Jeff also is a regular on the Layers Forum, known to many as “AdobeAce.”
Training website – http://mywebpages.comcast.net/AdobeAce
Portfolio website – http://mywebpages.comcast.net/witcheladv
A special thanks to Applejack and Associates of Denver, CO (Applejack Wine and Spirits) for allowing me to use this cartoon artwork from their advertising, which was developed by Ellish Marketing Group, also of Denver, CO. Artwork used in this tutorial cannot be reproduced outside of this tutorial without permission. Artwork is © 2006 Applejack and Associates. All rights reserved.
