
Creating Reflecting Web Icons in Illustrator
One of the looks of “Web 2.0” is the aqua icons that Matt Kloskowski shows us how to make in the first issue of Adobe Illustrator Techniques print issue. Another look is the reflecting icon. The clean, crisp look of these attractive images makes clicking through a website’s navigation fun. Here’s how to make one of those neat icons.

Step 1
Open a new document in RGB mode, since this will be for the web and not for print. For this example, we’ll make a black background with white icons for a wide variation between the icons and their background. Draw a black square or rounded square with the Rectangle tool or the Rounded Rectangle tool (click-and-hold over the Rectangle tool icon on the Toolbar to get more options). Hold Shift while dragging to make a square.

Step 2
Click-and-hold the Rectangle tool icon and then click the Star tool. Change the Fill at the bottom of the Toolbar to White. Make sure the Stroke is set to None. Click-and-drag on the black square area to draw a white star.

Step 3
Click the Selection tool on the Toolbar. Hold down Option (PC: Alt) and click-and-drag the star to duplicate it. It doesn’t matter where you move it, we’ll situate it correctly next. With the Selection tool, click-and-hold the middle box at the top border of the star. Now drag it down so that is upside down but about half the size of the original star. Move it so its two points meet the points of the original star.

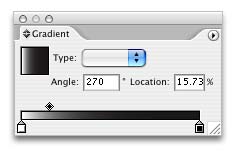
Step 4
Click the Rectangle tool and draw a rectangle over the new upside down star. In the Gradient palette (Window>Gradient), change the gradient to white and black, and move the middle slider to the left. I set it to about 15%. Change the angle to 270° so the black is on bottom moving vertically to lighter shades.

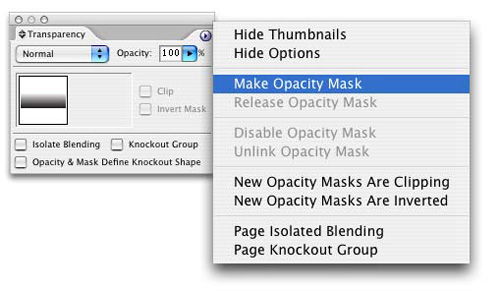
Step 5
Select the rectangle we just made as well as the upside down, smaller star. One way to di this is to click-and-drag over the area with the Selection tool, then Shift-click the black background to de-select it. In the Transparency palette (Window>Transparency), click the arrow to get the flyout menu. Click Make Opacity Mask. Now we have the reflecting icon!

Step 6
Try a few different shapes. Here I’ve drawn a few different objects by drawing the shapes then grouping them (Object>Group) to create a few more examples.

