
Flexible and Efficient Animation Projects in After Effects
The Winds of Change
It’s that time of year—the seasons are changing, the colors are shifting, the leaves are falling…autumn and winter are approaching. Animation projects can be just the same way—color schemes, graphic elements, and keyframe motion need to be flexible and efficient enough to make immediate changes. A recent titling project used such techniques, creating a look of organic autumnal motion with leaves, which was changed to wintry snowflakes at the very last second. Here’s how it was done.
The specs for this project are an NTSC square-pixel composition (720×540), 29.97 frames per second, 6 seconds long, with a background color of white.
STEP 1 The Elements (Pardon the Pun)
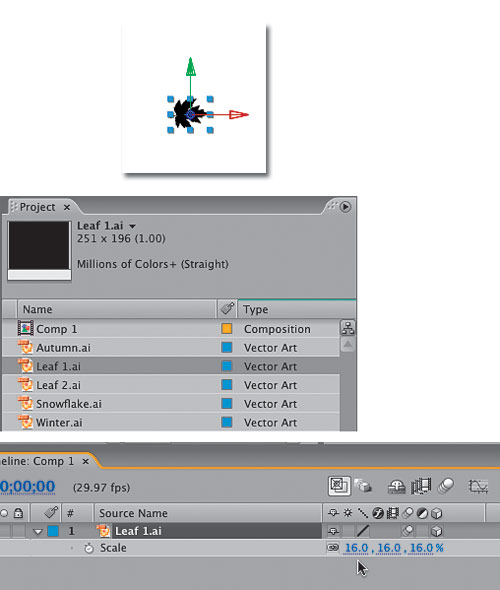
For this animation, we need five elements: two different leaf shapes, a snowflake, an autumn backdrop, and a winter backdrop. We recommend making the leaves and snowflakes in Illustrator, using similar outer dimensions for easy replacement in After Effects. The backdrop graphics are 720×540 pixels, and all elements are saved as native Illustrator files named Leaf 1.ai, Leaf 2.ai, Snowflake.ai, Autumn.ai, and Winter.ai.

STEP 2 Import Files; Add 3D Leaf
In After Effects, double-click inside the Project panel to bring up the Import dialog. Locate and select the five Illustrator files, and click Import. Deselect, then drag Leaf 1.ai into the open composition’s Timeline, which will place it in the center. Press the S key to reveal the layer’s Scale property, and drag the values to set the size of the leaf as desired. In the Switches column, turn on the 3D Layer and Motion Blur switches for that layer.
STEP 3 Add Wiggle Expression to Position
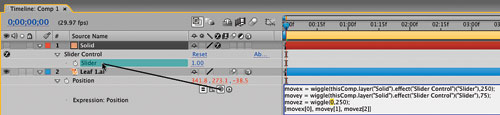
In the Comp panel, change the view from Active Camera to Custom View 1 to see the 3D leaf from a perspective angle—this makes it easier to see animation changes. Hit the P key to reveal the leaf’s Position property, and Option-click (PC: Alt-click) the Stopwatch to add an Expression field. In the field, type the code as shown in the image above, then press Enter (not Return) to confirm.

STEP 4 Add Control; Assign Values to Slider
Choose Layer>New Solid, click OK, then turn off its Visibility icon in the Timeline. Go to Effects>Expression Controls>Slider Control to add a slider to the solid. Hit E to reveal the effect in the Timeline, then twirl down to show the Slider name. Click in the Expression field for the Leaf 1 layer, select the 0 value of the movex line, then click-and-drag the Pick Whip icon to point at the Slider name of the Solid layer. Repeat this for the other 0 values on both the movey and movex lines. Select the Slider effect’s value and change it to 1.
STEP 5 Repeat for Orientation
Step 4 added a control to allow you to change the wiggle speed of all three position axes with just one slider. Very neat! Let’s use the same for the rotation of the leaf. Select the Leaf 1 layer, hit R to show its Rotation property, and add an Expression field to the orientation value (affecting all three rotation axes simultaneously) by Option-clicking (PC: Alt-clicking) its Stopwatch. Type in “wiggle(0,180)” then press Enter to confirm. Go to Layer>Transform>Auto Orientation, and choose Orient Along Path.

STEP 6 Assign Orientation to Slider
Make sure the Slider on the Solid layer is still visible in the Timeline, then select the 0 value for the Rotation Expression, and drag the Pick Whip icon to the Slider name. Now, the single Slider value of 1 is being used to drive the speed of the random wiggle on both Position and Rotation. It’s so much easier to control than individual, line-by-line Expression changes. Deselect the layer(s), and hit 0 on the keypad to RAM preview the result—a perfectly swirling leaf in 3D!

STEP 7 Disable Expressions; Duplicate & Arrange
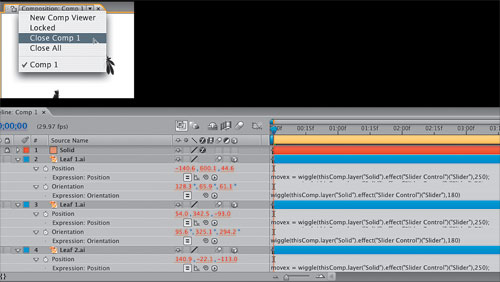
Select the Leaf 1 layer, then hit EE on the keyboard to show both Expressions. Click the small, highlighted = symbol next to each Expression to disable it temporarily. Now, go to Custom View 1 in the Comp panel and choose Front. Press Command-D (PC: Control-D) to duplicate the Leaf 1 layer, and manually position it elsewhere in the Comp window. By default, After Effects assigns new wiggle values to each new layer, so by disabling the Expressions, it’s easier for us to see the initial position of the leaves before they start blowing around.

STEP 8 Continue Duplication; Replace Selected Leaves
Continue duplicating and moving the leaves until you’re happy with the numbers. Now, hold down the Shift key and randomly select about half of the leaves in the Comp window—we’re going to change these to the second leaf shape. Go to the Project panel and select Leaf 2.ai. Hold down the Option key (PC: Alt key) and drag the new leaf onto any one of the selected leaf layers’ names in the Timeline, and let go. All those leaves are replaced with the second design but retain the Expression, Scale, and Position settings we applied earlier.

STEP 9 Enable Expressions; Close Comp
Click the Lock icon next to the Solid layer, then press Command-A (PC: Control-A) to select all the leaves. Hit EE to reveal all their Expressions, then click on each of their = symbols again to reactivate the Expressions. Change the Comp view from Front to Active Camera and do a RAM preview to see the final random motion of all the leaves. Now, click in the Composition menu at the top of the Comp panel and close the comp.
STEP 10 Nest Comp; Add Position Keyframe
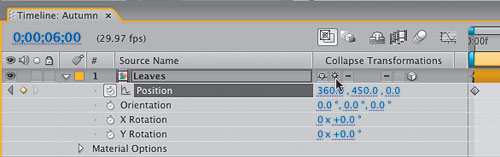
In the Project panel, select the Leaves comp (Comp 1) and press Return (PC: Enter), then rename it “Leaves.” Now, go to Composition>New, leave the specifications the same as the Leaves comp, but name this one “Autumn.” Click OK to open this new comp, then drag the Leaves comp from the Project panel into the Timeline to nest it. Hit the P key to access its Position and change the value to 360,150. With the Current Time Indicator (CTI) at 0 seconds, click the Stopwatch for Position to add a keyframe.

STEP 11 Animate Position; Rasterize 3D Comp
Now drag the CTI to 6 seconds, and change the Position value to 360,450. As you drag the CTI through the Timeline, you might notice that some leaves get cropped off the top or bottom. This is because we nested a 3D comp as a 2D layer, so in the Switches column in the Timeline, click both the 3D Layer and Collapse Transformations icons. Drag the CTI again and you’ll see all the leaves as they were in the previous comp.
STEP 12 Add Backdrop; Change Leaves’ Colors
At 0 seconds, drag Autumn.ai from the Project panel into the Timeline below the Leaves layer. We now have black leaves on an autumnal backdrop. Select the Leaves comp in the Timeline, choose Effect>Generate>Fill, and the leaves will all turn red! In the Effect Controls panel, click the red swatch and change the leaves to your desired color. This is another timesaving reason the leaves were all left black in the original comp. Turn on the Comp Motion Blur switch in the Timeline and RAM preview the results.

STEP 13 Winter is Coming
Close the Autumn comp and in the Project panel, select both the Autumn and Leaves comps and duplicate them (same shortcut). Press Return (PC: Enter) on each of the duplicates to rename them as “Winter” and “Snowflakes,” respectively. Open the Snowflakes comp and press Command-A (PC: Control-A) to select all the layers. In the Project panel, select Snowflake.ai, then Option-drag (PC: Alt-drag) it onto one of the selected layers in the Timeline to replace all the leaves with snowflakes. When done, close the Snowflakes comp.

STEP 14 Add Winter Elements
Open the Winter comp, select the backdrop layer and Option-drag (PC: Alt-drag) Winter.ai from the Project panel to replace it. Select the Leaves layer and replace it with the Snowflakes comp, then go to the Effects Controls panel and change the color of the flakes to white. Close that comp and create a new one called “Seasons.” Drag both the Autumn and Winter comps into the new Timeline, with Autumn on top. At 3 seconds, select the Autumn layer and hit Option-] (PC: Alt-]) to trim the layer. A RAM preview shows the seasons changing, but the leaves and snowflakes transition perfectly.

