
Time for your Close-Up with Adobe After Effects

Building and animating a detailed 3D environment in After Effects is one of my favorite things to incorporate into the right motion-graphics project. Adding shapes, lights, and shadows can give the scene extra depth and detail, but one of the most photo-realistic effects to aspire to is true depth-of-field.
In this example of a program title intro, depth-of-field gives a sense of scale and proximity to the layers. After Effects has wonderful built-in depth-of-field controls, and controlling them correctly can yield terrific results.
The specs for this project are an NTSC square-pixel composition (720×540), 29.97 frames per second, 5 seconds long, with a background color of black.
For a QuickTime preview of this project, click here.
STEP 1: Import Graphic Elements
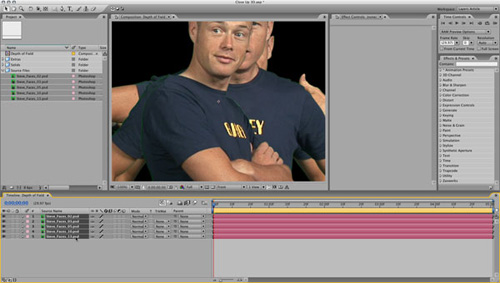
First, assemble the main elements that will make up the animation. In this project, we imported into the Project panel a selection of five high-resolution images of me against a green screen backdrop (thank you to James Dean Conklin for these images). Our square-pixel images, around 1080 px in height, have already had their backgrounds removed in Photoshop.
Any graphics with transparent backgrounds will work for this technique. Once the images are loaded, select them all and drag them straight into the open composition’s Timeline.
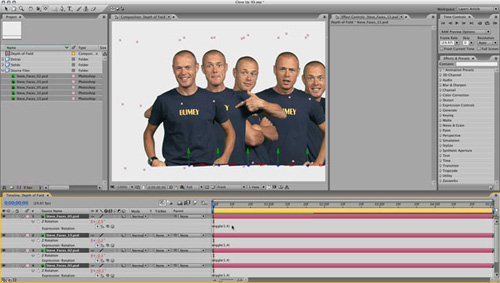
STEP 2: Scale and Arrange Layers
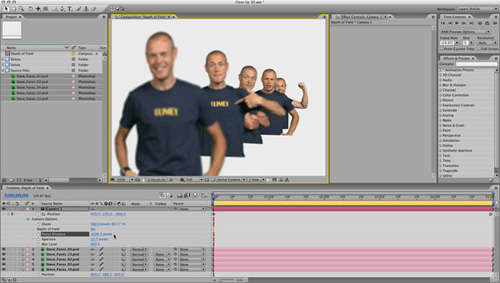
Because the images are large in a small composition, let’s scale them down. With the layers still selected in the Timeline, press the S key to reveal their Scale property, and click-and-drag on one of the 100% values until you reach the size you need (we used 40%). Also, drag the layers up and down in the Timeline to put them in the order you’d like to see them, from front to back. This doesn’t affect anything when working in 3D, but it makes it easier to see which layer is which.

STEP 3: Change Background Color; Create 3D Layers
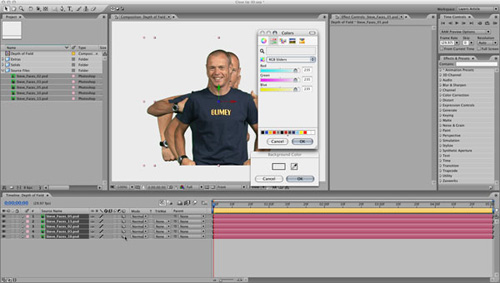
Our images will look better on a lighter background, so we’ll go to Composition>Background Color, click on the swatch to access the RGB values, enter 235, 235, 235 to give us an almost-white color, and click OK. If we use pure white on such a large scale as this, it could cause audio buzzing during television broadcast, so this is a nice little trick to avoid that. Now, with the layers still selected, click the 3D Layer icon under the Switches column in the Timeline to make them all 3D layers.
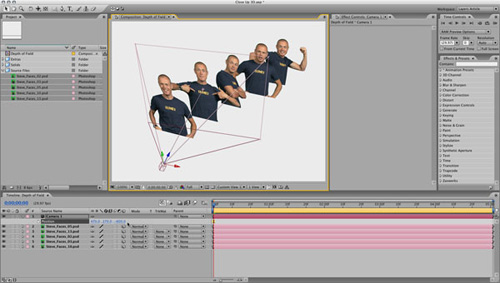
STEP 4: Adjust 3D Positions
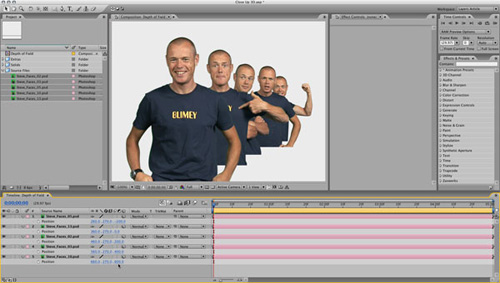
Press the P key to reveal the selected layers’ Position properties, and you’ll see three values for X, Y, and Z. We can now edit these values to stagger the offset between the layers, not only left to right but more importantly, to put space between them down the Z axis so we can focus on them with depth-of-field (referred to as DOF from hereon in). Select your topmost layer and change the position values to 260, 270, – 200, shifting it slightly to the left and moving it toward you.

STEP 5: Finalize 3D Positions
Leave the second layer at 360, 270, 0 (dead center of the comp). Change the third layer to 460, 270, 200, pushing it to the right and further away from you. Change the fourth layer to 560, 270, 400, and the final layer to 660, 270, 600. By now you should get a sense of 3D space with all the layers offset along the Z axis. Note that we’ve separated their Z positions evenly by 200 pixels each, which will make DOF control and animation much easier for this project.
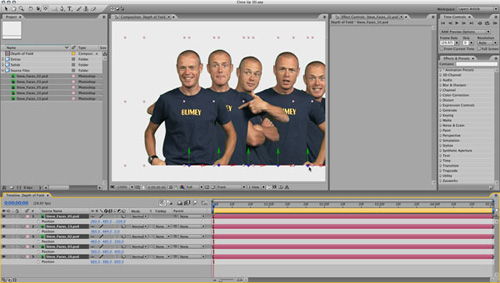
STEP 6: Front View; Adjust Anchor Points
Go to the Active Camera pop-up at the bottom of the Composition panel and choose the Front view to see our layers with no perspective. With the first layer selected, choose the Pan Behind/Anchor Point tool from the Tools panel at the top of the screen, then Shift-click on the blue center circle of the layer and drag down until the Anchor Point aligns to the bottom of the layer. Repeat this process for the other four layers.
STEP 7: Add Wiggle Expressions
In the Timeline, select the first layer, press R to reveal its Rotation property, hold down Option (PC: Alt), and click on the Z Rotation stopwatch to add an Expression. In the text field, type in "wiggle(1,4)" and then press Enter to apply it. Hit 0 on the keypad to RAM Preview the file and the first layer gently rotates back and forth randomly. Again, repeat this process for the remaining four layers and our animation now has some life! Note: The wiggle Expression can use the same numbers for frequency and rotation, but it creates unique results each time.
STEP 8: Add 3D Camera
Switch to Custom View 1 from the view pop-up in the Composition panel to view the scene from a different angle. Then to see the offset between the layers, press C to access the Camera Orbit tool and drag it around the Comp. Go to Layer>New>Camera and choose 28mm from the Preset pop-up menu. Click OK, and you’ll see the camera appear in the Timeline and the comp view, positioned in front of your foreground layer. Press P and change the camera’s position values to 470, 270, – 600.
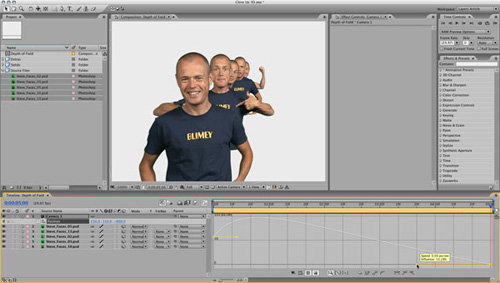
STEP 9: Animate Camera; Adjust with Graph Editor
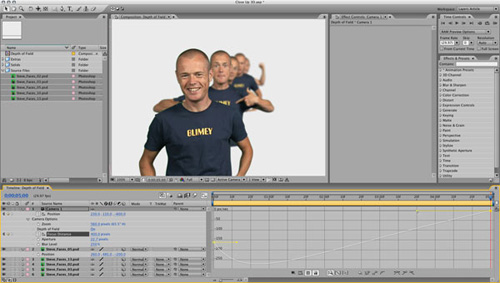
Now, switch your comp view back to Active Camera and you’re looking through the lens of your new 3D camera. At 0 seconds on the Timeline, click the Position stopwatch to add a keyframe, then hit End to jump to 5 seconds. Change the camera’s position to 230, 110, – 600 for its final position. Click the new Graph Editor icon in the Timeline to view the velocity graph for the property and drag the rightmost handle down and left to ease the camera position down gently over the last second or so. Check your animation with a RAM Preview (0).
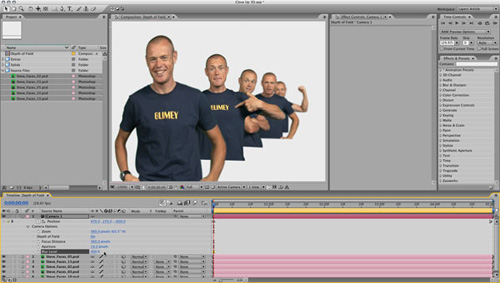
STEP 10: Activate Depth of Field
Go to 0 seconds and turn off the Graph Editor. With the camera selected, press AA to reveal its 3D Camera Options. The DOF option is off by default, so let’s turn it on and set the Blur Level to 400%. You should now see accurate blurring of the layers based on their distance from the camera’s focus point, with your second layer appearing the most in focus. Why? The camera’s default focal distance is 560 pixels in front of its body, which is 600 pixels back from the scene center, which happens to be near the Z position for that layer.
STEP 11: Adjust F-Stop
If you relate to real-world camera terminology and measurements, then seeing an Aperture value of 14.2 pixels in the Camera Options in the Timeline may cause some confusion! But it’s possible to use the more popular F-Stop setting instead. Double-click the camera layer to open up the dialog again, set the Units at millimeters (on the left), and set the F-Stop value (on the right) as desired. For this project (and if I were photographing it), I’d use an F-Stop of around 3.5. Click OK, and you should see a shift in the DOF effect.

STEP 12: Adjust Focus Distance
Remember, the F-Stop adjustment reacts like a real lens would and shortens the DOF. The Blur Value is a fine-tuning adjuster-dragging it up to 800 to try and achieve the same blur will render noticeably "chunky" edges. If you RAM Preview, you’ll notice the second layer always staying in focus, so let’s change that. At 0 seconds we want to focus on the backmost layer, which is at 600 pixels beyond scene center. The camera body is positioned – 600 behind scene center, so enter the total value of 1200 into the Focus Distance property to set it correctly.
STEP 13: Animate Focus Distance; Adjust Velocity
Click the stopwatch next to Focus Distance at 0 seconds to keyframe it, then hit End to go to 5 seconds. To focus now on the frontmost layer, we can calculate the value based on positions: Layer is – 200, camera body is – 600, so the distance is 400 pixels from the camera body. Enter that number to add another keyframe and then drop that Blur Level down to 250%. Select the Focus Distance property, activate the Graph Editor, choose Edit Speed Graph from the Graph Type menu at the bottom of the Timeline, and again adjust the speed gently into the final keyframe.
STEP 14: Add Final Elements
Now that the depth-of-field animation is complete and you’ve grasped how the 3D position of layers can be used to focus on the right plane, you can add other 3D layers and elements to your composition and they’ll be visually affected in the same way. Depth of field adds so much reality to any 3D composition in After Effects, so use these techniques sparingly and intelligently and you’ll see some wonderful results in your future animations. Enjoy!

