In addition to the almost universal access and ease of distribution of PDF documents, using PDFs in conjunction with Acrobat Professional can also offer a powerful and flexible collaborative publishing solution.
The commenting features in Acrobat 8 provide the ability to make, share, distribute, and track input on the same document from multiple people in different locations. Creating and managing comments requires the use of Acrobat, but reading comments can also be accomplished through the use of the free-for-download Adobe Reader (www.adobe.com).
Step 1 Access Your Commenting Tools
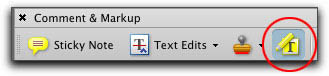
In Acrobat 8, you can access the commenting tools from the Getting Started startup screen or through the Tools menu, which we’ll use here. Duplicate, rename (e.g., Doc_Review_1), and open a PDF document that you’d like to review. Select Tools>Comment & Markup>Show Comment & Markup Toolbar and the Comment & Markup toolbar appears. Drag this toolbar to an accessible place onscreen. You could dock it at the top of your screen in the main toolbar but you’ll likely find it easier and faster to access if you leave it floating.


Step 2 Create a Sticky Note
Let’s place a “sticky” note on our PDF. Click on the Sticky Note icon located at the far-left of the Comment & Markup toolbar and click on the PDF where you’d like to place the note. Then simply type in your comment in the window that appears (in our example, a comment about the bleed of the image). Use Sticky Notes to make general comments about the document’s characteristics; however, some of the other tools are more suitable for a specific reference to text or a graphic.


Step 3 Make Text Editing Suggestions
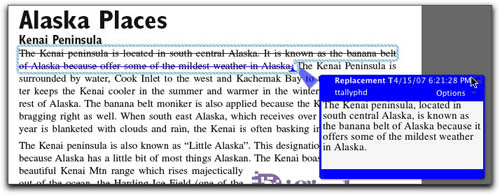
To make a comment on a specific range of text, select the text with the Select tool then copy the selected text (Edit>Copy). Next, click on the down-facing arrow to the right of the Text Edits icon in the Comment & Markup toolbar, and from the menu, choose Replace Selected Text. In the window that appears, paste (Edit>Paste) the text you copied. Now edit the copied text to suit your needs. Note how the text we originally selected appears crossed out.

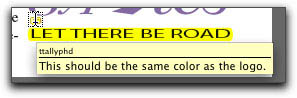
Step 4 Highlight Items
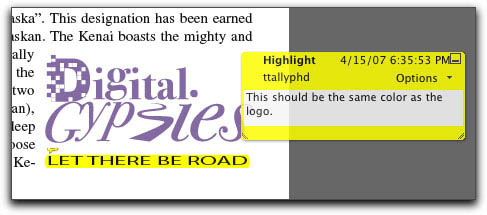
The Highlight Text tool is the markup tool of choice to highlight and comment on type (rather than suggesting edits). Using the Highlight Text tool, click-and-drag across the copy you’d like to highlight, then double-click the highlighting to open a comment pop-up, and type in your remarks. (Tip: In the Commenting Preferences, you can set comment pop-ups to open automatically.) You can view the comment by rolling over the highlighting or click it to open the pop-up window. Note that you can close any of the commenting pop-up windows by clicking the _ symbol in the upper-right corner.
Step 5 Create a Callout Referring to a Specific Area
Use the Callout tool to point to a specific location where you’d like to make a comment. Choose the Callout tool, then click on the location to which you want to point, and drag the tool where you want the Callout text to appear. Now click again and enter your text. To edit Callout copy, simply double-click on the text area—the Callout will expand to accommodate your copy. Tip: To delete a callout, click on it with the Callout tool and press the Delete key (PC: Backspace).

Step 6 Add a Text Box
Sometimes you may want to insert a text box that represents the exact dimensions and location of a document element that you want to add. Select the Text Box tool, click-and-drag over the area where you want the text box, then type in the copy you want to appear. To move or resize a Text Box, click on it once with the Select tool. To edit the copy, double-click to activate the text cursor, and edit away. This moving and editing technique works with the Callout tool as well.

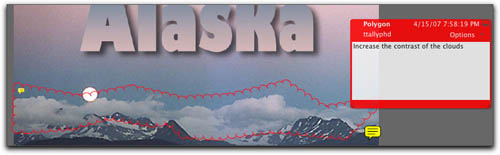
Step 7 Outline/Point to Comment Areas or Points
Acrobat 8 has a variety of area commenting tools, including the Arrow, Line, Rectangle, Oval, Pencil, and Polygon tools that are used differently: Simply select the Rectangle or Oval tools then click-and-drag over the areas you want to highlight; draw with the Pencil tool; or use the Arrow or Line tools to point to specific locations. To use the Polygon tool (Tools>Comment & Markup>Polygon Tool), click along the outline of the area you want to highlight. To complete the path, either return to where you first clicked or double-click. All these tools include text entry pop-up commenting windows.

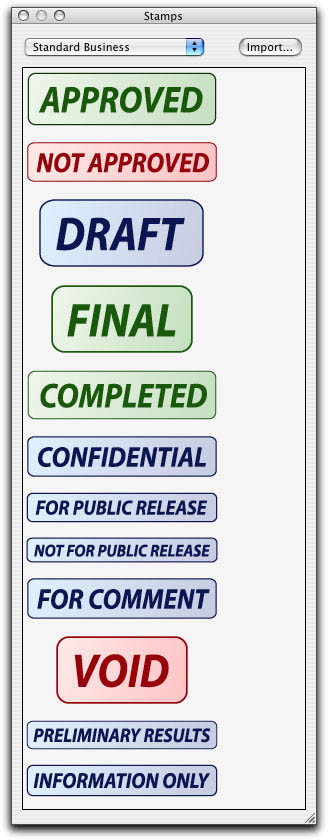
Step 8 Apply Stamps
With Acrobat 8, you can also stamp your PDF with a variety of built-in stamps, or you can import and use custom stamps. Click on the down-facing arrow next to the Stamp tool to access the menu, then navigate through the submenus to locate the stamp you want, or choose Show Stamps Palette to access the floating palette. Next, click on the stamp you want and then click on the document to place the stamp. Custom stamps can be created in Illustrator, saved out as PDF files, and accessed through the Import button in the palette.

Step 9 Set Commenting Preferences and Properties
You can control the appearance of and review the status of an individual comment pop-up window by clicking on the Options menu (in the upper-right corner). To set the Preferences for all comments, press Command-K (PC: Ctrl-K), select the Commenting category, and there you can control the pop-up behavior, the visibility and printability of comments, and the placement and initial content of pop-ups. For instance, you can have Acrobat automatically include selected text in highlighted, crossed-out, and underlined text. This is also where you activate the comment rollover feature.


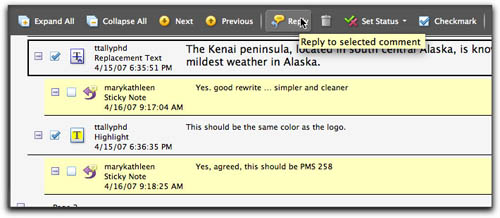
Step 10 View and Edit Comments
You can view, respond to, and manage all of your comments by displaying them in the resizable Comments panel. Simply click on the Comments icon located at the bottom-left corner of the Acrobat window, then you can Expand All or Collapse All comments, or expand and collapse individual comments by clicking the + or – icons next to each. To edit a comment, click in the comment’s text field and edit to suit—often an easier and faster way to edit comment copy, rather than clicking on the comment pop-ups.

Step 11 Respond to and Manage Comments
To reply to a comment in the Comments panel, first click on the comment to select it, then click the Reply icon located at the top of the Comments panel, and type your response in the text field that appears. You can also attach a voice message by selecting Tools>Comment & Markup>Record Audio Comment. (Tip: You can add tools to the floating toolbars by choosing Tools>Customize Toolbars.) Use the Checkmark icon in the Comments panel to keep track of the comments you’ve reviewed (other viewers won’t be able to see these checkmarks).
Step 12 Summarize Comments
Sometimes many comments from multiple reviewers can create confusion, so Acrobat provides a couple of summarizing options. For a PDF summary, click on the Options button at the right side of the Comments panel and choose Summarize Comments. Then configure the Summarize Options dialog to create the layout of the PDF summary you want. Your summary can include the document and/or comments laid out on single or facing pages. You can also include connector lines with reduced opacity and control which comments are included in the summary.


Step 13 Share and Distribute Comments
Comments can be shared in a couple of ways: Email the PDF summary (that we created in <h3 class="step">Step 12) or Export and Import selected comments. Select the comments you’d like to include and choose Export Selected Comments from the Options menu. This will generate an FDF file, which can be sent to another reviewer. The reviewer chooses Import Comments from the Options menu, which loads the selected comments into their copy of the PDF document. You can also organize and sort Comments by using the Show and Sort By pop-up menus located at the top of the Comments panel.