
Digital Video Solutions: Troubleshooting
Nonlinear-editing systems seem especially vulnerable to these quirks, regardless of which operating system you’re running.
Troubleshooting A New Version Install
Anytime you upgrade to a new version of any software, you run the risk of transforming a perfectly stable system into one that has myriad little glitches—for no apparent reason. Nonlinear-editing systems seem especially vulnerable to these quirks, regardless of which operating system you’re running. Some common problems that can occur after upgrading your video-editing application may include a frozen screen, frozen cursor, flickering dialog, completely blank dialog, or a number of error messages, such as: (1) API failure. (2) Illegal instruction. (3) Unhandled exception detected. Application will be terminated. (4) Sorry, a serious error has occurred that requires [this application] to shut down. (5) The application has unexpectedly quit. The system and other applications have not been affected.
There are a number of specific steps you can take to minimize the chance of this occurring or fix the problems once they’ve taken hold of your system. In this article we’ll look at both Mac and Windows systems and give you specific strategies to follow to get a clean editing system up and running as efficiently as possible.
Basic Troubleshooting
Many times you can get a system error or frozen screen because you don’t have enough RAM for your new application. Or there’s a driver conflict or even a corrupt file. To ensure that your installation was completed smoothly (i.e., no corruption of files) and that you have the necessary hardware requirements to run the new software, here are a few suggestions:
Make sure that your old system meets your new software’s system requirements. I recommend always going above the minimum system requirements suggested. Your system will always run better.
Update your video card driver. More and more applications are offloading their processor-intensive tasks from the computer’s CPU to the graphics card GPU. Checking that you have a properly updated graphics card will make a world of difference in your system’s performance.
Do you have the correct version of QuickTime installed? Sometimes you need the very latest version; other times, the newest version will really mess up your system. Make sure you know which version you need.
And do you have a working QuickTime file installed? You could have a damaged QuickTime file, so to be safe, remove QuickTime, delete any QuickTime files or folders remaining on your system, and then reinstall the QuickTime software—better safe than sorry.
Check for dust on your CD/DVD and CD-/DVD-ROM drive. Dust or dirt on a CD/DVD can seriously corrupt an installation or at least interfere with a CD-/DVD-ROM drive’s ability to recognize parts of the media. Examine your install media disc for dirt, dust, and (the dreaded) oily fingerprints, then gently wipe the bottom of the disc from the center outward with a soft, lint-free cloth. Also, examine your loading tray to make sure that it’s free of any kind of dirt, dust, or debris.
Optimize and check your hard drives for damage. This includes your scratch disks! There are a ton of disk utilities for checking drives for disk fragmentation and general damage. Use any of them to check your system on a regular basis.
Disconnect peripheral devices. This includes any device connected by FireWire, USB, Serial ATA, IDE, or SCSI. Always disconnect these devices one at a time so that you can find the specific one that’s giving you the problem. Also, it may not be the device that’s the problem; it might be the cable connecting the device.
Troubleshoot third-party plug-ins. Frequently, third-party plug-ins won’t be compatible with your new version of software until they’ve been updated. Simply remove them from the plug-ins folder and then restart your application. If the problem recurs, then they weren’t part of the problem. If it doesn’t recur, then contact the manufacturer or programmer for an update to the plug-in.
Specific troubleshooting tips for Mac
The following tips are specific to any troubleshooting on the Mac:
Log in as a user with administrator privileges. It’s been my experience that installs run more smoothly in this mode.
Start the system in Safe Boot mode. Press-and-hold the Shift key immediately after you hear the start-up tone, then release the Shift key when the Apple logo appears. Safe Boot appears on the Mac OS X start-up screen.
Re-create the application’s Preferences files. You can do this by going to Users>[Username]>Library>Application Support>[App Company Name]>[App Name] and then dragging that folder or file to the Trash. This eliminates any problems caused by a damaged Preferences file and it restores settings to their defaults when you re-create the Preferences files. If the problem recurs after you re-create the Preferences files, then the problem isn’t related to Preferences files.
Set up a default printer in the Printer Setup Utility. I know this sounds stupid, but you’d be amazed at how many times this works! You can find it in Applications>Utilities>Printer Setup Utility, or if you’re running Leopard, go to System Preferences>Print & Fax.
Repair disk permissions by running Disk Utility. Also found in the Utilities folder is the Disk Utility. If you log in to an account with administrator privileges, but are still unable to install or run your program, then your disk permissions may be damaged.
Specific troubleshooting tips for Windows
The following are specific tips for troubleshooting Windows systems. First, three quick things that you probably already know how to do: Install current Windows service packs and other updates; disable start-up items and services; and verify that all of your device drivers are compatible.
Then, three things you may have to Google to find out how to do them on your specific (XP or Vista) system: Troubleshoot your codecs; set the virtual memory paging file to the default size; and optimize the handling of temporary files using Disk Cleanup Utility.
Install the application from the desktop. Some system components, such as device drivers and virus protection utilities, can conflict with an installer and result in an incomplete or failed installation. To prevent these conflicts, install from the desktop. Simply copy the application install folder from the install disc to the desktop, then double-click the Setup.exe file, and follow the onscreen instructions as usual.
Run the application in a new user account. Create a new user account that has the same permissions as the account that you use when the problem occurs. If the problem doesn’t recur, then the original user account may be damaged. For instructions on creating a new user account, click on the Windows Help tab and check out “To add a new user to the computer.”
Scorched earth
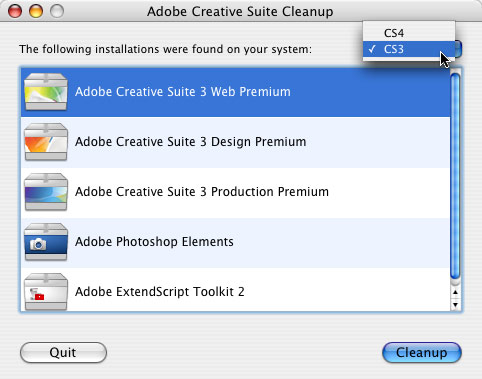
If all else fails and you’re running an Adobe application, it may be time for “scorched earth.” Adobe provides a simple program called Clean Script for both Macs and Windows that removes all existing Adobe programs from your system.
When you launch the script, you’re given the choice of Level 1 or 2 for removing Adobe items from your system; however, if you really want to get every trace of Adobe software from your system so you can do a super-clean reinstall, then you want to type in the number 4. It’s a hidden level that basically tears a rip in the space/time continuum, returning you to a time when Adobe wasn’t even available on this planet. Really, it removes every hidden file that could possibly be linked to an Adobe application.
Unfortunately, this level is only available in the CS3 version of Clean Script. The CS4 version allows you to uninstall only a specific Adobe bundle.
Remember, this script wipes everything off your drive so make sure that you’ve made a backup of your Lightroom galleries, Acrobat documents, PSD files, etc. If this is the level of clean that you need, check out www.adobe.com/support/contact/cs3clean.html and www.adobe.com/support/contact/cs4clean.html.