
Bring Your Podcast to Life

BY RICHARD HARRINGTON & MARK WEISER
By now you’ve probably heard the term “video podcast,” but what exactly does it mean? The simplest answer is this: A video podcast is a TV show that’s delivered via the Internet. Shows are usually targeted to special interest groups and cover niche subject matters. The files can be watched on a computer; many TVs; and, of course, portable media players such as the iPod, iPhone, and Zune. The unique part is that viewers can subscribe and have new shows download automatically.
So why all the buzz? Because consumers want their Web video—a lot! It’s estimated that 38 million Americans will consume podcasts in 2009. When you expand that to worldwide, Web video is growing at an exponential rate. One reputable group estimates that Web video will have an audience of one billion by the year 2013. It’s a pretty exciting time for those wanting to share with the world.
It’s possible for a podcaster to reach out and connect with large audiences. This audience may not rival those consuming mainstream media (although some podcasts, such as Photoshop User TV [www.photoshopusertv.com], regularly outperform cable and network television), but your chances are good to reach a substantial percentage of a niche market.
Consumers are looking for news and entertainment that they can relate to—that addresses their needs and specific interests. But webcam video and low production values rarely cut it. Viewers expect nicely shot video with attractive graphics, effective editing, and killer sound. If you produce professional-looking content, your audience can enjoy the show without being distracted by horrendous production values.

Whether you’re a business, a government agency, or even an enterprising individual, you can harness the power of podcasting to reach an audience. Additionally, the video you produce for podcasting is fully compatible with other video distribution channels, ensuring that you can repurpose your content to reach the broadest audience. Let’s take a look at how you can use professional techniques and the Adobe Creative Suite to make great podcasts and Web video.
Video editing advice for podcasts
The editing stage is the place where all the pieces come together into the final story. In many ways, it all comes down to how the editor puts these pieces together. Editing podcasts has a few unique challenges compared to traditional video.
Determining editing size: Don’t worry about making your sequence match the finished podcast size. All of the resizing can happen later during the compression stage. Simply set up Premiere Pro to match your footage. If you shot in HD, edit that way. Widescreen DV? Set up the project to match. It’s a very good idea to stick with the sequence presets that ship with your editing software. Just be sure to match the right sequence settings to your footage. If you have to render everything in your Timeline, the sequence settings are wrong.
Maintaining optimum color and exposure: Many podcasters understand little about color correcting their video. Here are a few simple pieces of advice:
• Try to avoid blowing out the image. If it’s a choice between too light or too dark, favor too dark.
• Make sure you have sufficient contrast because a lack of contrast will cause problems when you compress.
• Use a three-way color corrector or curves-based color correction effects.
Consider transitions carefully: Oftentimes, wipes and transitions will break up due to a podcast’s compression. A transition (especially a dissolve) is much more complex to effectively compress. This is because so many of the pixels are changing at the same time—and usually quite rapidly. Podcast compression relies upon MPEG-4 technology, which saves space by only updating pixels that change. When you use a wipe, it causes a spike in the data needed to show the image clearly. Because podcasts generally have caps on their data rates, this results in the picture breaking up. Many podcasters eliminate wipes altogether, and instead rely upon the most basic dissolves and fade to color transitions (or even the most basic transition of all—the cut).
Dealing with interlaced material: There’s a very good chance that the video in your Timeline is interlaced (even if it was shot in 24p). Most video formats involve some interlacing. This is a “leftover” technology from the earliest days of television. Video interlacing causes half of one frame to load, followed by the second half. While this is useful for video that’s intended for television sets (it can produce smoother motion), it looks terrible on progressive-type displays (such as LCDs, iPods, etc.).
Here are a few ways to solve the problem:
• Shoot progressive: If you know that you’re only delivering to podcast, shoot your video progressive to get rid of fields.
• Deinterlace the Timeline: Premiere Pro lets you set a Timeline to progressive scan in the New Sequence dialog. You’ll generally need to remove fields using a plug-in for After Effects and Premiere Pro such as FieldsKit (www.revisionfx.com) or Resizer 2.2 (www.redgiantsoftware.com). Note: Resizer, formerly from Digital Anarchy, is now part of Magic Bullet Instant HD from Red Giant Software.
• During compression: The Adobe Media Encoder CS4 will automatically remove interlacing from your footage when you use a podcast preset on interlaced material (we’ll talk more about Adobe Media Encoder later).
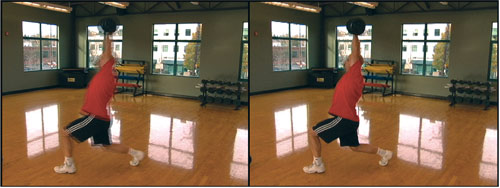
Audio normalization: Pay attention to your audio levels. The podcasting audience is largely comprised of people with headphones jacked into their ears. If your audio mix keeps varying, with areas being very loud followed by very quiet, you’ll annoy your audience. A sudden blast of sound because the talent got really loud will cause someone to take the ear buds out and turn off your show.
Fortunately, Premiere Pro offers normalization gain. This process automatically smoothes out your audio levels. It won’t totally “flatten” the mix, but it will move it all closer to the middle: your highest highs will drop to a specified target (in dBs) and your lowest lows will be raised closer to the center. This is a very important step and worth doing. Here’s how:
STEP ONE: In the Timeline panel, select the sequence you want to normalize, and choose Sequence>Normalize Master Track.
STEP TWO: In the Normalize Track dialog, enter an amplitude value in the dB field (zero to –2 dB is a good starting point), and click OK.
STEP THREE: Play your sequence and listen to your audio. You can undo and repeat with a different dB value as needed.
Run time strategies: Never forget your target run time. For most podcasts, you’re editing short-form entertainment or training. It’s far better to keep a podcast short and to the point. In our opinion, this is an easy way to meet the audience’s needs and lower production costs. We personally target three to eight minutes per episode.
One trick is to add a marker in your Timeline to make it easier to see your target run time. Remember, most shows benefit from editing out the bad parts. A shorter show helps you distill your content to only the best parts.
Graphics for podcasts
There are several issues to consider when it comes to building motion graphics for a podcast. The advice we offer here is specific to podcast graphics. However, if you’re inexperienced with broadcast graphics, we strongly recommend additional reading and practice (there are tons of great tutorials on the Layers magazine website [www.layersmagazine.com] and books on motion and video graphics, such as Photoshop for Video, by Focal Press).
Screen size and design issues: Try resizing your graphics to a podcast size (such as 640×480 or 640×360 for widescreen) to see how they look. You don’t want to make your audience squint, so keep the text larger and easier to read. For podcasting, leave a 10% margin around the outside edge of your graphics so the text doesn’t get hard to read by being too close to the edge of the computer screen or portable media player.
DV/HDV sucks the life from graphics: The DV (digital video) and HDV (high-definition video) codecs are the kiss of death to graphics. They instantly throw away three-fourths of the work you’ve done and it makes it look terrible. Be very careful if you’re working with DV footage not to finish your sequences using the DV codec. Instead, change your sequence settings to a higher quality (such as Animation codec) for the final render. If using HDV, capture to a different codec and work with something less compressed.
Keep ’em clean: While clean is a subjective judgment, it’s still essential. By clean, we mean crisp, easy-to-read, and easy-to-understand designs. You want clarity with your podcast graphics. If things feel too busy, it’s probably too busy; if you think it’s a little hard to read, your audience will think it’s very hard to read. We’re not advocating for vanilla design, just remember that podcasting is a very low-resolution medium that’s also heavily compressed. You have less latitude than print (and even video), so it’s essential you design with the medium in mind.
Match style of show: The goal is simple; you want the personality of your graphics package to match the style of your show and its host. Make sure that you’re figuring out a way to make your show different than all the rest. Analyze your perceived competition then develop graphics that have a unique appearance that matches your show.

Read time: Many motion graphic designers and editors seem to forget that graphics are actually meant to be read by an audience. The idea with read times is that you want to be able to read the graphic “out loud,” preferably twice, before removing the graphic. This is an old broadcast standard for a good reason.
Fonts for small screens: Be sure to invest in a font for your show that didn’t come preinstalled with Microsoft Office. You need to find a visual identity for your podcast, and good use of type is an easy way to do so. Take a look out there—there’s a typeface that has your show’s personality. Something that’s somewhat unique and will help convey the character of your show. Here are a few of our favorite type foundries: Chank (www.chank.com); Dinctype (www.girlswhowearglasses.com); BV Fonts (www.bvfonts.com); and Acid Fonts (www.acidfonts.com).

Working with screen captures
Are you looking to launch the next podcast to share your design ideas or software tips? Then you need screen capture software. There are software programs that allow you to record what’s happening on your computer’s screen. The software can create and store a video file on a hard drive so you can edit it with Premiere Pro. Here are some popular screen capture utilities:
• iShowU (www.shinywhitebox.com): This Mac-only tool is reasonably priced and does a great job of writing files to disk.
• Snapz Pro (www.ambrosiasw.com): This is another Mac-only tool that offers capture of both static and motion screens.
• Camtasia Studio (www.techsmith.com): This PC-only solution writes very small files. It can then export to virtually any video format.
Music for podcasts
Finding the right music to use in a podcast is very tricky. Sure you have the same selection challenges as any video—making sure the music fits the mood—but it goes well beyond that. With podcasts, you have all sorts of issues. First, the files are shown on the Web (which is usually considered worldwide distribution). Then, add the fact that the items can be downloaded to a user’s computer. When it comes to licensing music, things can get very expensive. Here are two approaches to staying legal that are worth considering:
Pod-safe music: Many independent musicians make their music available for promotional reasons. There are websites where musicians of all genres offer up their music for free use as long as you identify them in your show credits. This is a great way to find music that sounds fresh and literally costs nothing. Here are some sites for finding pod-safe music:
• PodSafe Music Network: http://podsafemusicnetwork.com
• IODA Promonet: www.iodapromonet.com
• Moby gratis: www.mobygratis.com
• AudioFeeds.org: http://audiofeeds.org
• Kahvi Collective: http://kahvi.org
Soundbooth scoring: Building a customized music track is easy with Adobe Soundbooth CS4. Soundbooth is a recent addition to the Adobe Creative Suite and represents a significant evolution in approaching audio tasks. Adobe Soundbooth is designed to make music creation simple. Soundbooth gives you access to several musical scores as well as sound effects. The first step to scoring music with Soundbooth is to preview scores. Most of the scores aren’t loaded by default, but they’re easy to access with an Internet connection.
STEP ONE: Launch Adobe Soundbooth CS4 and choose Window>Resource Central. If your computer is connected to the Internet, you’ll see new content load.
STEP TWO: Click the Scores tab to see the free scores for download. Each score is a highly customizable song that can intelligently adjust to the length of your video and has the ability to change intensity and instrumentation. Items in the Score and Sound Effects tabs are free to download and use.
STEP THREE: Click the category drop-down menu (currently labeled Ambient) and choose Electronic 2. Click the Preview icon (right-facing arrow) for “River of Unreality.” Let’s give this track a try. Click the download icon (down-facing arrow) to save the file. Wait until the file finishes downloading to proceed.
STEP FOUR: Click the Scores tab to switch to the Scores panel (not within Resource Central, but at the top of the window). At the bottom of the Scores panel, click the Import Scores to Score Library icon. Select the downloaded score.
Once a score is selected, you can add it to a movie file, After Effects composition, or Premiere Pro sequence. Soundbooth makes it easy to adjust the length of a score to get a customized sound that fits the duration of your video.
STEP ONE: In the Scores panel, select the score “River of Unreality.” Click the Add Score to Multitrack icon. The score moves into the Editor window. You can now add a Premiere Pro sequence.
STEP TWO: Choose File>Adobe Dynamic Link>Import Premiere Pro Sequence. A new window opens asking you to specify a location for the Premiere Pro project. You can also choose File>Import>Files to simply add a video file. Select the sequence or file and click OK.
STEP THREE: If the music is too long or short, click the score track then move the pointer over the end of the audio track until it turns into a red cursor. Click-and-drag to adjust the audio track to match the video’s length.
STEP FOUR: Choose Window>Video to see the video you’re scoring to. Click Play to preview the music and video. Not too shabby, but the score can be customized using basic presets to set the intensity or adjusted over time using keyframes. This flexibility greatly improves the usefulness of each score.
STEP FIVE: At the top of the audio track in the editor window, click the Parameters drop-down menu and choose Show All to see all the keyframeable properties for the track. Volume allows you to adjust how loud the clip is—usually louder in the beginning and end, but dips lower when people are talking. Intensity impacts how “strong” the music is. Experiment with Intensity by scrubbing its value up and down.
STEP SIX: When you’re done, you can save the ASND file and sync to your video in Premiere Pro.
Podcast compression
To output your podcast video files, you have the perfect tool: Adobe Media Encoder CS4. This versatile utility can read any video format that you’d create using the Creative Suite and can output podcast-ready MPEG-4 files.
STEP ONE: Launch the Adobe Media Encoder, click the Add button, and select one or more files.
STEP TWO: From the Format drop-down menu, choose H.264, and then click the Preset drop-down menu and choose an Apple iPod preset for standard-definition shows or an Apple TV preset for HD shows. After you select a preset, you can click on its name to customize the settings to make them more compatible for Apple iPods.
STEP THREE: Click the Output File path to specify a location for your compressed files. Choose File>Save Queue, then click Start Queue to create your podcast-ready video files.
RSS & podcast delivery
Once the video is encoded, you need to create an RSS file and host the shows. There are no Adobe services for hosting and delivering podcasts—but the process is pretty straightforward. Here are a few resources to check out to learn more about podcast hosting and delivery.
• Apple podcasting online class: http://seminars.apple.com/seminarsonline/podcast/apple
• iTunes podcasting tech specs: www.apple.com/itunes/whatson/podcasts/specs.html
• Podcast Maker for Mac: http://lemonzdream.com/podcastmaker
• The Podcast RSS Buddy for Mac and PC: www.tolley.info/rssbuddy
• RSS Feed Validator: http://feedvalidator.org
• The Adobe Media Player: www.adobe.com/products/mediaplayer
And here are a few hosting companies that offer podcast hosting packages. These plans often have much higher bandwidth than webhosting plans and are priced differently. Don’t use standard webhosting for your podcast as it’s more expensive and not the best solution.
• AltarCast: www.altarcast.com
• Apple MobileMe: www.apple.com/mobileme
• Big Contact: http://v2.bigcontact.com
• Blogamp: http://blogamp.com
• GoDaddy: www.godaddy.com
• Hipcast: www.hipcast.com
• LibSyn: www.libsyn.com
• mDialog: www.mdialog.com
• Ourmedia: http://ourmedia.org
• Podbean: www.podbean.com
• podbus: www.podbus.com
• Podcast Spot: www.podcastspot.com
• podHoster: www.podhoster.com
• Podkive: www.genetichosting.com
• PodStrike!: www.podstrike.com
• Switchpod: www.switchpod.com
The road ahead
At this point, we would like to welcome you to the new publishing revolution. Be sure to keep up on podcasting news by visiting the blog www.vidpodcaster.com, and you can find local podcasting groups by visiting www.meetup.com. Join us—there’s an audience out there waiting just for you.
ALL IMAGES ©RHED PIXEL UNLESS OTHERWISE NOTED