Lighting for Sports Portraits

The photographic niche of sports portraiture is gaining popularity, so it’s important to notice details and create great settings to set yourself apart from the field. Knowing the sport is important, too.
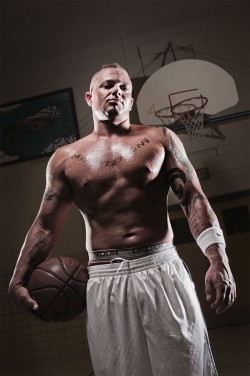
Basketball is my favorite traditional sport. My dad played for Purdue, I played through school, and now my son plays, as well. But my favorite type of basketball photography isn’t shooting games; it’s creating stylized portraits and action shots. I recently found a new local sports model, Matt, who plays basketball. Matt also had some great tattoos that would contribute to the edgy look I had in mind for the shot. Sometimes I create shoots around a model’s look, other times I create a shoot around a location. Working with clients on assignments, I do both. In this case, I was able to get access to a local school gymnasium.
Step One

Here’s the view of the gym when we came through the door. It didn’t have fancy wooden floors or modern basketball goals, but it was all ours for the night. I’m a huge optimist in my photographic approach, and every location has advantages and disadvantages. The job of a photographer is to use the photographic craft to create a good image with any location. In this case, I knew I would eliminate the overhead fluorescent lighting and create my own light and scene. This would allow me to reduce any distractions in the gym and focus the viewer on my subject. I had Matt stand on the free throw line to see how things would look. Lining him up with the basketball goal in the background would be the shot.
Step Two
 The next step was establishing an exposure that would underexpose the background to a dim, grungy level, setting the stage for the portrait. Shooting 1/200 at f/10 and ISO 200 did the trick. Now I needed to add my own light. We set up an overhead light using an Avenger D600 boom arm, and used an Elinchrom Ranger shot through a 27″ square Rotalux softbox. This was our main light. Having this light on a boom arm allowed me to photograph Matt without a stand in the middle of the shot. High overhead lights also cast strong shadows downward—great for highlighting a strong physique. We placed basketballs around the floor to add some interesting shapes and break up the white space. Two problems showed up: a light stand was in the frame (this would be cloned out in the final shot), and the overhead light spilled light into the gym, reducing the dramatic underexposed background. Time to fix it.
Step Three
 To reduce the spill from the overhead light, I added a grid to the light. These soft “egg crate” grids dramatically control the spill of light, great for working in small rooms or eliminating errant light. This worked well to control the light, but the shot needed more to really bring it to life. To get more edgy light and better separation from the dark background, I added two Elinchrom 14×35″ strip softboxes, one on each side of Matt. A Ranger pack was attached to each of these lights. Using battery-powered strobes eliminates searching for power outlets and running extension cords all over your set.
We tried a shot with all three lights running—one overhead and two cross lighting strip banks—but another problem arose. The strip banks spilled light onto the floor, creating opposing shadows at the basketballs. We normally think of shadows coming from one direction. Opposing shadows would have to be eliminated.
Step Four
 Once again, grids saved the day. This time we added 30° Lighttools egg crate grids to the strip banks. Grids come in a variety of degrees: the smaller the number, the smaller the spread of light. Using 30° grids on the strip banks eliminated the light spill on the floor and allowed us to use the lights quite a distance from Matt. These lights wouldn’t be in the photo. Without the grids, the lights would need to be really close to Matt to get the same effect. I adjusted the light output to have the strip lights around 1.5 stops brighter than the overhead light. The highlights added some tension to the shot and created more separation. This lighting style would also work well to add some grit and texture in Photoshop. Matt was looking good, but the shot lacked depth and dimension. Time to bust out another light.
Step Five
 Throughout the shoot I kept using the basketball goal as a background element for the portrait. But since the goal was not lit, it faded into the background. To add some importance to the goal, I decided to light the basketball goal. Adding this light to the background also added another layer to the image, creating more depth. But once again I didn’t want to light up the entire back wall, only the goal. To accomplish this I used another Ranger pack with a gridded strobe head. This 20° grid kept the light hitting the goal and not much else. I positioned the light to camera right about 25′ away from the goal. The light cast a strong shadow to the left of the goal, which I liked for the dramatic look. Now the shot was looking good, and I could finally shoot some frames and work with Matt on poses.
Step Six
 As I was working with Matt, I kept thinking about what was missing. What was unique about Matt, and how could I bring that out in the portrait? I realized I had forgotten one thing I liked about Matt—his tattoos. And even better, he had a lot more body art on his chest. Off came the shirt, out came the spray bottle for a little sweat, and now we’re talking! I repositioned the overhead softbox to the front, adding light to Matt’s chest. I also had an assistant hold a silver reflector under the overhead light. This reflected light back onto Matt’s torso and face. I decided on a tighter composition to focus on Matt and his tattoos. This tight angle eliminated the floor and basketballs, adding another look to the mix of photos from the shoot. In post I added grit and texture to the shot. Looking good!
For some great sports photography inspiration, check out these images from Scott Kelby or try one of our great Sports courses from Dave Black.


