Not all PDFs are created equal—just ask any prepress manager. Prepress-bound PDFs are best created by high-quality PDF generation tools such as Adobe Acrobat Distiller or the Export command in Adobe InDesign. Prepress PDFs should have high-resolution images; simplified flattened, RIP-Ready images; high-quality embedded fonts; CMYK or spot color assignments; no lines that are less than 0.25 pts; and need to have large enough dimensions to accommodate crop marks and color bars.
If you are the receiver of a PDF file that’s destined for prepress, you want to be able to evaluate and prepare a PDF for prepress output. Here are some of the Acrobat 8 tools you can use to evaluate, edit, and fix your PDF files to ensure that they print properly.
STEP 1 Open and Resave PDF Document
Open the PDF document you want to evaluate and prepare for prepress. Choose File Save As and choose Adobe PDF Files from the Format pop-menu. Name your new PDF with “_Print” at the end of the name to indicate it’s a print prep image. Performing this Save As will accomplish two things: (1) You’ll save your initial document in its original, unedited form; and (2) the simple act of resaving a PDF will often simplify and reduce the file size of the PDF—this is a good thing for printing!
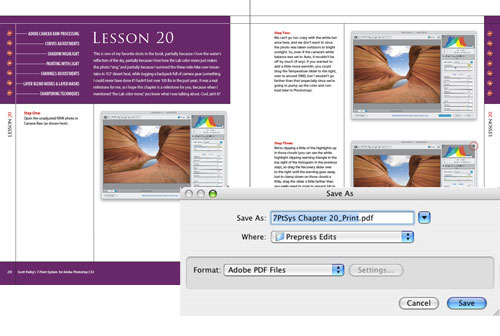
PHOTO CREDIT – SCOTT KELBY
STEP 2 Determine Document Dimensions and PDF Creator
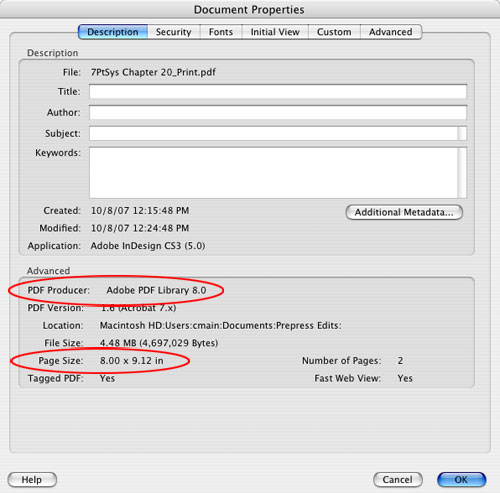
Begin the evaluation of your PDF document by determining its dimensions and how it was created. To determine the PDF file size, choose File>Properties and click the Description tab. Confirm that the Page Size matches your desired output dimensions. In the Advanced section of the Document Properties dialog, view the PDF Producer: either Adobe PDF Library 8.0 or Acrobat Distiller 7.0.5 indicates the high-quality PDF was exported from InDesign or Distiller, respectively. Mac OS X 10.4 indicates a questionable operating system PDF driver. (See Step 14 below for instructions on regenerating PDFs with Distiller.)
STEP 3 Check Font Use and Embedding
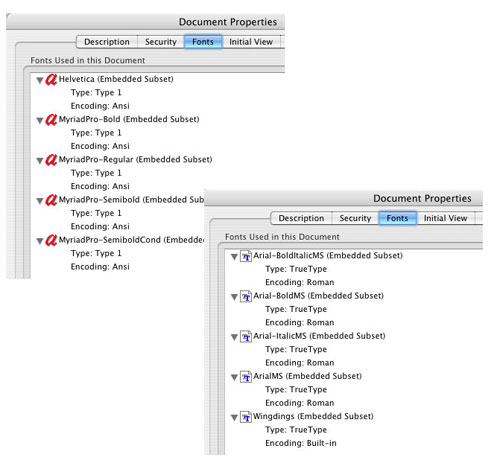
Preferred prepress fonts include PostScript Type 1 and OpenType (an expanded PostScript derivative). In the Documents Properties dialog, click the Fonts tab. View the list of fonts to see the type of font files and whether or not they are embedded. In this first example, the fonts are all PostScript fonts (good for prepress). The second example shows TrueType fonts (less desirable for prepress). In both examples the fonts are embedded. Embedding is required to ensure the original fonts used to create this PDF can be used for printing.
STEP 4 Preflight Your PDF
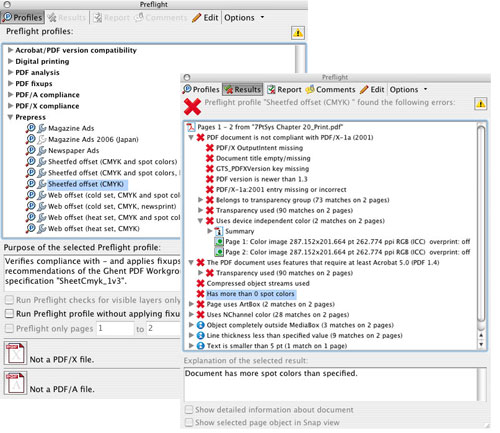
Acrobat 8 has a robust set of preflight tools to help you determine the printability of your PDF document and perform some fixes. Choose Advanced>Print Production>Preflight. In the Preflight dialog you’ll see a list of preflight categories including Digital Printing and Prepress. Click the right-facing triangle next to Prepress to display the list of default preflight profiles. Select the Sheetfed Offset (CMYK) profile. This is the profile you would select if you intended to print this PDF on a commercial sheetfed press using only CMYK process inks. Click the Execute button, read the Results dialog, and click OK.
STEP 5 Check Separations and Overprint
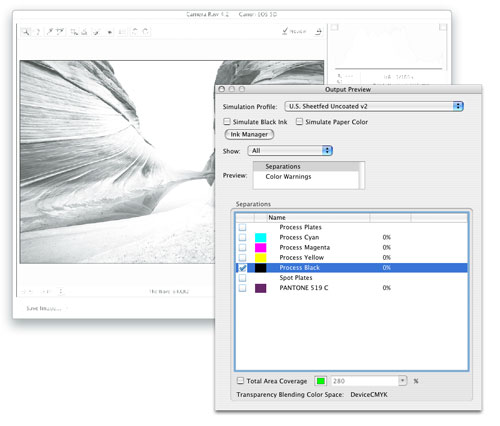
To view separations, choose Advanced>Print Production>Output Preview. In the Output Preview dialog, select Separations from the Preview menu and check the printing colors you’d like to preview (here Process Black). Note: Previewing the black plate is particularly useful for viewing the amount of black ink that will be used to print your images. Choose Color Warnings in the Preview menu and then click Show Overprinting to view how overlapping objects will print. Choose Rich Black to find objects that use both black and process colors.
STEP 6 Convert to CMYK Color Space
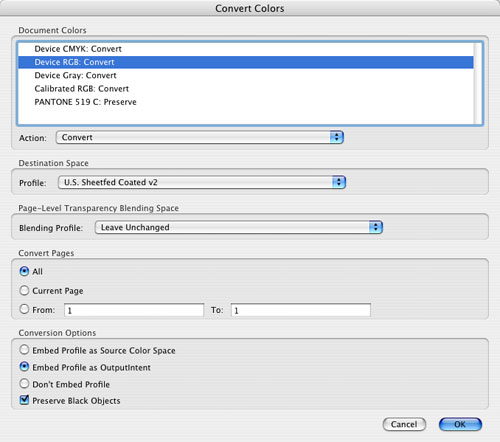
One fix you can perform is to change colors to make them print properly (i.e., change from a Web RGB color space to a CMYK color space). Choose Advanced>Print Production>Convert Colors. Select the colors to be converted (here Device RGB: Convert). Choose Convert from the Action pop-menu, and assign the Destination Space Profile for your printing device. Check Preserve Black Objects so any original black items will remain black when you print. Then click OK to affect the conversion. Note: This applies a global conversion. If you want to apply different conversions to separate images, see Step 13 below.
STEP 7 Convert Spot Colors to Process
One common color designation error is assigning spot colors when only four process colors (CMYK) will be used in printing. To convert spot colors to process colors, choose Advanced>Print Production>Ink Manager. View the list of inks assigned to print (here CMYK and Pantone 519 C spot color). Note the open circle icon located to the left of the Pantone spot color ink. Check the Convert All Spots to Process box and notice how a CMYK icon replaces the open circle icon. Click OK to apply this color conversion.

STEP 8 Crop Page to Add White Border
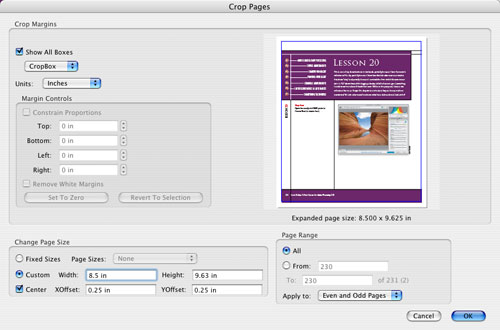
You can either crop your PDF page to subtract or add dimension. Here we’ll add a white border to make room for the printer marks. Choose Advanced>Print Production>Crop Pages. In the Change Page Size section, located in the lower-left corner, click the Custom checkbox. Type in values for both Width and Height that are 0.5″ larger than the current dimensions of the document. View the 0.5″ white margin in the preview area. Check the All button in the Page Range area, and click OK to add the white margin to all your pages.
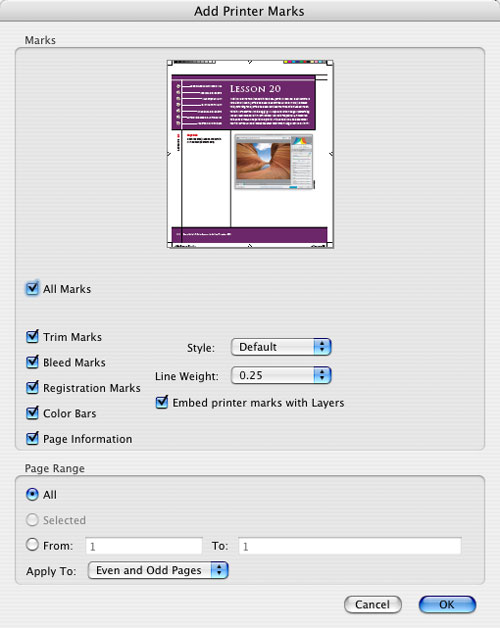
STEP 9 Add Printer Marks
You can add printer marks to your PDF documents without adding any additional margin, but unless you’ve already added enough margin space to see them they won’t be visible. Thus perform Step 8, if necessary, prior to adding printer marks so they’ll be immediately visible upon creation. To add printer marks, choose Advanced>Print Production>Add Printer Marks. In the Add Printer Marks dialog, check the marks you want to include, and check All in the Page Range area. Click OK to add the marks.
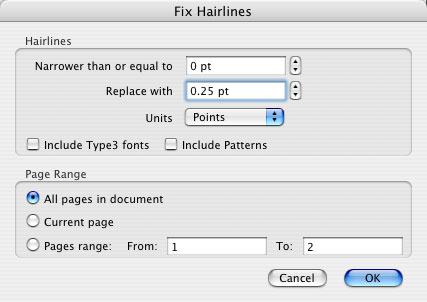
STEP 10 Keep Your Hairlines Thick
Another common problem is hairlines that are too thin. Thin lines are often created when an object is scaled down and the line weight scales down along with the overall dimensions of the object. To assign a minimum point size to all lines in your PDF, choose Advanced>Print Production>Fix Hairlines. Configure the Fix Hairlines dialog as follows: (1) Set the Units pop-up menu to Points; (2) enter 0.25 in the Replace With field; (3) set the Narrower Than or Equal To field to 0 (the default value); and (4) in the Page Range section, select All Pages in Document. Click OK.
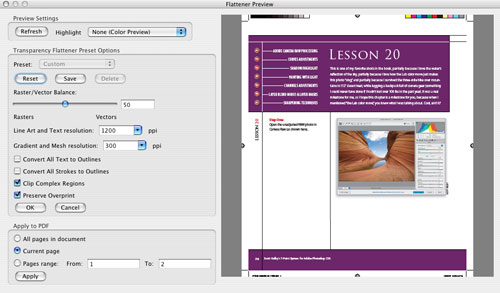
STEP 11 View and Adjust Transparency
Currently, one of the most commonly occurring problems with printing PDF documents is printing the transparency the way it looks in the original document. To view and adjust the transparency in your PDF, choose Advanced>Print Production>Flattener Preview. You can make a global adjustment using the Flattener Preview dialog; however, at this stage of your workflow it may make sense to perform single-page adjustments. If you’re only having a transparency output problem with one page of your PDF document, then concentrate on that page. Click the Refresh button to view the results of various settings.
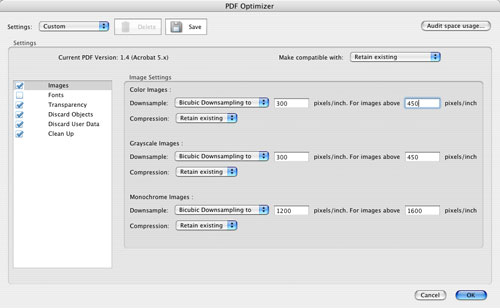
STEP 12 Adjust Compression and Remove Items
You can adjust the internal contents and structure of a PDF by using the PDF Optimizer tool. Choose Advanced>Print Production>PDF Optimizer. To resample all the images in your PDF, click on Images on the left. For high-quality printing, set the dialog as follows: downsample maximum/minimum resolutions to 450/300 for contones and to 1600/1200 for line art. I recommend setting all three Compression menus to Retain Existing. To remove lots of unwanted structure and content, check all the boxes in the Discard Objects, Discard User Data, and Clean Up screens. Then click OK to apply the changes.
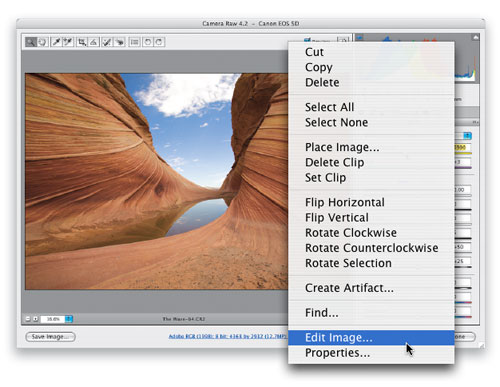
STEP 13 Edit Individual Images in Photoshop
To extract, edit, and replace a graphic image in a PDF, choose Tools>Advanced Editing>TouchUp Object Tool. Click on the image you’d like to edit, Control-click (PC: Right-click) on the image, and then select Edit Image from the contextual menu. The image will open in Photoshop. Perform your edits, such as flattening and/or converting to CMYK, and then save the image to place it back in the PDF.
STEP 14 Create a Brand-New PDF
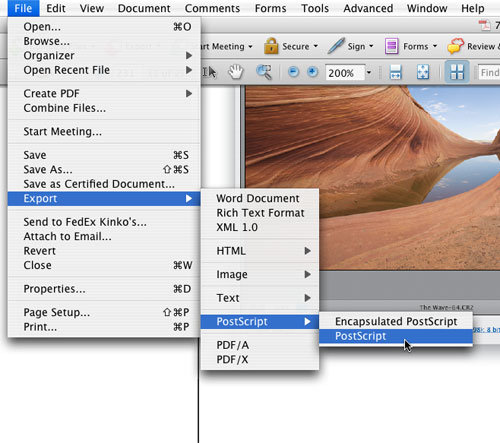
To create a whole new PDF, launch Acrobat Distiller by choosing Advanced>Print Production>Acrobat Distiller, and then export your PDF as a PostScript file from Acrobat by choosing File>Export>PostScript>PostScript. Save the file in a watched folder controlled by Distiller to process your file into a shiny new PDF document (for more on watched folders, see “Folder Watching,” Layers magazine, May/June 2007, or visit www.layersmagazine.com and navigate to the Tutorials section). Sometimes this is all you need to create a PDF that’ll print properly.
Well there you have some of the more important Acrobat 8 print evaluation and fixing tools.