Using Keyable Footage in After Effects
With the accessibility of green screen setups these days, it’s easier to get keyable footage than ever before—opening up creative options without set or color restrictions. Once you have your footage, After Effects has some wicked tools to key and extract—and when combined they can create some wonderful results.
Step 1: [IMPORT GREEN SCREEN FOOTAGE]
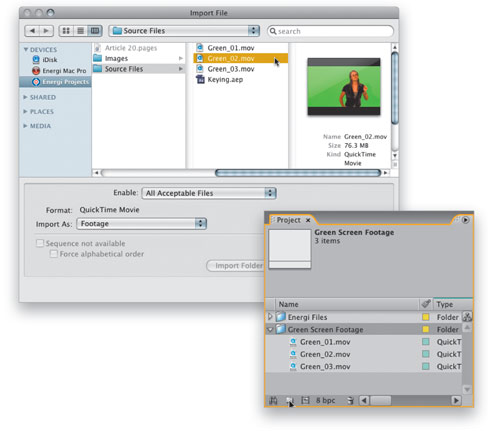
Starting out in Adobe After Effects CS3 with a blank project, double-click in the Project panel to bring up the Import File dialog. Locate and select the green screen clip(s) you plan to use and click Open. Here, I’m importing three clips of our intern, Marina, shot in HD in the green screen studio. One of these clips “Green_01.mov” is available (shortened) for you to download from the Layers website. Click the Create a New Folder icon at the bottom of the Project panel, name the new folder, and drag your clips into it to store them.
Step 2: [CREATE NEW COMPOSITION]
Let’s work at the size this was intended for—NTSC Widescreen. So go to Composition>New Composition, and in the Composition Settings dialog, set the Width and Height to 960×540 (16:9) with a Pixel Aspect Ratio of Square Pixels (when working on keying, it’s easier to see clean edges and results when not viewing expanded rectangular pixels). Set the duration to at least the length of your clip (2+ seconds), then click OK. Finally, go to Composition>Background Color, click the color swatch in the Background Color dialog, and choose white in the Color Picker.

Step 3: [ADD FOOTAGE; GARBAGE MATTE]
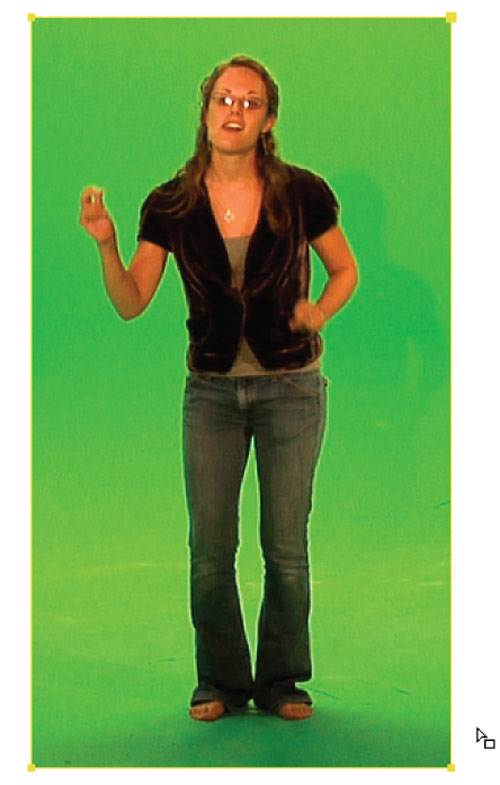
Select your Green_01 clip and drag it straight into the Timeline. Now, when keying a large area like this with a small subject area, it’s best to first remove as much of the background as you can so the keyer has less work to do. In the Tools panel, select the Rectangle tool (Q), then click-and-drag a rectangle around the subject to remove everything except our dancing Marina. This is removing all the “garbage” we don’t need—hence the name Garbage Matte.
Step 4: [ADJUST MATTE]
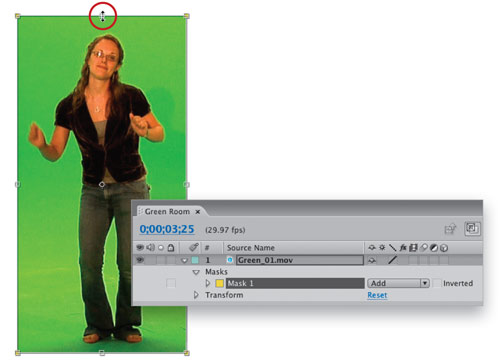
Go back to the main Selection tool (V) and scrub the Current Time Indicator (CTI) in the Timeline to check that none of your subject gets cropped during playback. In the case of people dancing, jumping, and moving, arms, hands, or feet can easily go outside the garbage matte later down the line without you realizing. Simply double-click on the edge of the mask border to resize and move it accordingly—but keep it as tight as possible to the focus on the shot.
Step 5: [APPLY KEYLIGHT; SELECT KEY COLOR]
With the layer selected, go to Effect>Keying>Keylight to apply the effect. In the Effect Controls panel (ECP), click the Eyedropper tool next to the Screen Colour swatch and click on a midrange green in the image. Then, click on the Toggle Transparency Grid icon at the bottom of the Composition window to view the alpha channel—certainly not great at this point. To further illustrate this point, choose Status in the View pop-up menu in the ECP to view the simple transparency information.
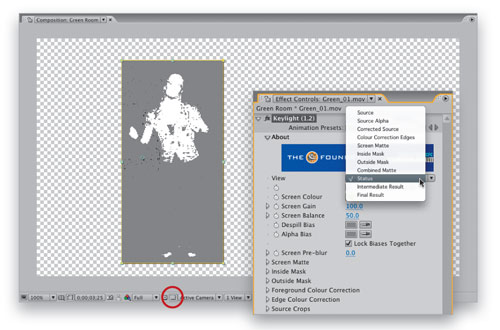
Step 6: [ADJUST KEYLIGHT SETTINGS]
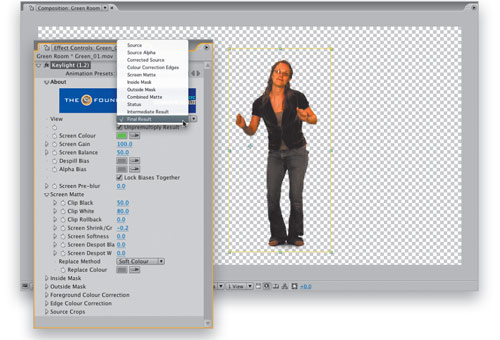
Twirl down Screen Matte in the ECP, and drag the Clip Black until the gray area around Marina is black (around 48–50). Drag the Clip White to get Marina as white as possible, leaving some green (around 80). Now choose Screen Matte in the View pop-up to see the actual matte, then adjust Screen Shrink/Grow to –0.2 to trim the edges of the alpha channel slightly. Now switch View to Final Result, and the first part of the key is complete.
Step 7: [CHOKE MATTE]
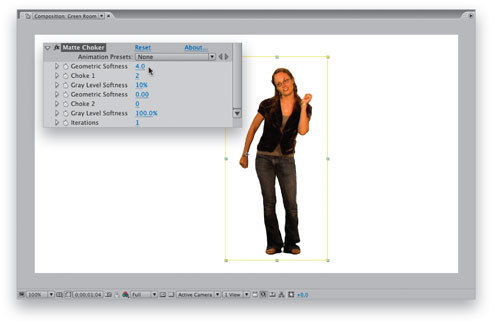
Turn the Transparency Grid off to return the white backdrop. This reveals that we have slightly jagged edges, but we can easily smooth them out. Go to Effect>Matte>Matte Choker, and in the ECP adjust Geometric Softness 1 to around 4 and Choke 1 to around 2 pixels (no more). This gives us a much better edge to the key—perfect for an image like this at this size. If you scrub your Timeline now, the key is looking good, so let’s restore some color into the clip and give it some punch.
Step 8: [ADJUST COLOR]
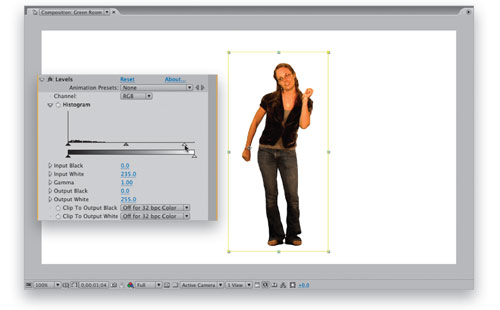
Go to Effect>Color Correction>Auto Color to auto-boost the color. Now go back and choose Levels from the same submenu, and in the ECP, adjust the Input White to around 235 to boost the brightness of the clip. To reduce the slight green colorcast that still remains, go back to Effect>Color Correction and choose Curves.
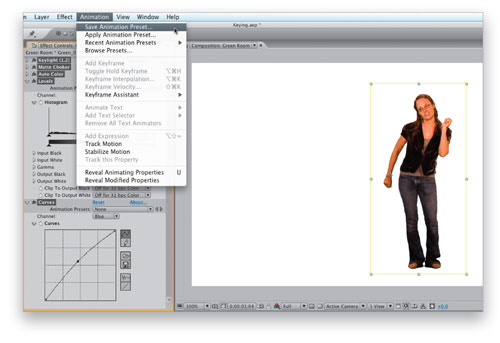
Step 9: [ADJUST CURVES; SAVE PRESET]
In the Curves controls, choose Blue from the Channel menu, then drag a point from the middle of the graph slightly up and left to lighten the channel, bringing a little more red back into the image—perfect! As keys and color adjustments go, this is a good template to use, so let’s save a preset for reapplication. In the ECP, Shift-select Keylight 1.2, Matte Choker, Auto Color, Levels, and Curves to select them all, then go to Animation>Save Animation Preset. Name it “Key & Color.ffx” and click Save.
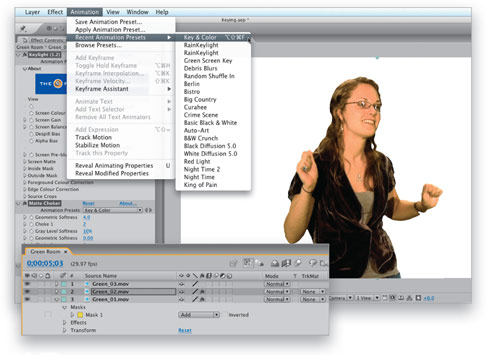
Step 10: [REUSING PRESETS]
Reapplying the saved preset to other clips will either work perfectly, terribly, or be somewhat usable—depending on the clip. We’ve added two more clips from the green screen shoot to the Timeline, one medium distance and one close-up (you can use your own footage or drag in the same clip that you used for the previous steps). To use your new preset, select a clip in the Timeline, go to Animation>Recent Animation Presets, and choose Key & Color. In this example, the same settings from Green_01 are too harsh on Green_02, but the color adjustment matches fine. A couple of tweaks then…
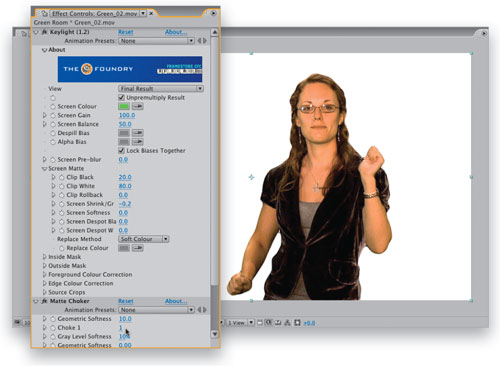
Step 11: [ADJUST KEYLIGHT & MATTE CHOKER]
In the ECP for Keylight, we adjusted the Clip Black value to around 20 to reintroduce some of the softness around the hair. Then, under Matte Choker, we changed the Geometric Softness 1 to 10 and the Choke 1 value to 1. This softened the edge of the matte for this medium zoom image quite nicely. Now, moving on to the close-up Green_03, this is a true test of keying settings—loose hair transparency! Selecting the clip, we applied the same Animation Preset once more.
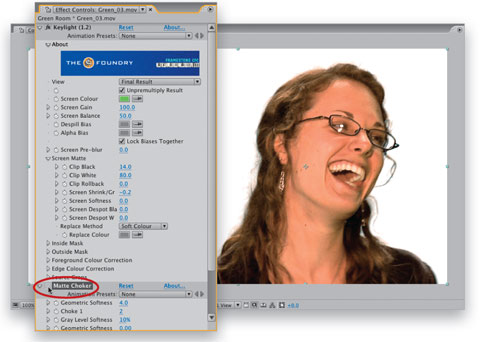
Step 12: [ADJUST SETTINGS FOR HAIR]
We then played with the Screen Matte settings in Keylight to bring the hair softness back in. We adjusted the Clip Black to around 14, and then in this instance, turned off the Matte Choker effect by clicking the small fx icon next to its name in the ECP. Looking pretty good! As you can see, an initial key created for one clip can easily be reused and adjusted for each future keying operation, with the simple use of an Animation Preset.
Step 13: [COMPOSITE BACKGROUND; CHANGE COLOR]
Now that you have your clip(s) nicely and very cleanly keyed, the After Effects world is your oyster. Add new backgrounds, new effects, type titles, movies, logos—whatever works to complete your project and present your keyed footage as cleanly and strongly as possible. Enjoy!