
In this tutorial, we’re going to create a cool-looking retro background for a poster. And thanks to layer styles, smart objects, and smart filters, our design will be completely editable.
1 CREATE A NEW DOCUMENT AND MAKE SELECTION
Create a document (File>New) in the size you need, ideally with a width that’s an even number (e.g., 600 pixels rather than 587 pixels). Click on the Rectangular Marquee tool (M) and in the Options Bar choose Fixed Size from the Style drop-down menu. Enter a width that divides evenly into your overall width: in this example we used 50 px since our document width was 600. For the height, use a value that’s larger than your documents height. Click once in the very top-left corner to make a selection.

2 ADD A LAYER AND FILL THE SELECTION
Click the Create a New Layer icon at the bottom of the Layers panel to add a new layer. Click the Foreground color swatch near the bottom of the Toolbox, select a color in the Color Picker (in our example we used a gold color, R:255, G:178, and B:55), and click OK. Press Option-Delete (PC: Alt-Backspace) to fill the selection with the Foreground color. Keep the selection active. To prepare for the next step we’ll add a new guide. Choose View>New Guide and add a Vertical guide with a Position that’s three times the width of your selection (in our example 150 px), and click OK.

3 DUPLICATE THE COLORED BAR MUTLPLE TIMES
With the color bar still selected, press Command-Option-T (PC: Ctrl-Alt-T) to Free Transform a copy of the selection. Hold down the Shift key and drag the duplicate of the bar to the right until its right edge lines up with the guide. Press Return (PC: Enter) to commit the transformation, and then press Command-Option-Shift-T (PC: Ctrl-Alt-Shift-T) multiple times to repeat the previous Free Transformation, creating copies until you fill the layer with colored bars. Then press Command-D (PC: Ctrl-D) to deselect.

4 HIDE THE BACKGROUND AND DEFINE A PATTERN
Next, hide the Background layer by clicking on the Eye icon beside the layer in the Layers panel. Make sure that the colored bar layer is active and choose Edit>Define Pattern. If you wish, you can choose a name for the pattern and enter it here in the Pattern Name dialog. Click OK.

5 ADD NEW LAYER; APPLY PATTERN OVERLAY
Add a new layer and fill it with a color that contrasts with your colored bar pattern (this will be the second color in the design—we used R:117, G:3, and B:3). Choose Layer>Layer Style>Pattern Overlay. Click the Pattern thumbnail to open the Pattern Picker and select the pattern that you saved in the previous step. Since the pattern includes transparency, you should see the colored bar pattern and the color of the layer behind it. Use the Scale option (with an even number such as 50%) to add more stripes, and click OK.

6 CONVERT TO SMART OBJECT; APPLY POLAR COORDINATES
Right-click on this top layer in the Layers panel and choose Convert to Smart Object—this will allow us to apply a smart filter that can be edited even after it’s been applied. Choose Filter>Distort>Polar Coordinates, use the Rectangular to Polar option, and click OK. Drag the original gold stripe layer to the Trash icon to delete it, as we no longer need it, and click on the Eye icon next to the Background layer to make it visible again.

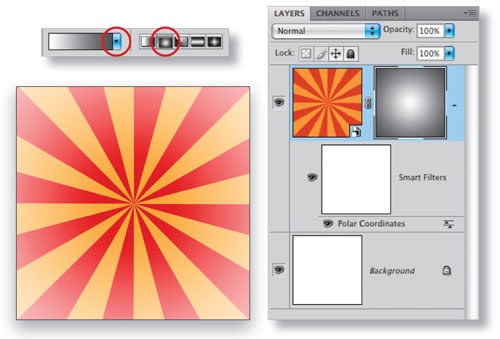
7 ADD A LAYER MASK AND FADE THE EDGES
Click the Add Layer Mask icon at the bottom of the Layers panel to add a layer mask to the smart object layer. Change your colors to a Foreground of white and a Background of dark gray (R:44, G:44, and B:44). Choose the Gradient tool (G) and then in the Options Bar, click the down-facing arrow next to the gradient preview to open the Gradient Picker. Select the Foreground to Background gradient, and click the Radial Gradient icon. With the Layer Mask active, click on the middle of the design and drag out to the edge. This will add a gradient to the mask that will fade the edges of our design.

8 ADD A TEXTURED PHOTOGRAPH
Open a photograph of a texture and use the Move tool (V) to drag it onto the document, resizing if necessary (Command-T [PC: Ctrl-T]) to fill the entire document. Change the blend mode in the Layers panel from Normal to Multiply with an Opacity of 40–60% (this amount will vary with your texture photo). If the photo texture color is altering the colors of your design too much, click on the texture layer and press Command-Shift-U (PC: Ctrl-Shift-U) to Desaturate the texture. (Of course you can use other blend modes, too.)

9 ADD GRAPHIC ELEMENTS
Add whatever graphic elements you want to appear in your poster design. In this example (since we’re focusing on the background), we used the Webdings font to add a train graphic. Just switch to the Type tool (T), select Webdings in the Font Family field in the Options Bar, click in your document to create a type layer, and press the letter T.

10 CREATE A DISPLACEMENT MAP
In the next step we’ll use the Displace filter to alter the graphic elements, so we need to create a displacement map. Click on the texture layer and use the Layers panel flyout menu to choose Duplicate Layer. Change the Destination to New and click OK. Change the blend mode to Normal and the Opacity to 100%. If the texture is in color, press Command-Shift-U (PC: Ctrl-Shift-U) to Desaturate the texture, and Save the document as a PSD file.

11 CONVERT TO SMART OBJECT; APPLY DISPLACE
In order to apply filters to the text layer we’ll need to convert it to a smart object. Right-click on the type layer and choose Convert to Smart Object. Then, choose Filter>Distort>Displace. Enter values for Horizontal and Vertical Scale, click OK, navigate to the displacement map you saved in the last step, and click Open. One of the advantages of using a smart filter here is that you can experiment with different values in the Displace filter by double-clicking on the smart filter (see the following steps for more on editing smart objects and smart filters).

12 OPTION: EDIT THE BACKGROUND COLOR
Thanks to smart objects, it’s simple to change the color of the background behind the gold stripes, while preserving the layer mask and other effects. Double-click on the thumbnail of the layer containing the stripes, click OK in the resulting dialog, and in the new document window that opens, fill the layer with a different color. Close and Save the document, and the smart object layer will update with the new color.

13 OPTION: EDIT THE NUMBER OF STRIPES
To change the number of stripes in the background, double-click on the stripes smart object and in the new document window that opens, double-click on Pattern Overlay in the Layers panel. Lower the Scale amount to add more stripes (again using an even number for the Scale percentage), click OK, and Close and Save the document. The smart object layer will update and the Polar Coordinates filter will be re-applied.
14 OPTION: INVERT THE LAYER MASK
Here’s a simple option to change the look of the poster background: click on the layer mask thumbnail for the stripes layer and press Command-I (PC: Ctrl-I) to invert the mask and make the design fade in the opposite direction.

