
Re-Create a Logo in Illustrator Based on a Photo
Have you ever worked on a layout that required a specific logo but all you had was a photograph of that logo, and no matter how hard you tried you couldn’t find a nice high-res or vector version to use? In this tutorial, we’ll take you through one example of how you can re-create a logo in Illustrator based on a photo.
1 SELECT A PHOTO TO WORK FROM
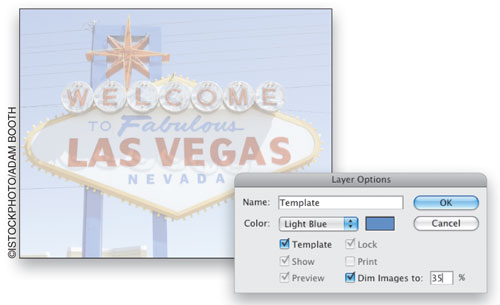
Choose File>New to create a new RGB document. Go to File>Place, locate the photo you’d like to use, turn off the Link checkbox, turn on the Template checkbox, and click Place. Once placed, you can see it has a lowered opacity. Open the Layers panel and double-click the Template layer to rename the layer and lower the Dim Images To option to 35%, and click OK. Then click the Lock icon next to the Template layer to unlock it. Choose the Selection tool (V), press-and-hold the Shift key, and drag a corner handle to resize the photo proportionally (ours is about 525 pixels wide with proportional height).
2 CREATE BASIC SIGN SHAPE
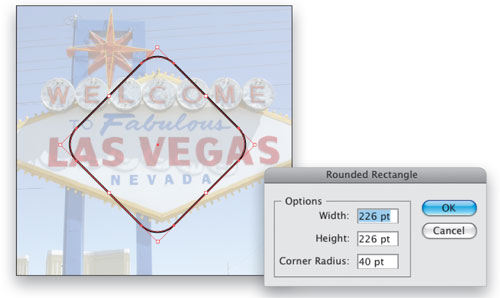
Select Layer 1 in the Layers panel and choose the Rounded Rectangle tool (nested under the Rectangle tool [M]). Click on the artboard and in the Rounded Rectangle dialog, enter appox. 226 for the Width and Height (this is the height of our sign at its current size), set the Corner Radius to 40, and click OK. (Note: These sizes are based on the current size of our template. Double-check your template to determine the right dimensions.) Use the Selection tool to reposition and rotate the shape over the sign. In the Control panel, set the Fill to None and add a 1 pt black Stroke.
3 EXTEND SIDES OF SHAPE
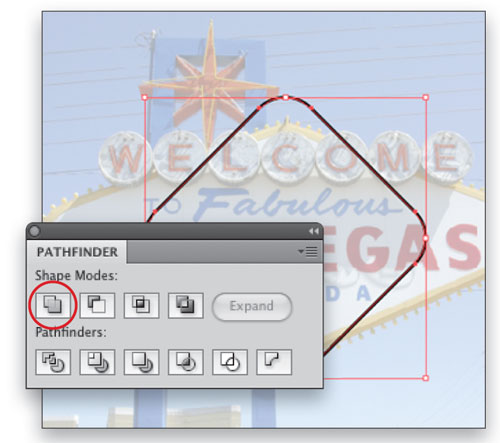
To reassign the bounding box of the rounded rectangle to the shape of the sign, open the Pathfinder panel (Window>Pathfinder) and click on the first icon under Shape Modes, Unite. Now Option-click (PC: Alt-click) on either the left or right handle and drag out to the edge of the sign. This will give us the overall shape of the sign.
4 COMPLETE SIGN SHAPE
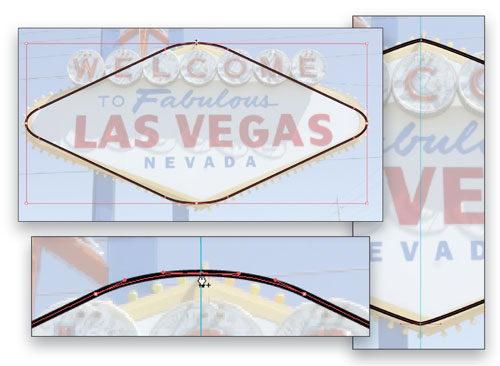
Now the sides match up but the top and bottom are more rounded than they need to be. Press Command-R (PC: Ctrl-R) to Show Rulers, then drag out a vertical guide and place it in the center of the shape. Select the Add Anchor Point tool (+) then click to add points at both places where the guide intersects the path. Then select the Delete Anchor Point tool (–) and click the points on each side of the new points. This will tighten up the top and bottom of the shape. Now drag the center control handles inward so the path conforms to the shape of the sign.
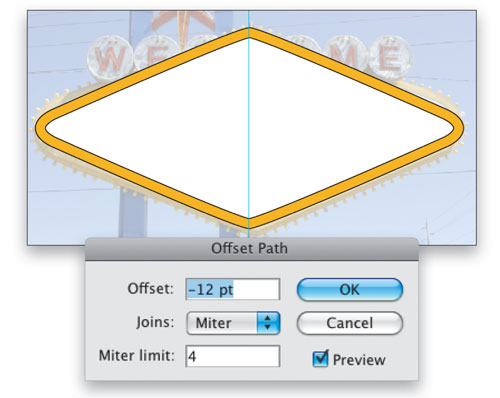
5 CREATE THE INSET BORDER
Choose Object>Path>Offset Path and in the dialog that appears, enter –12 for the Offset amount, leave the other settings alone, and click OK. As you can see, this created an inset for a border effect. With this shape still selected, go to the Control panel and set the Fill to white and make sure it has a 1 pt black Stroke. With the Selection tool, select the outer shape and give this a yellow fill (you already have the stroke).
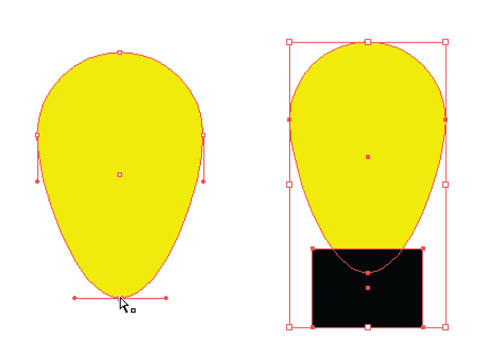
6 LET THERE BE A LIGHT BULB
Now let’s create the first of our light bulbs that surround the sign. Choose the Ellipse tool (L), press-and-hold the Shift key, draw a small circle, fill it with yellow, and set the Stroke to None. Choose the Direct Selection tool (A), select the bottom control point of the circle, and drag it down a little. Now choose the Rectangle tool (M), draw a small box over the bottom area of the bulb, fill it with black, and set the Stroke to None.
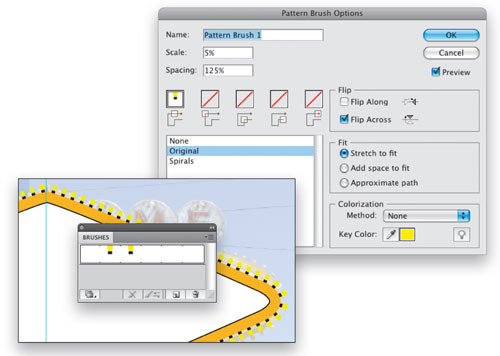
7 MAKE A PATTERN BRUSH
We want to repeat this bulb around the sign, and we’ll do that by making a pattern brush. If we make it a brush now it will center the graphic to the path, but we want it to sit on top of the path. With the Rectangle tool, draw a rectangle the same height as the bulb but very thin. Set the Fill and Stroke to None and position the top of it at the bottom center of the bulb. Select all of these shapes and open the Brushes panel (Window>Brushes). Drag the object into the Brushes panel. In the New Brush dialog that appears, choose New Pattern Brush and click OK.

8 SET THE PATTERN BRUSH OPTIONS
In the Pattern Brush Options dialog, reduce the Scale quite a bit and set the Spacing to 125%. Turn on the Flip Across setting because the position is reversed on the path, and click OK. Now just select the outer shape of the sign and click on the new pattern brush to apply it. If you need to make adjustments to the brush Scale or Spacing, double-click the brush in the Brushes panel and make the changes in the Pattern Brush Options dialog (turn on the Preview option so you can see your changes). You may delete the light bulb you created in Step 6.
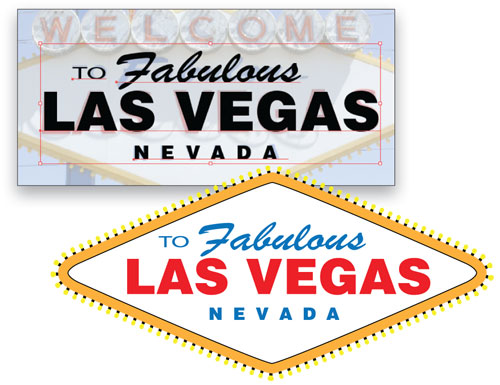
9 SET TYPE FOR SIGN
Use the Selection tool to select the sign you created and drag it out of the way so can see the Template layer. Choose the Type tool (T) and click on the first word to start setting the type. Find the closest font you have to each of the words on the sign and create a new text object for each one (our fonts are Myriad Pro Regular, Brush Script MT Italic, and Helvetica Black, respectively). Use the Character panel (Window>Character) to adjust the size and tracking. Change the color of the text, select each piece, choose Object>Group, and drag your sign onto the type.
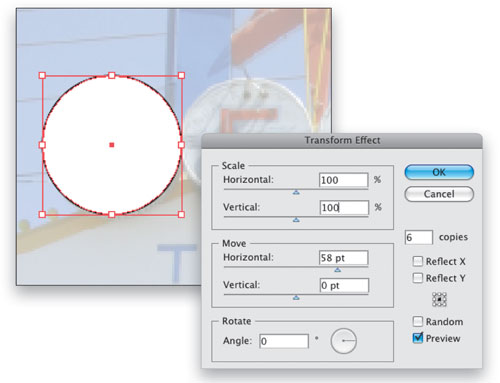
10 EVERYBODY’S WELCOME
Now let’s add the WELCOME letters above the sign. Select the Ellipse tool (L), press-and-hold the Shift key, and drag out a circle over the first circle on the Template layer. You can add the Option (PC: Alt) key to draw the circle out from the center. Press the Spacebar to reposition as you draw. Set the Fill to white and the Stroke to 1 pt black. Choose Effect>Distort & Transform>Transform, enter 6 for Copies, turn on the Preview checkbox, then drag the Move Horizontal slider to the right. You can see the shapes spacing out as you drag. Keep going until the circles are just touching end to end. Click OK.
11 ADD TEXT
Now choose the Type tool and set the word WELCOME in a font that closely resembles the original (we used a version of Helvetica). It doesn’t have to be dead on, just close enough. Line up the W in the first circle and set the font size for the text. When done, choose Type>Create Outlines to convert to shapes. Then choose Object>Ungroup.

12 POSITION INDIVIDUAL LETTERS
Shift-click the W to deselect it then press the Right Arrow key to move the rest of the word to the right until the E lines up in the second circle, then Shift-click the E to deselect it. Repeat this process for all the letters. When you’re done, just set the text color to red and hide the Template layer. We now have a logo that’s pretty close to the original. At this point you can convert all of your type to outlines and use the Direct Selection tool to alter the paths so they more closely match the original text.

13 & 14
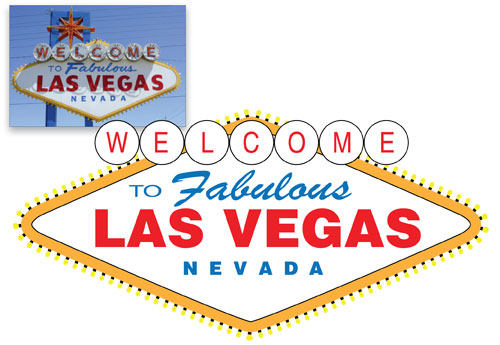
In just a matter of minutes you can re-create a logo from a photograph that closely resembles the original.
