
Although it’s not a layout tool, Photoshop does have a very powerful step-and-repeat function—if you know just a couple of tricks. Once you learn these tricks, you can create a whole series of evenly spaced objects in no time at all.
1 [ADD FIRST OBJECT ON NEW LAYER]
First, open a new (File>New) 16×12″ document at 72 ppi. Click on the Foreground color swatch in the Toolbox, choose a color for your background (in this example, R:235, G:162, B:69), and click OK. Press Option-Delete (PC: Alt-Backspace) to fill the Background layer with your new color. Click the Create A New Layer icon at the bottom of the Layers panel to add a new layer. Choose a different color and use the Rounded Rectangle tool set to Fill Pixels in the Options Bar to create your first shape. (Our shape is 2.75×2.75″ and R:69, G:39, B:19.)

2 [DUPLICATE USING FREE TRANSFORM]
Hold down Command (PC: Ctrl) and click on the rounded square layer thumbnail in the Layers panel to select it. Press Command-Option-T (PC: Ctrl-Alt-T) to activate Free Transform—with a twist: The Option (PC: Alt) key tells Free Transform to make a copy of the original. Hold down Shift and drag the copy of the square to the right as shown. Press Return (PC: Enter), but don’t deselect.
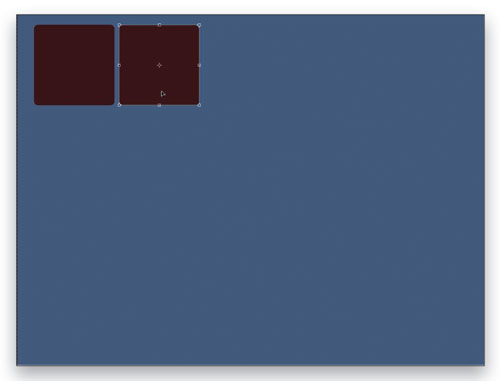
3 [MAKE EVENLY SPACED COPIES ACROSS]
Press Shift-Command-Option-T (PC: Shift-Ctrl-Alt-T) to make additional copies of the square the same distance apart. Press the same shortcut repeatedly until you get the number of copies that you require. (Because the square was selected, all the copies appear on the same layer.)
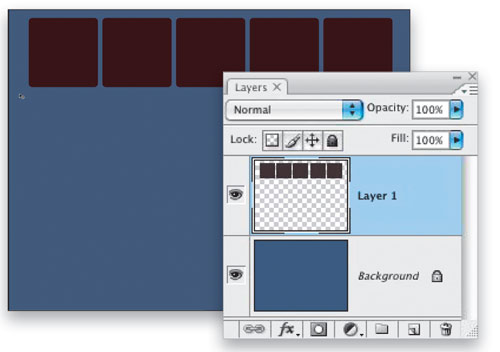
4 [MAKE EVENLY SPACED COPIES DOWN]
Hold down Command (PC: Ctrl) and click on the layer thumbnail to select all of the rounded squares on that layer. Press Command-Option-T (PC: Ctrl-Alt-T) to copy the row of squares and enter Free Transform. Hold down Shift and drag the line of squares down until they’re the appropriate distance form the first row of squares. Press Return (PC: Enter) and then press Shift-Command-Option-T (PC: Shift-Ctrl-Alt-T) to make additional copies equally spaced apart. Press Command-D (Ctrl-D) to deselect.

5 [ADD OTHER REPEATING ELEMENTS]
This technique can be used for a variety of objects. Create a new layer, switch to the Ellipse tool, choose a red color, hold the Shift key, and draw a circle at the intersection of the four top left squares. Then use the same method to make multiple copies: Select the circle, press Command-Option-T (PC: Ctrl-Alt-T), drag while holding Shift, and press Return (PC: Enter). Next, press Shift-Command-Option-T (PC: Shift-Ctrl-Alt-T) to make additional copies. After you’ve made all of your copies, drag the layer of circles below the layer of squares in the Layers panel.

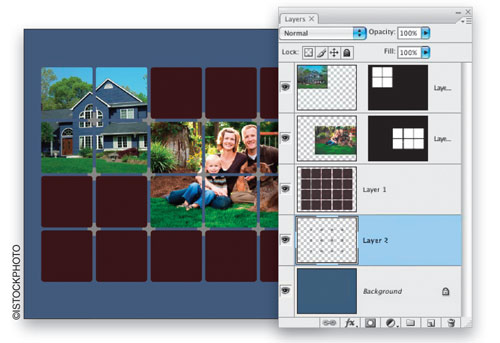
6 [ADD GRAPHICS WITH PASTE INTO]
Click on the squares layer in the Layers panel to make it active, and use the Magic Wand tool (W) to select the top-left square. Hold down Shift and click on the three surrounding squares to add them to the selection. Open a photo, press Command-A (PC: Ctrl-A) to select it, press Command-C (PC: Ctrl-C) to copy it, and then switch back to the layout document. From the Edit menu, select Paste Into—this will create a layer mask in the shape of the selected squares. Press Command-T (PC: Ctrl-T) for Free Transform to scale the pasted photo to fit. Repeat this operation to add photos to different squares.
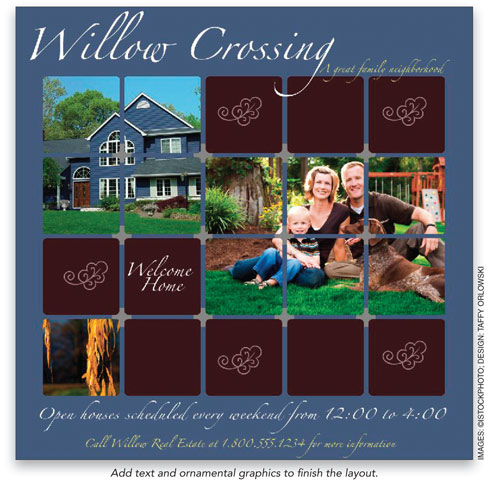
7 [ADD FINISHING TOUCHES]
Add text and graphics (in this case a map) to finish off the layout.
If you need to space objects numerically, such as spacing lines 50 pixels apart, try this: On a new layer, use the Line tool to add a line at the very top of the document (hold the Shift key to keep it horizontal). From the View menu, choose New Guide. In the New Guide dialog, click Horizontal and then enter the distance you want for the spacing between all the lines. (The dialog defaults to inches (in) but you can type “px” after the number to measure in pixels.) Click OK. Now we’ll use the same method to create and transform multiple copies.
1. Hold down Command (PC: Ctrl) and click on the layer thumbnail to select the line.
2. Press Command-Option-T (PC: Ctrl-Alt-T) to activate Free Transform (with a copy).
3. Holding Shift, drag the line until it snaps to the guide (make sure View>Snap is turned on).
4. Press Return (PC: Enter) and then Shift-Command-Option-T (PC: Shift-Ctrl-Alt-T) to make additional lines spaced 50 pixels apart.
All photos by Dave Cross unless otherwise noted
