One-Flash Environmental Portrait

BEHIND THE SCENES: We’re backstage at a classic old theater and the dressing rooms are to my left (this place just might be ready for a makeover, eh? But honestly, that’s what drew me to doing a backstage shoot here—it’s got “character”). I’m using my go-to lighting setup, which I talked about earlier in this chapter (the Impact QuikBox). I’m using a very-wide-angle lens, and I’m getting the camera really low to the ground to get a low perspective. To have the shot stay in focus, I hold the camera up to my eye, press the shutter button halfway down to lock the focus, then I lower the camera straight down to ground level while still holding the shutter button, and I take the shot (hey, it beats lying down on the dirty floor). It takes a little trial-and-error using this method, but again, it beats lying on the floor. Also, it’s not as bright backstage as this image makes it appear—I brightened this behind-the-scenes shot, so you could clearly see the setup.
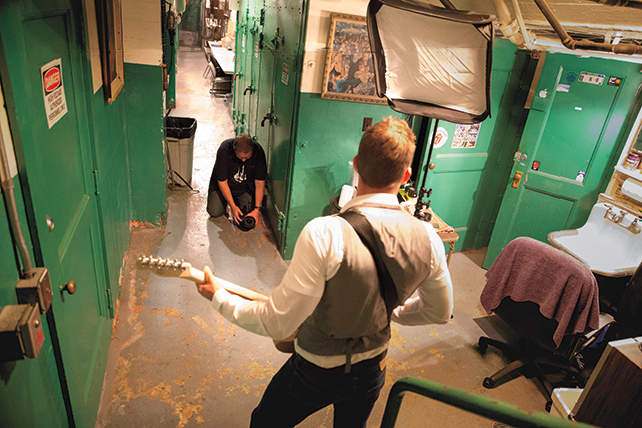
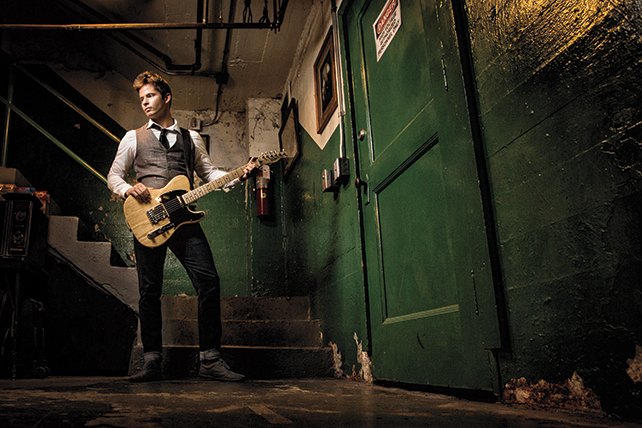
CAMERA SETTINGS: I’m using a super-wide-angle 16–35mm lens on a full-frame camera body with my f-stop at f/3.5. It was pretty dark down there (lit only by some dim factory lamps from above), so I had to crank up the ISO to 400. For an environmental portrait like this, it’s really important to see the environment, so I had to lower the shutter speed from my normal 1/125 of a second down to 1/60 of a second to let more of the room light into the shot. The final image (facing page) was actually taken at 16mm, so it was wider than what you see here. I cropped it in tighter, so you could see the musician better.

THOUGHT PROCESS: Environmental portraits aren’t just about the subject, they’re about the subject in that particular setting (maybe it’s taken where they work, like a guitar player backstage, or in their home, or art studio, etc.). The surroundings tell a story about the subject. For portraits where I want to see a lot of the surroundings like this, I generally use a wide-angle lens (usually either a 24–70mm or, in this case, my widest lens, a 16–35mm). While I love how the wide-angle lens takes in a lot more of the environment, there are three things to remember: (1) Be careful about stretching your subject wide. If you get your subject close to the left or right edges of your frame, it will distort and stretch their body, generally making them look heavier, which will definitely not make you any friends. (2) Know that shooting anyone up close with a wide-angle lens isn’t generally going to give you as flattering a look for your subject as zooming in tight with a long lens because you lose that flattering lens compression. That’s why I made sure I wasn’t up close when I was shooting this wide—look how far my subject is from me in the frame (and I already cropped it in a bit). And, (3) even if you’re at f/3.5 like this, when you shoot with a wide-angle, everything will pretty much be in focus in the background.
POST-PROCESSING: In Lightroom’s Develop module (or Camera Raw), I increased the Contrast amount by 1/3, added a little bit of Clarity (around 10%), and darkened the edges all the way around by going under Post Crop Vignetting in the Effects panel and dragging the Amount slider to –22. Lastly, I applied the Nik Color Efex Pro plug-in’s Tonal Contrast filter. That’s it. Here’s the final image.
For more awesome Photo Recipes like this one, check out Scott Kelby’s The Digital Photography Book, Part 5: Photo Recipes. For even more great photography instruction, pre-order your copy of The Best of The Digital Photography Book Series!