
On Location Photography Tips for in the Studio
Studio Techniques: Inspiration Can Be in Little Things
Many folks think that location shoots are always expensive—for example, hard-to-reach locations or locations that aren’t available for the everyday photographer. But, to be honest, most locations I shoot are normally available to the public.
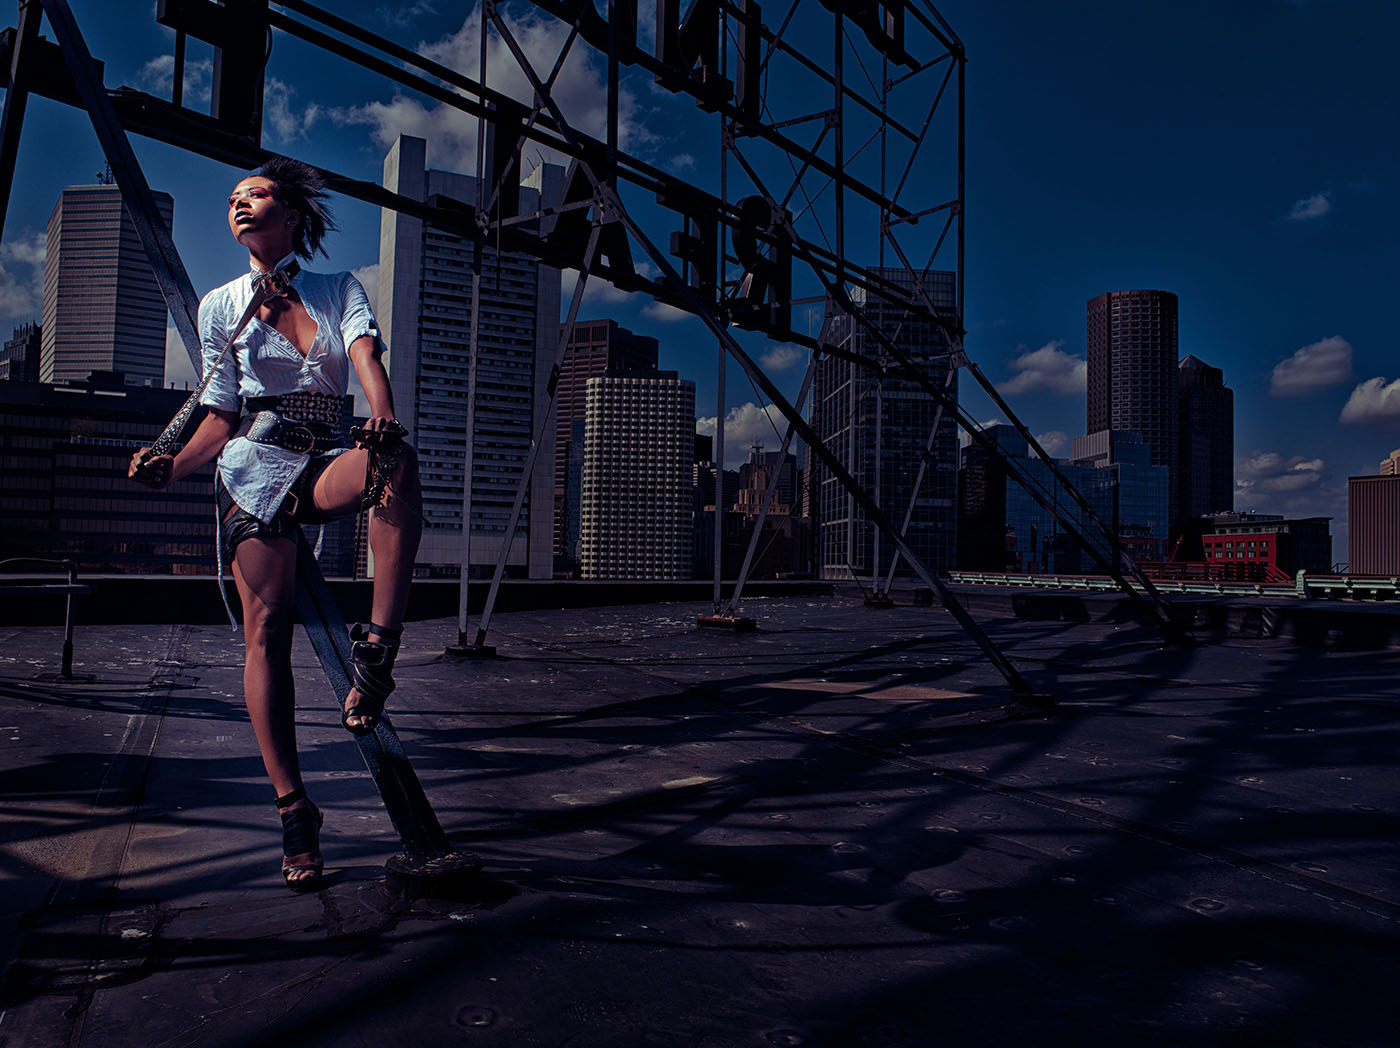
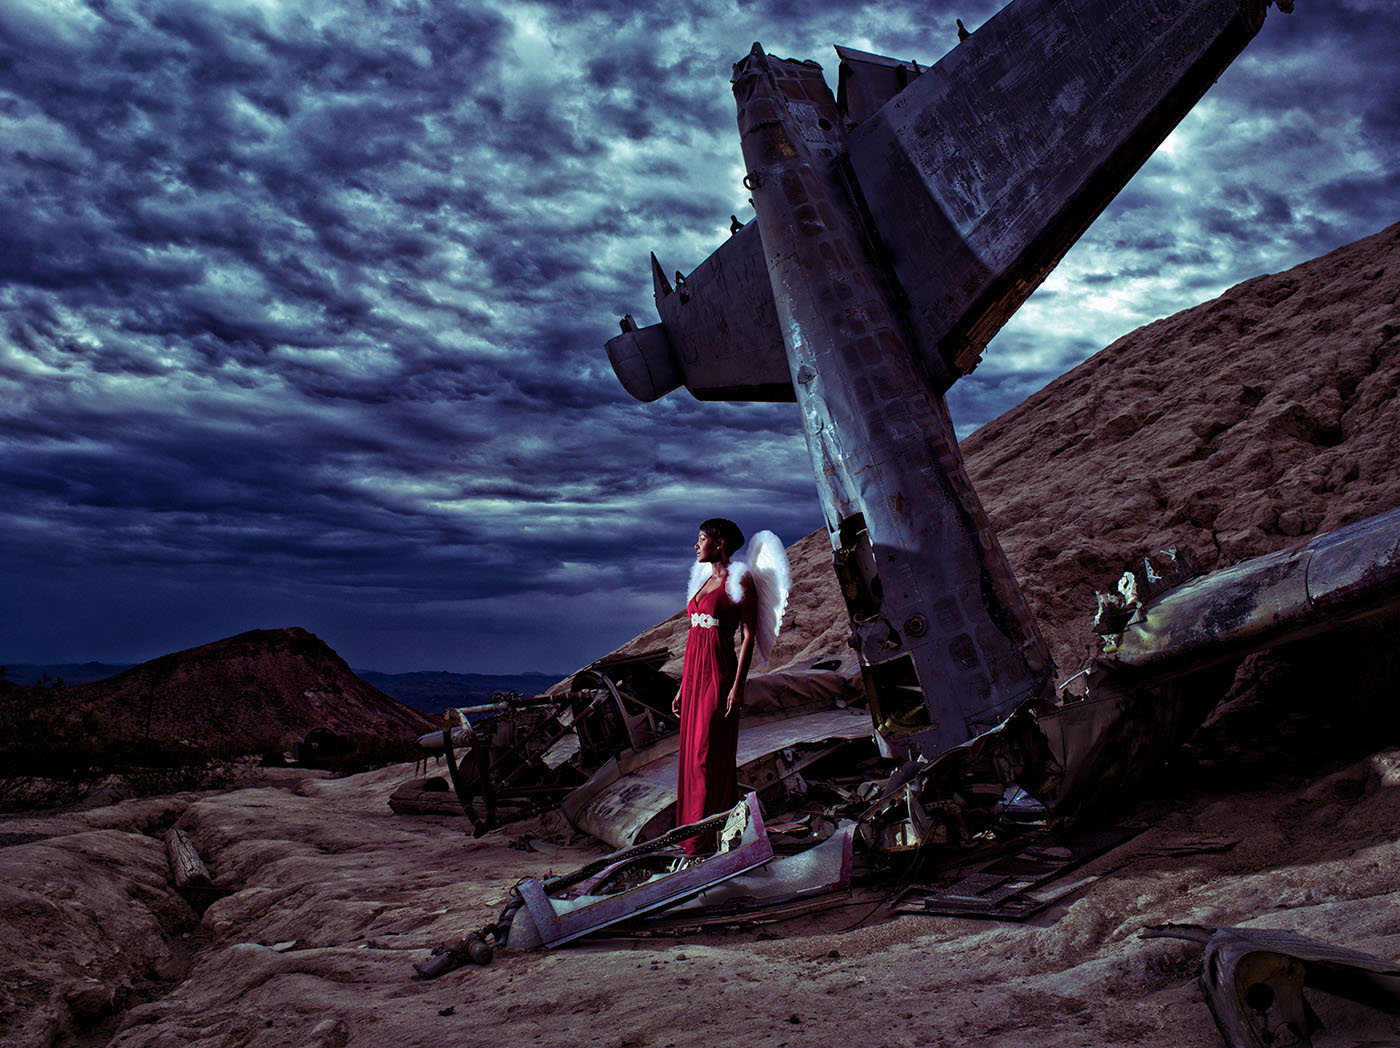
Since I’m mostly teaching workshops, location costs always have to be kept low; otherwise, we’d have to charge a ton of money for the workshops just to pay for the location. For example, the following images were shot during workshops I taught last year in Nevada and Boston, respectively. Both are standard, available locations.
This image was shot at a small town called Nelson, Nevada. The cost for shooting in that desert town is quite reasonable and there are many nice locations. I used an Elinchrom Ranger RX Speed with an A head and a standard reflector with grid. (I love working with grid light modifiers because they give you an incredible option to pinpoint your light just where you want it.) To get a shot like this, you first meter the sky and then adjust your strobes to the “darkness” you want the sky to be. For example, when you meter the clouds and set your strobes 2–2.5 stops higher, you’ll get a beautiful dark sky and produce a real moody image.
Tips: Meter the sky with a reflective meter and the model with an incident meter. You can find meters, such as the Sekonic L-558 and L-758, that feature both a spot meter and incident meter. For meters such as the Sekonic L-358, you can buy a simple attachment to give you a spot meter; however, for the price of these two items, you can almost buy the L-758.
Frank Doorhoff
This second image was shot atop an office building in Boston, Massachusetts—also a cheap location; in fact, it was free. For this image I used the Elinchrom Ranger with a Maxi Lite. Maxi Lites give you a lot of power (saving batteries), plus the quality of light is something I really like. Also, for this image, I first metered the sky with the reflective meter and added approximately 1–2 stops on the strobes to lower the brightness of the sky. The cool thing about this technique is that it makes your model “pop” and also gives you great saturation in the sky—the blues will be much deeper. This is easy to explain: When you remove brightness from a color, it becomes more saturated. This effect can also be seen when you use hard light to shoot a model: The image contrast will increase and, because of the light fall-off, the clothing colors will get a bit more contrast and less brightness, thus making the colors pop more.
Let’s change the scenario and say that you don’t have an outside location: You only have the studio or your home. No problem at all.
A Studio For the Future
Frank Doorhoff
When some photographers think about studios, they see large spaces with paper rolls or canvas as backgrounds. When you’re smart—and, of course, you are—it’s a much better idea to add themed walls to your studio. In our studio, we have several themed walls as well as walls that can be moved around. These are, in fact, just wooden constructions with two wallpapered sides that we can use solo or connect together.
No wall goes unused in our studio, which is a cool way to work. Over the years we’ve created several themes that can be used for different photo shoots, and the costs are relatively low. You can do it yourself or you can hire a painter. For me, it was much wiser to hire someone because I’d probably destroy the studio or light the whole thing on fire.
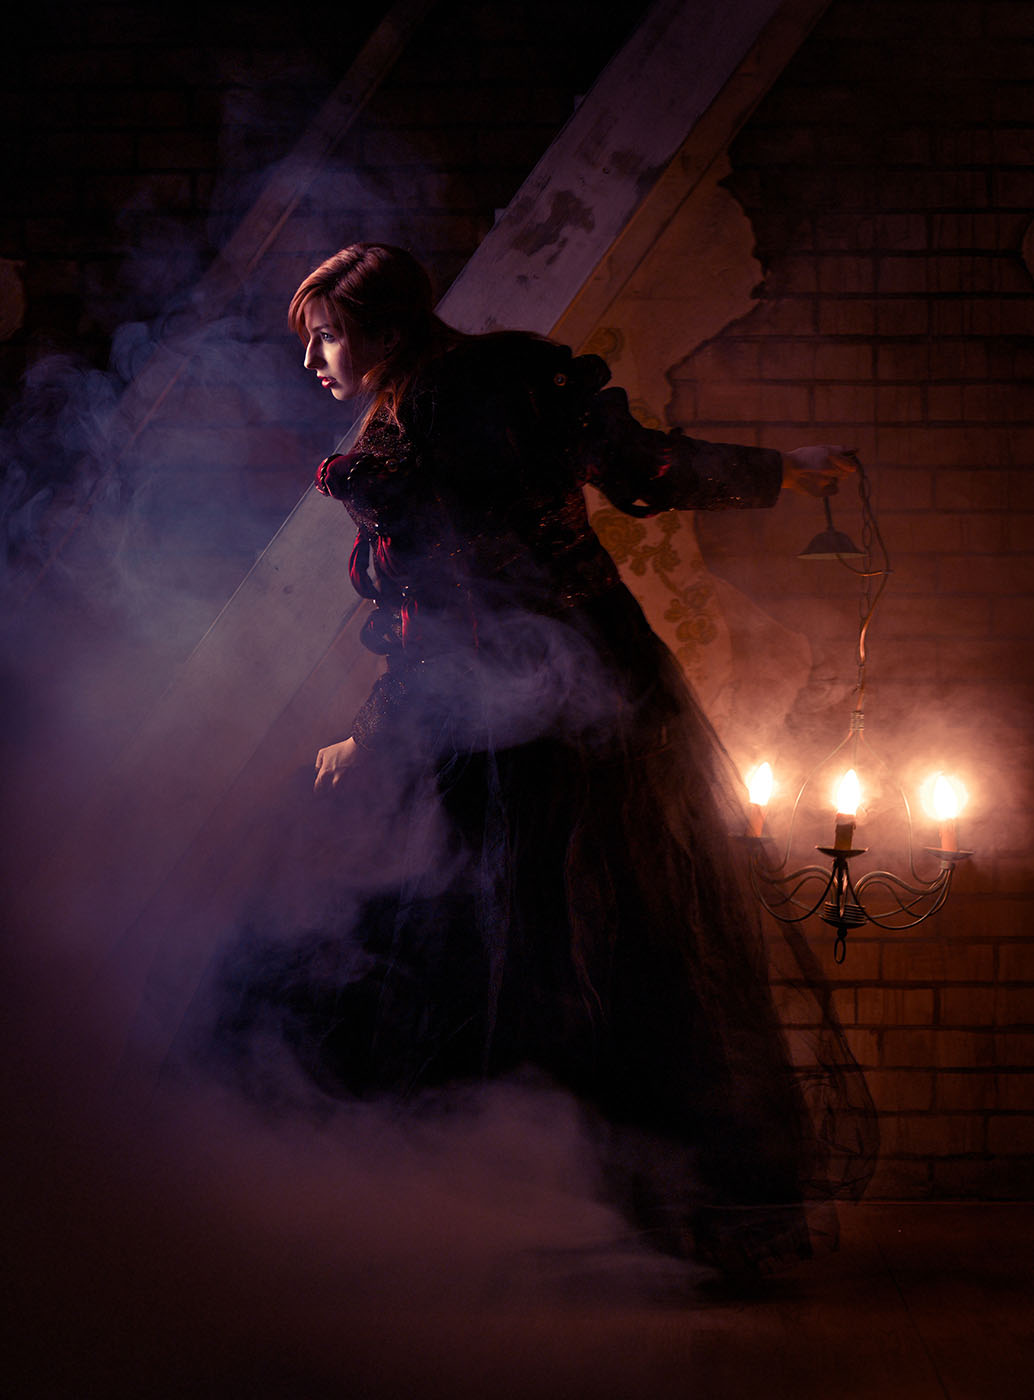
One of the themes we created is where the stairs lead to the second level of the studio. I’ve mentioned this in previous articles but here’s how we recently redid the whole scene to make it a bit grungier.
This image was shot with one strip light and one large softbox. The strip light was used to light our model from the side (left in the image), and the large softbox was located around my position and functioned as a huge fill light. I use this technique a lot when I want a really moody image; however, when using only the main light, I know that I’ll lose too much information on the rest of the set. By metering the fill light approximately 3.5–4 stops below the main light, it will register, but not destroy too much of the mood. The available light determines the mood of the rest of the set, but when you use too much fill, you can destroy that mood very easily. Many photographers use too much light; they’re afraid of the shadows. For me, shadows are the soul of a shot, so I always want them in my images.
For this image, we also used an old chandelier that I got from my parents a few years ago. It has standard light bulbs but with high light output. To make sure that the lights register, you’ll have to plan ahead, and probably use a tripod.
More Light Sources
The first thing you’ll realize is that your strobes will win out easily against the light bulbs. It’s a good idea to set the strobes as low as possible so you can keep the shutter speeds reasonable (and your model won’t turn blue from holding her breath). In the studio we normally shoot at 1/125, the so-called X-sync, and the biggest limitation of most DSLR cameras. (If you go higher, you’ll be rewarded with a nice black bar on your image as the shutter curtain closes.) For this kind of shot, we shoot at a much lower shutter speed.
The strobe will freeze the model. After this, we leave the shutter open for a determined amount of time to let in the available light from the light bulbs. How long is up to you. Some photographers want them to burn in and create an aura; some want them to just register—there’s no right or wrong. As for me, I like it to burn in just a little bit more.
Frank Doorhoff
The Magic Ingredient
As you’ll see with the previous image and the one below, there’s one ingredient in a shoot that can really make a difference: smoke. (Don’t stress out: A smoke machine isn’t expensive. You can get one similar to ours for about $50, and some are even cheaper.) I think a smoke machine (and a wind machine) should be in every studio, and when you can, always take it with you on location, especially in old abandoned houses where it can really create a stunning atmosphere. Also notice that there’s a color difference between the light bulbs and the strobe. I didn’t correct this because I loved the effect it gave.
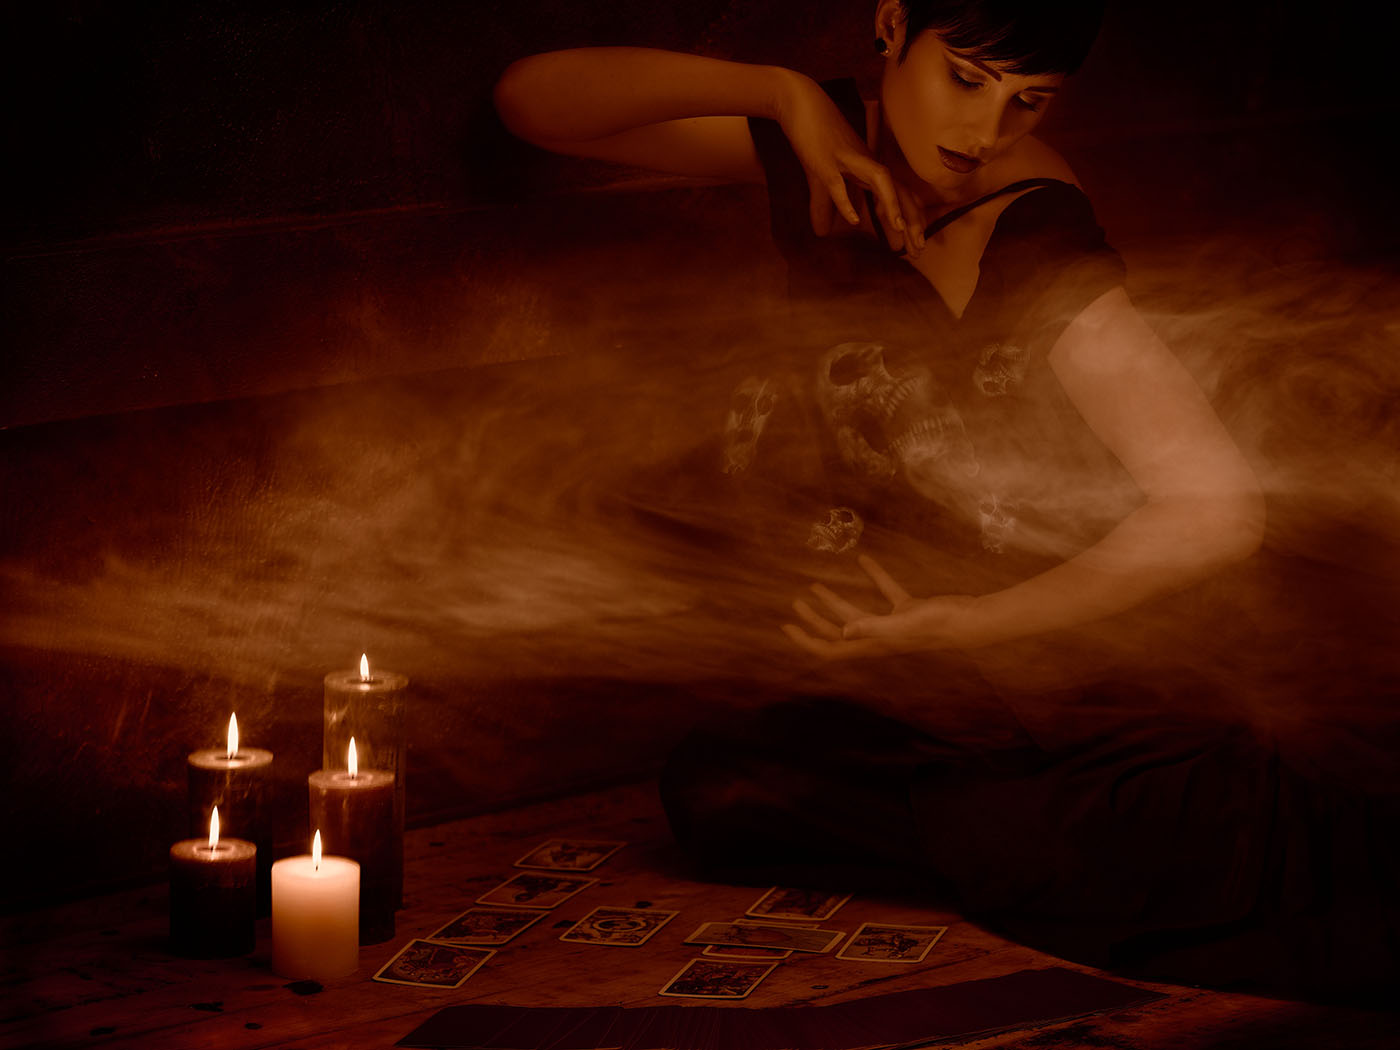
In this image, I used candles as the main light source, or so it seems. The reality is that you’re looking at two strobes and candles; but the strobes are the main light. I wanted a really warm tint (like candles), and I later enhanced the tint in Photoshop to make it even warmer.
First, you should know that every light source has a color temperature, indicated in Kelvin values. For example, a tungsten light bulb has a low color temperature of let’s say 2500–2800° K, which means the light is rather reddish. Outside, we have color temperatures of around 5500–6500° K, which is rather white; however, in the shade, the light is much cooler and runs into the more bluish side of the spectrum.
Frank Doorhoff
Of course, when we mix light sources, we’ll have different color temperatures and, although sometimes this can be cool (no pun intended), in most cases this isn’t so nice to look at. Luckily, you can use gels that you place in front of your strobes to change the strobe’s color temperature. This way, you can mix together different light sources without disturbing color differences in the image. In this candle image, I used two strobes with an amber-colored gel to lower the color temperature to a warm tint that you’d expect from candles. (Again, this was later enhanced in Photoshop.)
The metering of this scene was rather simple, but the light placement was not. Candles don’t radiate down, but mostly to the side and up, so it made no sense to place a strobe aimed down at the model. Because the model is seated on the floor, I had to place a strobe close to the floor, aimed toward the ceiling, which provided a convincing “candle” look. Our model is wearing a very dark dress and to show this, I added one extra strobe aimed at the ceiling to raise the ambient light in the studio. I metered the darkest part of her dress with a reflective meter set at 4.3 stops below the main light settings, which showed some hints of detail in the dress without taking away the illusion of the candlelight. To complete the magic, we used some smoke, and later added some figures in the smoke using Photoshop.
As you can see, you can create good images without a huge set and expensive clothing, props, etc., to tell a story. Knowing how to use lighting, you can create interesting scenes that will draw the viewer in.
Keep following Frank’s articles for more on this topic. Here’ s another tutorial by Frank on Studio Techniques. Frank is all about getting it right in camera, but if you are looking for some Photoshop tutorials, try this one on creating logos by Felix Nelson.
