I think one of the most brilliant things about Adobe Photoshop Lightroom is how the entire program is built around the idea of automation. Now it might not seem like it at first, but just under the hood, there’s enough automation features to make even Photoshop blush. But what’s really amazing is the seamless link from Lightroom to Photoshop; you can control much of the automation in Photoshop directly from inside of Lightroom. Once you see what these two can do together, you’ll be working at speeds and levels of efficiency you’ve only dreamed of. (If you like this tutorial, don’t forget to check out my brand-new book, The Adobe Photoshop Lightroom Book for Digital Photographers, which contains step-by-step tutorials just like this one here—there’s just a whole lot more!)
Email Client Proofs in One Click
STEP 1 Export Image
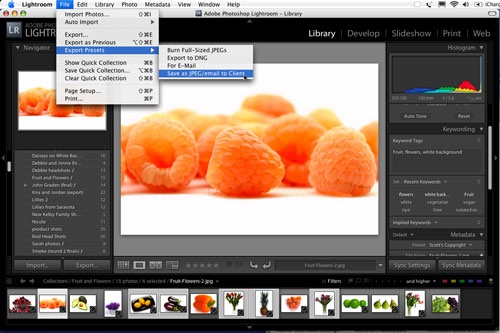
We’re going to start by setting up a simple automation that will allow us to email client proofs directly from within Lightroom. Once you have this set up, the only real input from you to email photos will be to enter your client’s email address. Then, we’ll take it up a notch and show you a technique for adding some Photoshop automation to Lightroom. To create the automation for emailing clients, start the process by clicking on any photo (it really doesn’t matter which photo at this point), then go under the File menu in Lightroom and choose Export.
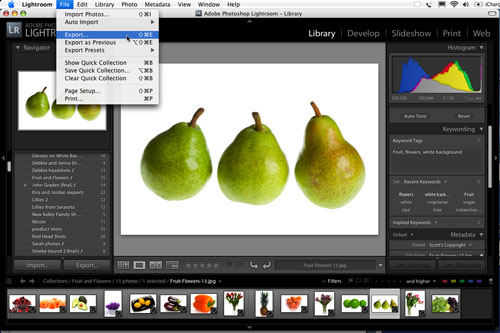
PHOTO CREDIT—©ISTOCKPHOTO
STEP 2 Go to Export Actions Folder
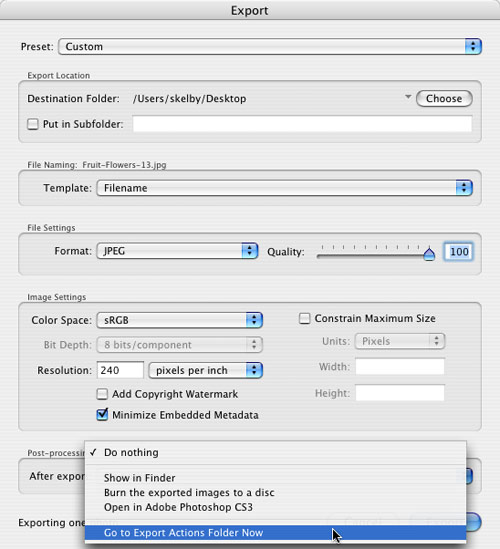
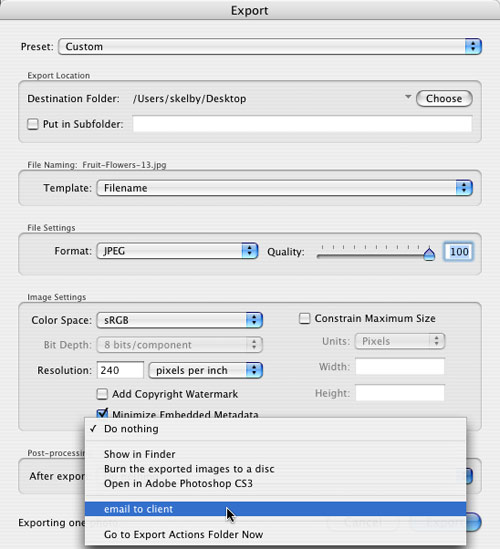
When the Export dialog appears, go down to the bottom of the dialog, to the Post-processing section, and from the After Export pop-up menu, choose Go to Export Actions Folder Now. This is a folder on your computer that lets you customize what happens immediately after you’ve exported photos from Lightroom. The default is Do Nothing. That’s not a super-productive choice (if you get my drift).
STEP 3 The Export Actions Folder
This brings up a set of folders hidden deep within your computer (that’s why Adobe gives you this shortcut to finding this folder, or you’d spend the day fishing around inside folder after folder). The Export Actions folder will already be highlighted. Anything you add to this folder will be added to the After Export pop-up menu that you just used in the last step.

STEP 4 Create Alias for Email Application
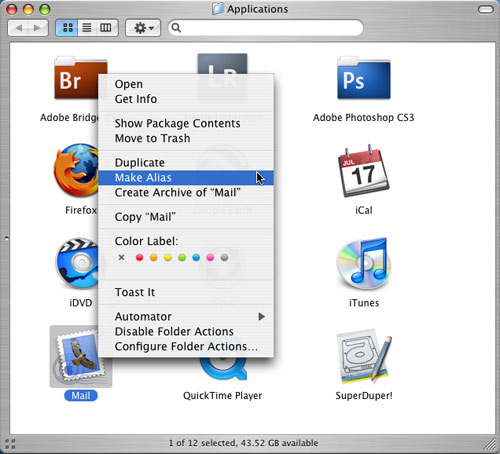
Go to your Applications (PC: Program Files) folder and Control-click (PC: Right-click) on your email application. From the contextual menu that appears, choose Make Alias if you’re using a Mac, or Create Shortcut if you’re using a PC. This creates a file that acts as a pointer back to the original application.
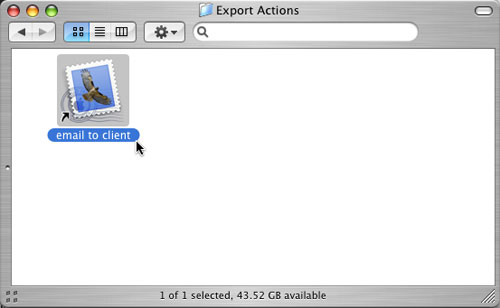
STEP 5 Move Alias to Export Actions Folder
Take that alias (or shortcut) file and drag-and-drop it into that Export Actions folder you had highlighted just a moment ago. Then, open that folder and rename your alias (or shortcut) with the name you want to appear in the After Export pop-up menu. (In this case, we named ours “email to client.”) Now you can close the Export Actions folder.
STEP 6 Refresh Export Dialog
Now go back to Lightroom. Your Export dialog should still be open onscreen. Click the Cancel button, and then reopen this same Export dialog by pressing Command-Shift-E (PC: Ctrl-Shift-E). By doing this, you’re refreshing the After Export pop-up menu, and if you look now, you’ll see a new After Export option: email to client.
STEP 7 Enter Custom Settings
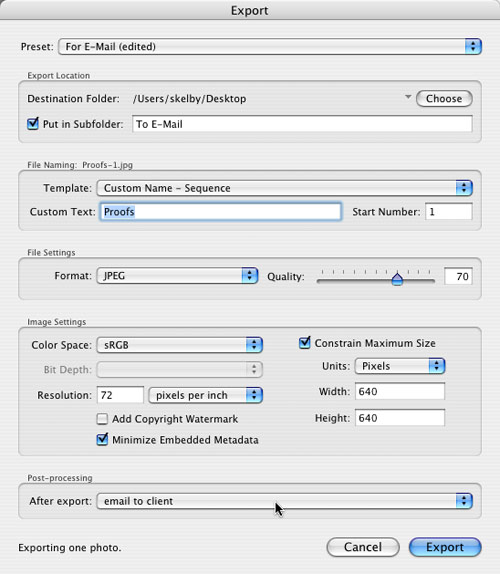
Adobe created an email preset that’s a great starting place for creating your own preset. From the Preset pop-up menu at the top of the Export dialog, choose For E-Mail, and all the email settings appear. Then, choose which folder you want the exported photos to appear in, and below that you can rename them as they’re exported. You can also choose the JPEG quality, color space (leave it at sRGB for email), and you can constrain the file to any width and height you like. Lastly, from the After Export pop-up menu, choose Email to Client.
STEP 8 Save Custom Preset
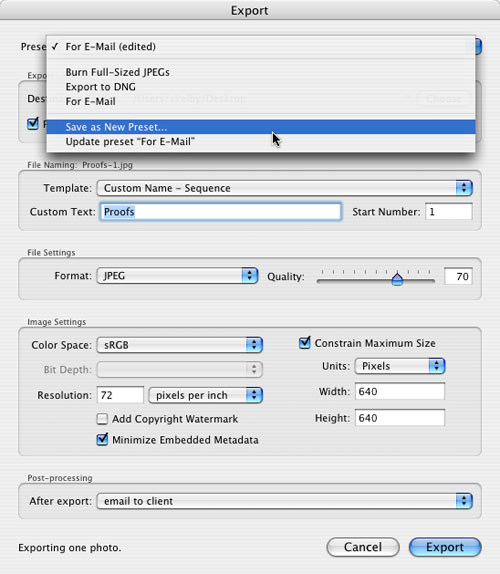
Now that your custom settings are in place, save them as a preset. That way, you don’t have to come to this Export dialog for emailing photos, as this will now all be just one click away. To save these settings as a preset, go to the Preset pop-up menu and choose Save as New Preset. Give your preset a descriptive name (we chose “Save as JPEG/email to Client”), click Create, and then click Cancel in the Export dialog. (It’s okay—your preset is saved. We don’t really want to export this random photo—it was just for testing purposes.)
STEP 9 Select Photos to Email; Choose Preset
When you have some photos in a collection you want to email to a client for proofing, just select the photos either in the grid or in the filmstrip along the bottom of Lightroom. (To select the photos, click on one photo, then Command-click [PC: Ctrl-click] on the rest you want to email.) Once they’re selected, go under the File menu, under Export Presets, and choose Save as JPEG/email to Client (or the name you chose for your preset).
STEP 10 Type in Your Client’s Email Address
Lightroom will now export your selected photos as JPEGs using the size and quality settings you saved in your preset, and then your email application will automatically launch and those photos will already be attached to your email (as shown here). All you have to do is type in your client’s email address. And that will be the process from now on—just these last two steps. Now that you’ve seen what Export Actions can do, let’s get Photoshop involved and really turn up the productivity.
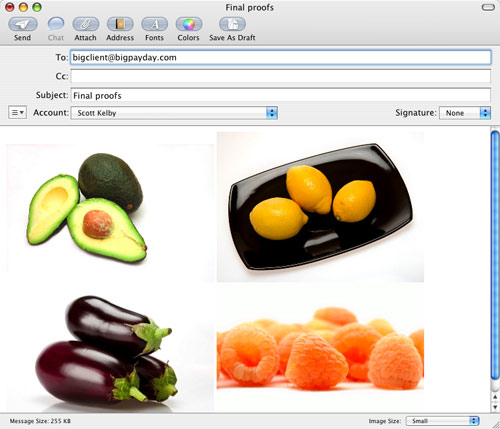
PHOTO CREDIT—©ISTOCKPHOTO
Access Unsharp Mask from Lightroom
STEP 1 Create New Action in Photoshop
With an image open in Photoshop, go under the Window menu and choose Actions to bring up the Actions palette (this is a recorder that records your steps—really great for repetitive tasks). Choose New Action from the Action palette’s flyout menu on the top-right corner of the palette to bring up the New Action dialog. Give your action a name. (In this case, we’re going to create an action that applies a good stiff level of sharpening to our photos using the Unsharp Mask filter, so we named our action “Unsharp Mask.”) Now hit the Record button.

PHOTO CREDIT—©ISTOCKPHOTO
STEP 2 Record Action for Unsharp Mask
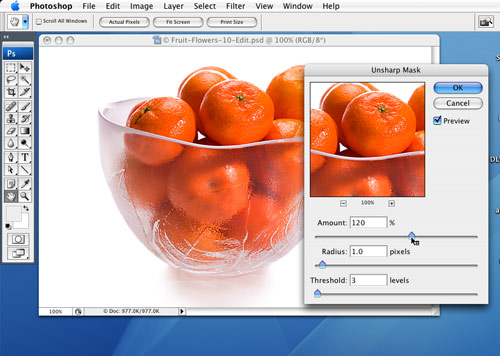
Go under the Filter menu, under Sharpen, and choose Unsharp Mask. When the Unsharp Mask dialog appears, for Amount enter 120%, for Radius enter 1.0 pixels, and for Threshold enter 3 levels (as seen above). Click OK to apply this sharpening to your photo. Then, go under the File menu, choose Save, and then close the document. Go back to the Actions palette (which has been recording all your steps), and click on the square Stop Recording icon at the bottom of the palette.
STEP 3 Create a Droplet from the New Action
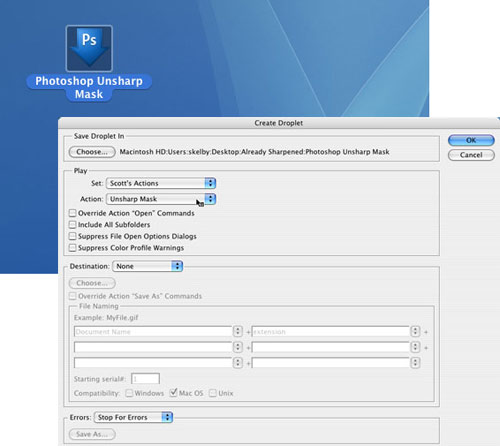
Go under the File menu, under Automate, and choose Create Droplet. In the dialog, choose your action in the second pop-up menu. Click the Choose button to select a destination for your droplet and to name it (we named ours “Photoshop Unsharp Mask” and chose to save it to our Desktop). Click OK and a separate file is created. If you drag-and-drop a file onto this droplet, it would automatically launch Photoshop and run that action, applying the Unsharp Mask filter, then saving and closing the document. Do you see where this is going? I thought so!
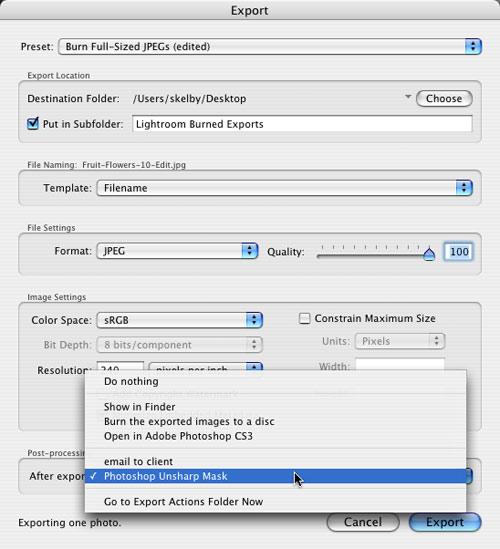
STEP 4 Create Custom Sharpening Preset in Lightroom
Move this droplet into the Export Actions folder. Then, go back to the Export dialog in Lightroom. You’ll see a new After Export choice: Photoshop Unsharp Mask. When you select this option, each exported photo will be opened, sharpened, saved, and closed. Save a new preset with this option so that anytime you need to sharpen photos that you’re exporting, you can select it from the File menu, under Export Presets. This is just the tip of the iceberg, but at least now you can start adding a new level of automation to your work in Lightroom and Photoshop.