
Adobe InDesign was the first major application to take full advantage of OpenType fonts, a superset of the existing TrueType (yes, I said a bad word) and Adobe PostScript Type 1 font formats. OpenType fonts provide improved cross-platform document portability, rich linguistic support, powerful typographic capabilities, and simplified font-management requirements.
STEP 1 Which OpenType Fonts Do You Have?
When you installed InDesign or the Creative Suite, you also installed some OpenType fonts; however, how do you know which fonts are OpenType? You can check it out in InDesign’s Type>Font menu. Since InDesign CS2, it actually shows you a sample of the fonts and better yet, it shows you the type of font that it is before you use it.
Note: If your font list doesn’t show type samples (as shown), press Command-K (Ctrl-K) to open the InDesign Preferences and under Type, check the Font Preview Size box, and click OK.

STEP 2 Create New Text Frame
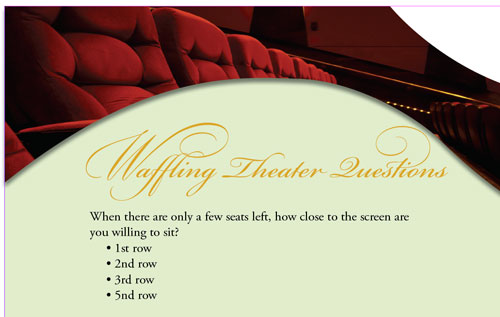
Use the Type tool (T) and create a new text frame in a document. I’m going to use Bickham Script Pro for this first example. Why? Because it’s my favorite script font and it has some really nice characters. For this illustration, we’ll type “Waffling Theater Questions.” It doesn’t really matter what we type; however with this phrase, we’ll have some nice characters to work with.

Theater chairs: ©ISTOCKPHOTO/HAL BERGMAN
Film reel illustration: ©ISTOCKPHOTO/ART12321
Theater usher: ©ISTOCKPHOTO/JOSHUA BLAKE
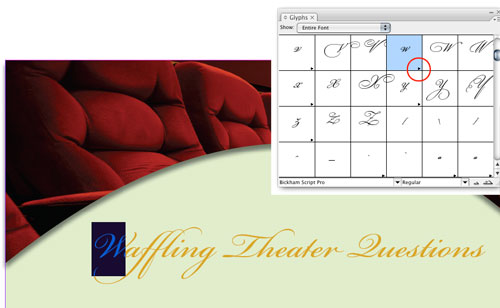
STEP 3 Alternate Characters
Let’s play with some alternate characters: First, highlight the letter “W” with the Type tool and go under the Type menu and choose Glyphs. By default, the Glyphs panel will show you the entire font, highlighting the character that you’ve selected. If you see a little arrow in the lower-right corner of the character in the Glyphs panel, then that means you have additional glyphs available for that character.
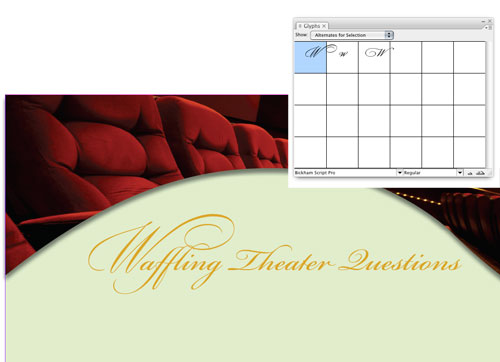
STEP 4 Switch to the Alternates View
Although we could use the little flyout of alternate glyphs for each character we highlight, it’s much easier to use the Alternates for Selection view. So in the Show pop-up menu, choose Alternates for Selection and you’ll see the alternate Ws for this font. Double-click on one of them to test it out. Then, try out alternate glyphs for some of the other characters in your text.
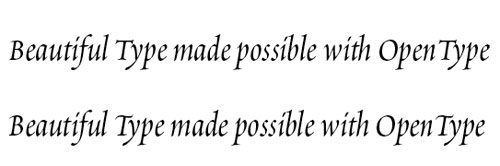
STEP 5 Use Stylistic Sets
Sometimes it’s hard to figure out which alternate characters you want to use. No problem, because some fonts have Stylistic Sets. For this example, we’ll use Poetica Std to type “Beautiful Type made Possible with OpenType” (top example). Highlight the text, bring up the OpenType flyout menu and choose Set 1 from your Stylistic Sets submenu. You’ll notice that the capital letters changed to different glyphs (bottom). Choose Undo from the Edit menu and try other sets.
You can also use your Glyphs panel to preview a set before you use it. Just choose the different sets from the Show pop-up menu.
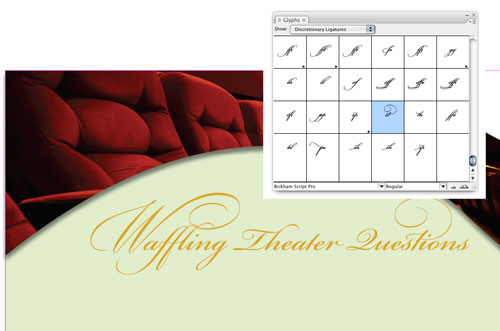
STEP 6 Discretionary Ligatures
Next, let’s take a look at Discretionary Ligatures. Highlight the “st” in Questions and switch to Discretionary Ligatures in the Show pop-up menu. You should see some really nice “st” ligatures, so double-click on one to choose it.
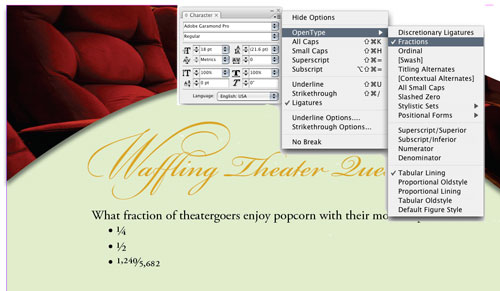
STEP 7 Real Fractions
Another OpenType advantage is “real” fractions. Since the dawn of computers, we’ve always typed one half as 1/2; however, in typography it should look like the 1 is higher than the 2 and above the slash. Typically, this would take some kerning and baseline shifting, or a special fractions font, to get this look. Now with OpenType, you can just turn on those fractions. Create a new text frame with the Type tool and type some fractions manually in Adobe Garamond Pro.

STEP 8 Use the OpenType Menu
There are a couple of places to pop up the OpenType menu: You can either do it from the Control panel flyout menu or the Character panel flyout menu. Highlight your fraction(s), then once you have the OpenType menu open, choose Fractions. This will turn your numbers and slashes into real fractions without the need for any extra work on your part.
STEP 9 What about Ordinals?
Once again, we’re all used to settling for ordinary-looking ordinals such as 2nd, 3rd, 4th, etc. In the typography world, we want those ordinals to be superscripted. Don’t worry: OpenType has your back! Create a new frame and type some ordinals like the ones shown. (Now I know that “5nd” isn’t a legitimate ordinal, but I did that on purpose.)
STEP 10 Turn on Ordinals
Highlight the ordinals you typed and choose Ordinal from the OpenType flyout menu from the Character panel or Control panel. Notice that only the legitimate ordinals converted and “5nd” didn’t. Type some additional ordinals onto the end of this selection and they’ll convert on the fly as you type.
Now go out and enjoy the power of OpenType. And keep in mind that you’ll also find OpenType support in Adobe Photoshop CS3 and Adobe Illustrator CS3, so the things that you just learned here will also work across the Creative Suite.

