Secrets of the Masters—Part 2
Excerpted from chapter 1 of Captured by the Light: The Essential Guide to Creating Extraordinary Wedding Photography by David Ziser
Now that digital cameras are so readily available, and more people want to try to make a few extra bucks shooting weddings, we’ve actually had a watering down of decent lighting techniques in wedding photography. Yet, it is interesting to note that these days, particularly when looking at so many blogs, Flickr groups, and mainstream photography magazines, there has been a resurgence of interest in the importance of quality lighting, portrait or otherwise. Decent lighting was quickly becoming a lost art, but has been resurrected by a few talented photographers and bloggers like David Hobby at Strobist.com. David has an entire blog dedicated to using small flashes to create a direction of light on a subject.
When it comes to wedding photography, I keep my lighting pretty darn simple. The classic portrait painters had it figured out hundreds of years ago—they’d put their subject next to a window or take them outdoors and paint away. The result always showed a beautiful direction of light. All we have to do is take what we learned from them and apply it to wedding photography. Let me show you how:
The Five Lighting Secrets
There are five basic classical lighting patterns with which to illuminate your subject(s): (1) butterfly lighting, (2) loop lighting, (3) Rembrandt lighting, (4) split lighting, and (5) rim/accent lighting. With the images here (all with the full-face view I described earlier), I’ll show you how the directional light relates to the facial axis in creating each of these five lighting patterns.
Butterfly Lighting
In the butterfly lighting pattern, we have the light directly in front of and above the subject (Figure 1a). It casts a little butterfly shadow under the subject’s nose (see Figure 1b).
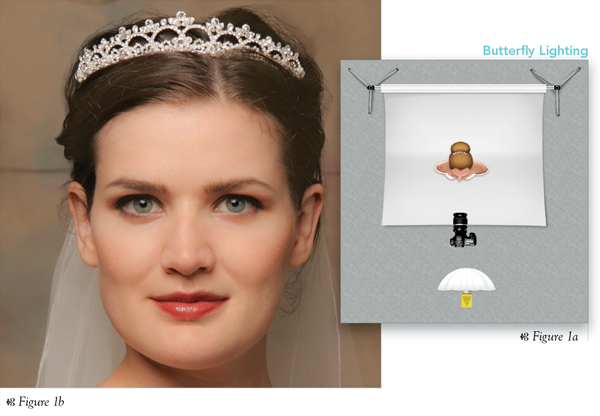
Butterfly lighting is a lighting pattern that’s been used by fashion photographers for years. Although flattering on fashion models, it adds weight to the subject because the full facial plane is illuminated. Of course, fashion photographers are generally working with very slender subjects. We wedding photographers deal with a much wider range of body sizes and shapes. That’s why I don’t think that butterfly lighting is the best lighting for most brides, grooms, wedding parties, and families. The unfortunate truth these days is that photographers who choose to bounce a flash directly off the ceiling above the subject, or use the various fill cards available, are basically creating this butterfly lighting pattern on their subjects, and many times, not very well.
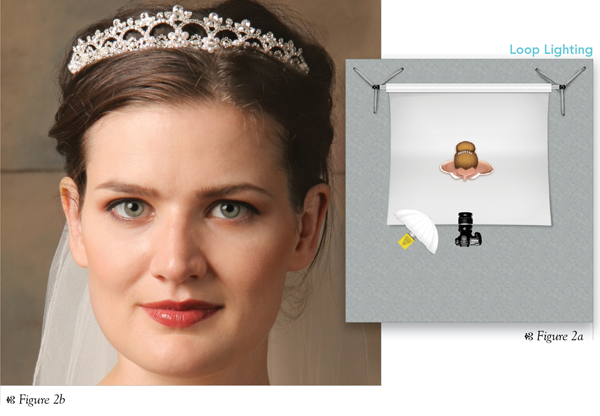
Loop Lighting
My favorite lighting pattern has always been the loop lighting pattern. So, in this scenario, let’s move the light around the subject just a bit (see Figure 2a). As I move the light around the subject’s face, the nose shadow will traverse the upper lip in the opposite direction of the light. That’s going to create a little loop shadow just off to the side of the subject’s nose. The cheek shadow also gets progressively larger. As the cheek shadow gets bigger, the highlight area is reduced. With more of the subject’s face shadowed, it creates the illusion of thinning them. The more I rotate the light around the subject, the more the shadow increases and the highlight area is reduced (see Figure 2b).
Rembrandt Lighting
Let’s say you have a person with an even rounder face, is there any way we can do a better job of flattering them with the lighting? Sure. Let’s just go ahead and rotate the light around the subject even further (see Figure 3a). As we do so, we will have the nose shadow connect with the cheek shadow ( Figure 3b). This is what is referred to as the Rembrandt lighting pattern.
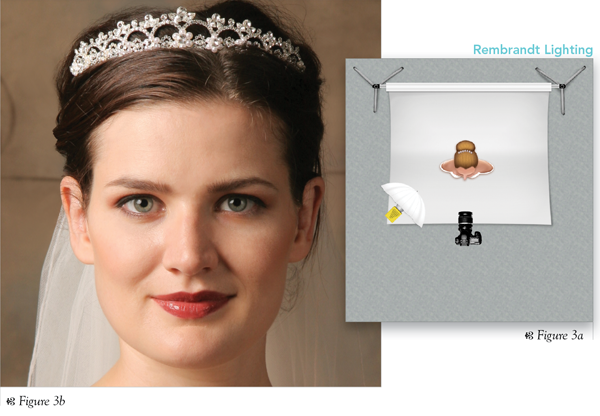
Notice that as the nose shadow connects with the cheek shadow, we are left with a little triangular patch of light right under the bride’s eye. You can see this same lighting characteristic in many of Rembrandt’s paintings, hence the name. Also, notice how we have minimized the area of illumination on our subject’s face, seeing much more shadow. This is how we minimize or reduce the weight of the person visually—simply by using light.
Split Lighting
If I continue rotating the light around the subject even more, to where it’s perpendicular to the subject’s face, then I have a split lighting pattern (see Figures 4a and 4b).
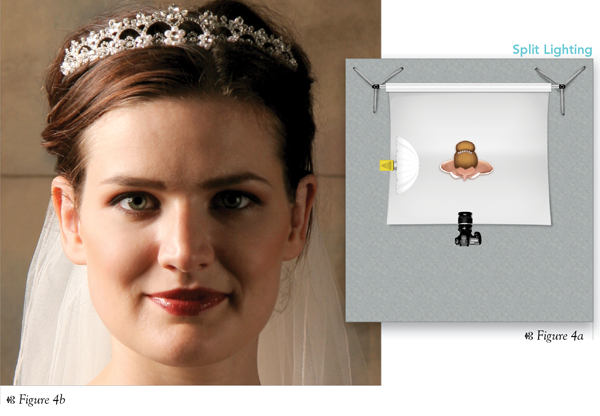
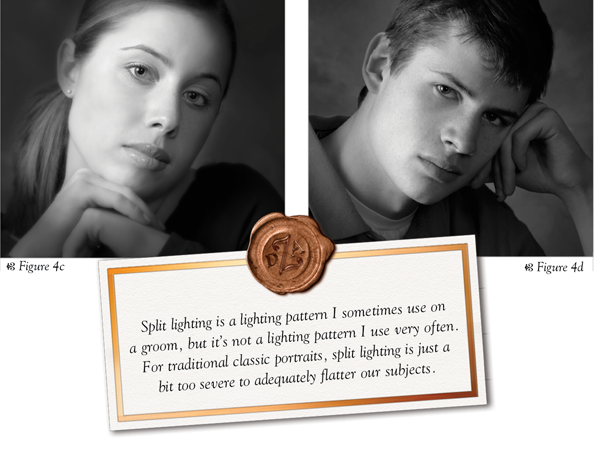
I mention the split lighting pattern because it needs to be included in our five classical lighting patterns. It does work well for the more dramatic portrait, a trendy senior portrait, or fashion-focused shoot, but typically it’s not what we’d use on a wedding day. I suggest you experiment with split lighting for your own projects, and you’ll see how it can add drama to the shot (see Figures 4c and 4d).
Rim/Accent Lighting
The first four lighting patterns—butterfly, loop, Rembrandt, and split—are the four main lighting patterns used in portraiture, but watch what happens if we continue rotating the light around the subject even further (Figure 5a). Notice how the light completely leaves the face and just rims out the subject’s head ever so slightly (Figure 5b). This crescent of light on the back of the subject is called rim or accent lighting.
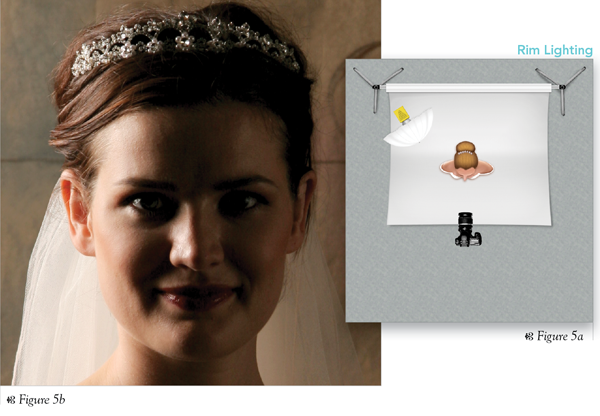
Since there is no light on the front of the subject’s face, the rim lighting pattern is not a predominant lighting pattern we use. The rim lighting pattern is an accent light, and is used when we want to separate the subject from a dark background. My good friend, Don Blair, God rest his soul, used to call it his “garlic light.” Don used to say, “Aah, add a little garlic on the back, just to separate them from the background. It will allow the subject to pop out from the background just a little bit more.” Once you’ve established your rim lighting on the subject, use the loop or Rembrandt lighting pattern to illuminate them properly.
So, folks, that’s pretty much the five lighting patterns of the face. Take a look at Figure 6 to see the relative position of the light source with respect to the axis of the subject’s face in each of the lighting patterns just described. Let me do a quick walk-through one more time:
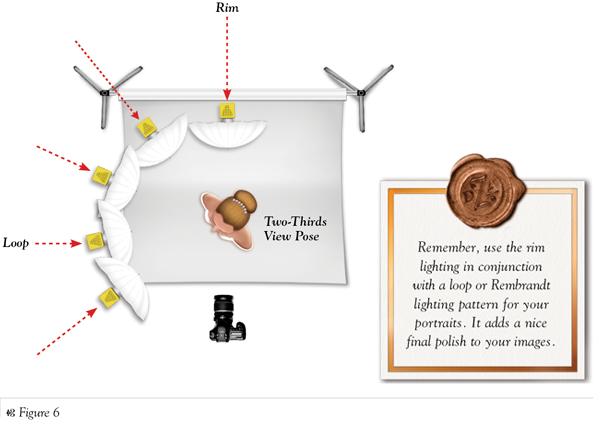
1. Notice that my camera is at the 4 o’clock position in relation to the subject’s face, and the subject is in the two-thirds view. You will also notice that the direction of the light is in line with the axis of the subject’s face for the butterfly lighting pattern.
2. For a loop lighting pattern, I just need to bring the light around through the arc a little bit more, so it throws a nose shadow on the camera side of the person’s face.
3. The Rembrandt lighting pattern then becomes apparent, as I continue to rotate the light around the subject.
4. You can see that the direction of the split lighting pattern is perpendicular to the axis of the subject’s face, illuminating just one-half of the face.
5. In the rim lighting pattern, the light source needs to continue all the way around our subject to the 10 o’clock position in relation to the axis of the subject’s face. Be careful not to photograph the light source in this instance.
Lighting Gear
When working in the studio, it’s easy to get the lighting pattern exactly where you want it—you just rotate the studio light around the subject’s face until you get the desired lighting pattern. But, there are all kinds of light sources we can use to illuminate our subject. Back in my early high school days, when I was just starting to learn about portraiture, I used the old Smith-Victor reflectors fitted with photofloods. Granted, I nearly melted my subjects in front of those 500-watt, super-bright, hot lights, but I could always see from which direction the light was coming.
My lighting setup today is utter simplicity. It consists of a studio strobe within a Westcott Halo, positioned on one side of the subject, with a 36-inch silver reflector placed on the other side and held in place by a light stand (see Figure 7).
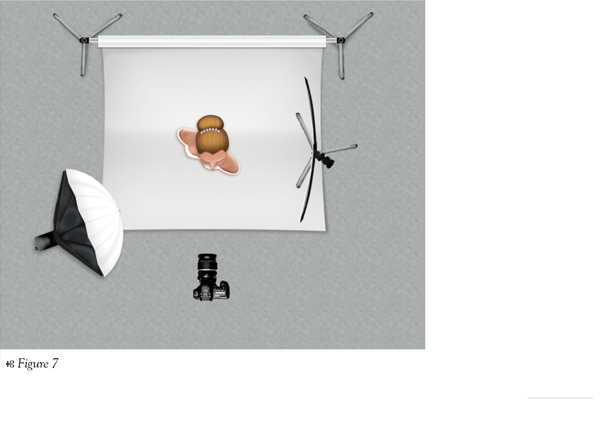
I’ve never been a big fan of the studio umbrella as a light modifier, but I am a huge fan of the Westcott Halo Light Modifier, and have been since it was introduced in 1986. The Halo (which works with any studio light) has been my choice for modifying my studio light for over 23 years. With my one light source and my reflector fill, I have just about all the control I need to create a studio portrait. The setup is fast, easy, and gives a beautiful result.
Okay, Now It’s Time for the Really Big Lighting Rule!
If you have been paying attention, you may have deduced this rule already. If you haven’t, then read these last few paragraphs. If you can get this rule etched into your brain, you can improve your portrait photography substantially. Here is the rule:
Regardless of the view of the face you are photographing (full-face, two-thirds, or profile) and the lighting pattern you are using (butterfly, loop, Rembrandt, split, or rim), you must remember that the axis of your studio light relative to the axis of the subject’s face creates an angle for that lighting pattern, and that angle is the same for that lighting pattern whether it is a full-face, two-thirds, or profile view. Check out Figure 8 to see exactly what I mean here.

Also, if the subject looks down, then the light moves down. If you ask the subject to raise their chin and look up, then the light needs to follow and move up.
Understanding the three simple views of the face (four, including my modified two-thirds view) and the five easy lighting patterns with which you can illuminate the subject’s face will improve your photography dramatically. They will give you the basic tools to go out and produce flattering photographs of your clients easily and consistently. If you can get them down, your photography will start zooming past your competition to the top of the heap. Why? Because there aren’t many wedding photographers out there paying attention to quality lighting, so learn from the masters and it will make a big difference in your photography.
Learn how to do more from Captured by the Light: The Essential Guide to Creating Extraordinary Wedding Photography by clicking here