

It’s exciting that Lightroom 2 and Photoshop CS4 are finally here. And now is the time to ask, “Is this new version worth the upgrade?” For me, the answer is a resounding yes! These two new programs have revitalized my workflow and creativity in unbelievable ways. On that note, the intent of the following tutorial is to help you take better advantage of these programs.
1 ADD STARS AND LABELS
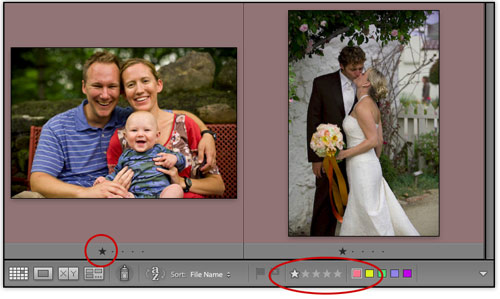
After importing your images into Lightroom, it’s time to find the keepers. First, press G to enter the Library module Grid view. Scroll through the entire set of photos to become familiar with them. Then go back to the top, click on the first image, and press E to enter the Loupe view. Use the Right and Left Arrow keys to navigate through the images. When you find a keeper, press 1–5 to give it a star rating, or 6–9 to assign a color label. The star and label ratings appear in the Toolbar below the images.
2 FILTER TO FIND KEEPERS
With your images rated and ranked, use the filter features to sort the wheat from the chaff. The quickest way to access the filters is to press Command-F (PC: Ctrl-F). Next, click on the Attribute tab and choose an option for filtering (we’re sorting based on a one-star rating and red label). Now, you’ll only see the images you tagged with those rating values. To focus on the images, press the Backslash key (\) to hide the Library Filter menus. To minimize the interface even further, press Shift-Tab to hide the Module picker, Filmstrip, and the left- and right-side panels areas.

3 DEVELOP MODULE BASICS AND TIPS
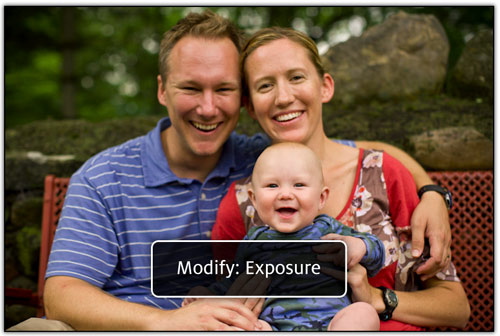
Press D to navigate to the Develop module. Open the Basic panel by clicking on the panel name or by pressing Command-1 (PC: Ctrl-1). Move the sliders to improve the image. For more control, press Option (PC: Alt) while moving the Exposure, Recovery, or Blacks sliders to switch to a view that reveals a clipping mask. For faster image processing, press the comma and period keys to select the different adjustments in the Basic panel. The adjustment option will appear as an overlay on top of the image (as shown). Then press the plus (+) or minus (–) keys to increase or decrease the values, respectively.
4 USE THE ADJUSTMENT BRUSH
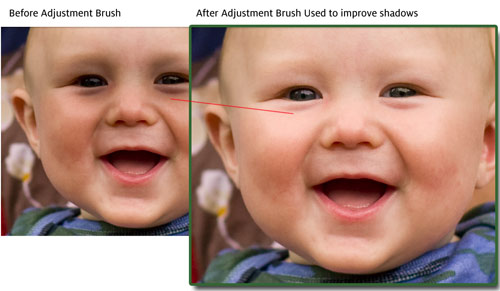
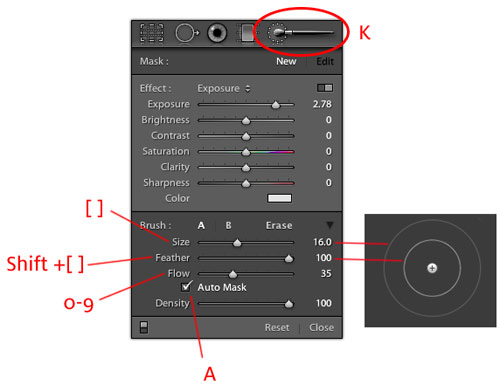
Now it’s time to work on more specific or localized aspects of the photo. Choose the Adjustment Brush (K) from the Toolbox. Next, modify the sliders for the type of effect you’d like to create, such as Exposure. Next, select a brush Size, Feather, Flow, and Density. Feather controls the edge transition of the adjustment. Flow controls the rate of the adjustment (typically a lower amount works best). Density controls the overall intensity of the effect. Turn Auto Mask on to limit the adjustment to a specific area; turn it off to make a more general improvement. Paint the adjustment on the image.
5 ADJUSTMENT BRUSH SPEED TIPS
The Adjustment Brush is one of the most revolutionary improvements in Lightroom 2; therefore, it’s worth learning how to quickly work with this tool. Press the Left and Right Bracket keys ( ) to decrease and increase the brush size, respectively. Press Shift- to decrease and increase the brush Feather. Press 0–9 to change the Flow amount. After you’ve started to use the tool, press the O key to turn the mask overlay on and off. To better evaluate the mask, press Shift-O to cycle through the different mask colors (black, red, green, and white).
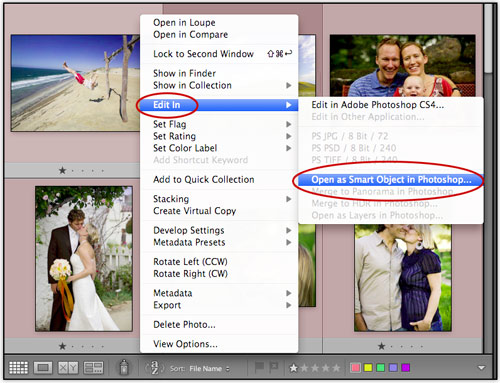
6 OPEN IN PHOTOSHOP AS SMART OBJECT
After completing your work in Lightroom, you might want to take the photo into Photoshop to add some finishing touches. You can open images to Photoshop several different ways, but here I want to highlight the new Open As Smart Object option. This technique gives you extra flexibility once in Photoshop. In Lightroom, press the G key to enter Grid view, Control-click (PC: Right-click) on the photo, and select Edit In>Open As Smart Object in Photoshop.
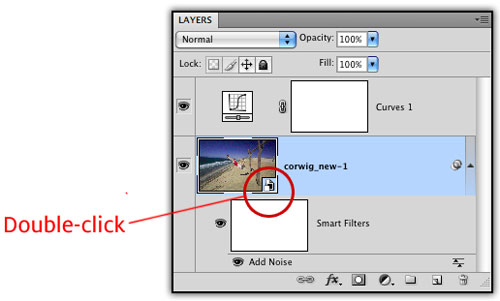
7 WORK WITH SMART OBJECTS IN PHOTOSHOP
With the image open as a smart object in Photoshop, you can continue your normal Photoshop workflow; for example, you could add a Curves adjustment layer, apply a filter, etc. The advantage of using smart objects is that they preserve the source image, allowing you to make nondestructive editing to the layer. The photo layer will appear with the smart object options. Double-click the Smart Object thumbnail to open the RAW image in Adobe Camera Raw to modify or change any of the RAW adjustments. As you can imagine, this added bit of flexibility is extremely helpful.
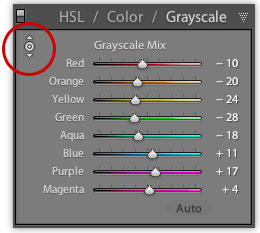
8 CONVERT TO BLACK & WHITE
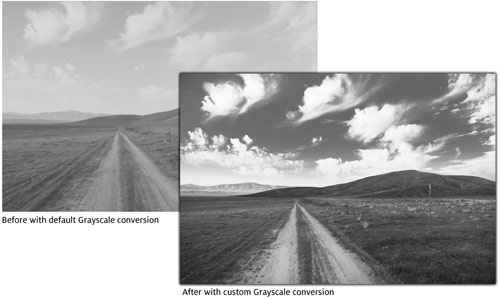
After completing and saving your work in Photoshop, it’s time to head back to Lightroom. And let’s say you want to convert another image to black and white. Select the photo and press D to select the Develop module. Next, press Command-3 (PC: Ctrl-3) to open the HSL/Color/Grayscale panel. Click on Grayscale to access the Grayscale Mix controls. Move the sliders to darken or brighten different areas of the photo, or click on the Target Adjustment tool (circled) and click-and-drag up or down on the image to increase or decrease the brightness of that area, respectively.
9 LIGHTROOM GRAYSCALE AND VIRTUAL COPIES
To evaluate your progress, press the Backslash key (\) to toggle between before and after views. The problem is that when converting to grayscale, the before view goes all the way back to the original color image, making it impossible to compare different types of black-and-white adjustments. To remedy this problem, select your grayscale image and press Command-’ (PC: Ctrl-’) to create a virtual copy. Next, make further grayscale adjustments and then press \ for before and after views.
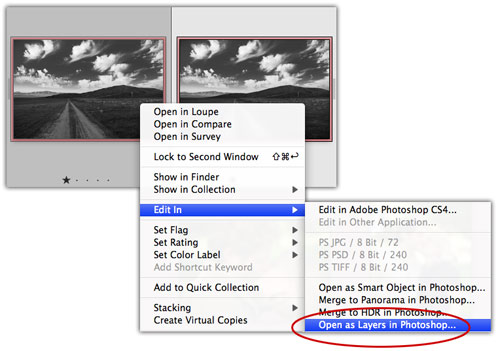
10 OPEN AS LAYERS IN PHOTOSHOP
Virtual copies allow you to create two different versions of the same image. In this example, one version has no sharpening and a high luminance noise-reduction amount to reduce the noise and soften the sky, while the other version has normal sharpening applied. To take advantage of both settings, press G to enter Grid view. Select both images, Control-click (PC: Right-click), and choose Edit In>Open As Layers in Photoshop. This will open both photos in one layered Photoshop document.
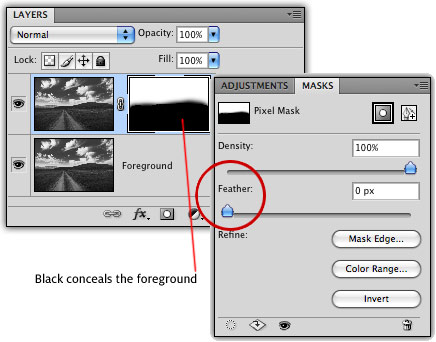
11 LAYER MASKING IN PHOTOSHOP
The layered document contains two photos: one processed with the sky in mind and the other processed for the foreground. To combine the two photos, select the sky layer and click the Add Layer Mask icon at the bottom of the Layers panel. Next, choose the Brush tool (B) and paint with a soft-edged black brush across the lower portion of the photo. This will conceal the foreground so that only the sky shows through. If the mask edge is too sharp, Photoshop CS4 now has the ability to soften the edge by increasing the Feather amount in the Masks panel (Window>Masks) to better blend the layers.
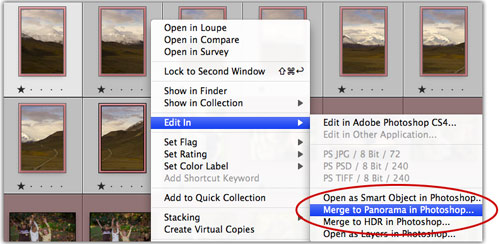
12 USE LIGHTROOM FOR PHOTOSHOP PANORAMAS
The new Photoshop CS4 auto-blend and auto-align features are better than ever and are used for a wide range of purposes, including creating panoramic photos. To take advantage of these features, in Lightroom press G to enter Grid view. Select the files you’d like to combine, then Control-click (PC: Right-click) and choose Edit In>Merge to Panorama in Photoshop. This will open Photoshop and the Photomerge dialog. It’s usually best to choose the Auto option. New to CS4 are the options for Vignette Removal and Geometric Distortion Correction for better results with photos captured with wide-angle lenses. Click OK to create the pano.
 —CREDIT: RALPH CLEVENGER
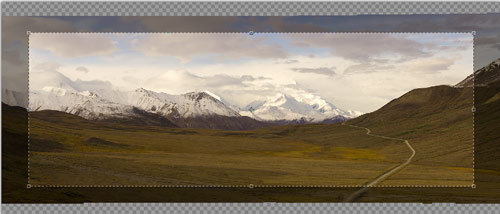
13 CROP PANO IN PHOTOSHOP
Now you’ll need to crop your panoramic photo. Choose the Crop tool (C) and click-and-drag over the image. The grayed-out area shows what will be cropped. Move any of the anchor points to resize the crop. Press Return (PC: Enter) to apply the crop. For faster results, double-click inside the crop area. Another great way to crop is to use the Rectangular Marquee tool (M). Click-and-drag over the area of the image you want to keep, then choose Image>Crop to remove the unwanted area.
ALL IMAGES BY CHRIS ORWIG UNLESS OTHERWISE NOTED
