
Photomerge in Photoshop CS4 does an amazing job of aligning and blending panoramas, but occasionally you run into an image where there’s a glitch that has to be fixed manually. In this tutorial, we’ll take a look at panorama alignment problems and explore various strategies for fixing them. We’ll finish with a look at how to get great-looking moving water in high-dynamic range (HDR) shots.
1 A PANORAMA ALIGNMENT GLITCH
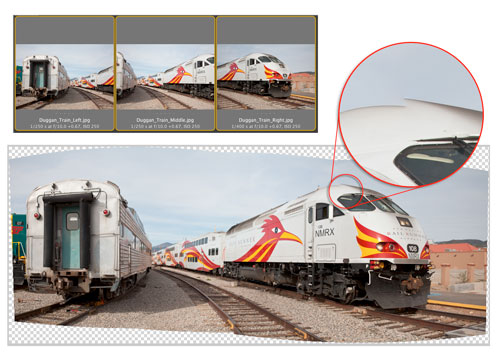
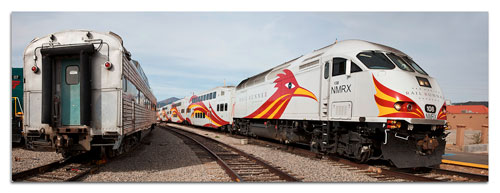
In most cases, the seams created by Photomerge are very successful, but sometimes it may have “issues.” This panorama was made from three horizontal images taken in Santa Fe, New Mexico. And no matter how many times I’ve tried to get Photomerge to blend these images, it always creates an alignment glitch at the top of the locomotive, just above the windshield. In this section of the article, we’ll create the initial panorama—glitch and all—and then explore a few different ways to try and fix the problem.
2 CREATE THE PHOTOMERGE
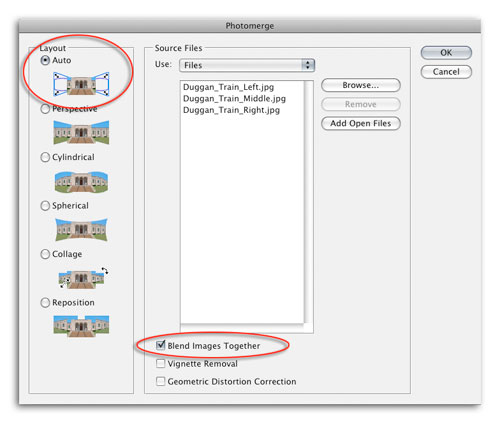
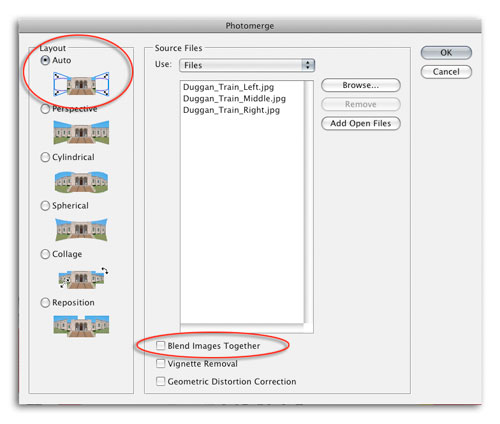
To experience the steps from the beginning, launch the Photomerge process. In this tutorial, we’ll launch it from Adobe Bridge by selecting the three thumbnails and choosing Tools>Photoshop>Photomerge. In the Photomerge dialog, leave the Layout set to Auto and make sure that Blend Images Together is checked. Click OK.
3 INITIAL EVALUATION
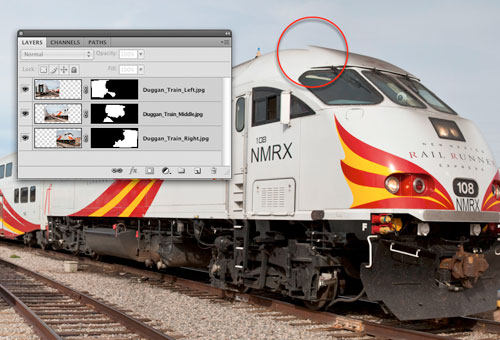
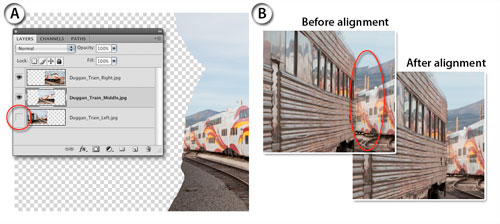
At first glance it might seem that the most straightforward way to tackle the problem would be to edit the layer masks that Photomerge has created. The problem with this approach, however, is that there are three layer masks and each one is precisely aligned with the other two. Although it’s not immediately apparent in the blended result, there’s also a problem created by the auto blending, which has changed tonal values in the sky to match the layer masks. Editing these masks will reveal this tonal mismatch and create additional problems.
4 TURN OFF THE LAYER MASKS
To see the potential problems created by the auto blending, Shift-click on each of the layer masks to temporarily disable them. You can see an obvious variation in the sky tones just above the cab of the locomotive (in this illustration, the image was darkened with a curve to make these tonal changes more visible). The tonal variation in this area is in the exact shape of the same area of the layer masks for the Train Middle and Train Right layers.
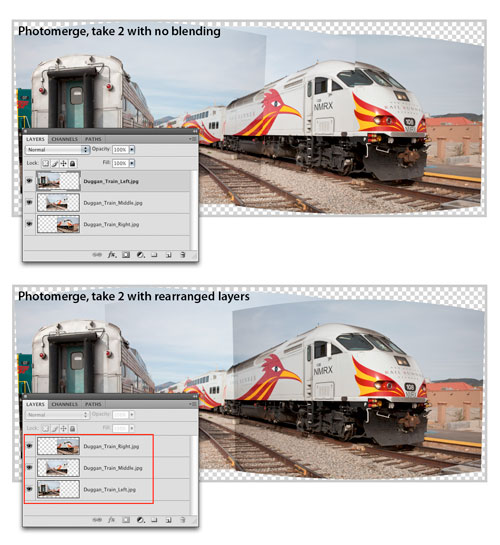
5 PHOTOMERGE, TAKE 2: NO BLENDING
Before we try any complicated patching or cloning repair jobs, let’s see if we can coax a better result from Photomerge. Close the first image without saving it and return to Bridge. With the three thumbnails selected, choose Tools>Photoshop>Photomerge. In the Photomerge dialog, leave the Layout set to Auto but uncheck the Blend Images Together option. Click OK.
6 TAKE 2: REARRANGE LAYERS
For this image, Photomerge has definite ideas about how the layers should be arranged. But one obvious way to try and fix the problem is to simply rearrange the layers so that Train Right is above Train Middle. Hopefully, this will address the problem of the alignment error on the roof of the locomotive. In the Layers panel, rearrange the stacking order of the layers so that Train Right is the top layer, Train Middle is in the middle, and Train Left in on the bottom.
7 MANUALLY ALIGN LAYERS
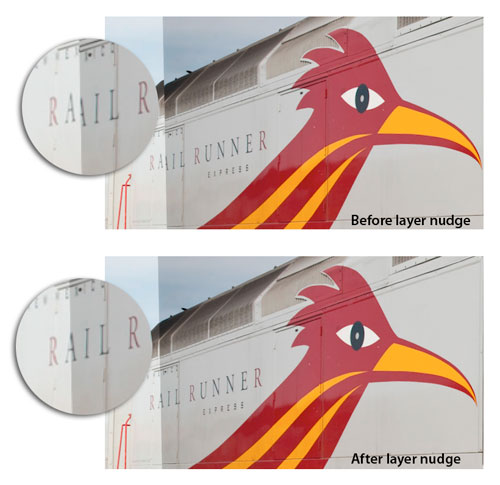
Even though we turned off the blending in the Photomerge dialog, there are still a couple of automated features left for us to try. To nudge these features in the right direction, we’ll manually align the layers. Make the Train Right layer active. Double-click the Zoom tool to zoom to 100%. Select the Move tool (V) and use the Up and Left Arrow keys on the keyboard to nudge this layer up and left until the “A” in the word RAIL aligns with the same letter on the middle layer. This will also align the top of the train.
8 CUSTOM LAYER TRIMMING
The letter “A,” which we just aligned, could conceivably still cause some problems, so let’s fix that. Make sure the top layer (Train Right) is active, choose the Lasso tool (L), and set the Feather value in the Options Bar to 0 px. Make a lasso selection around the letter “A” in RAIL and press Delete (PC: Backspace) to delete this chunk of pixels. Press Command-D (PC: Ctrl-D) to deselect.

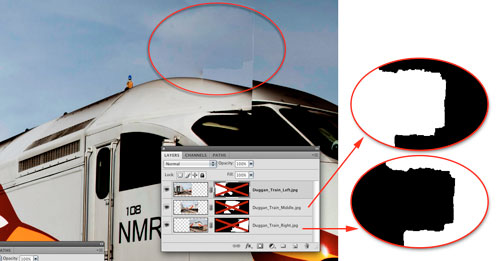
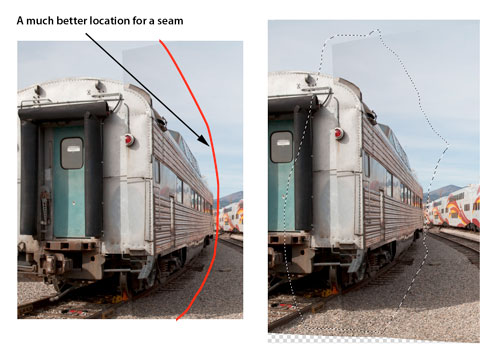
9 MODIFY THE LEFT SIDE
Now let’s inspect the left side of the image. Creating a seam through the back of this older train car makes no sense. It’s better to choose a less-complicated seam: on the far side of this car in the background of the image, where the newer RAIL RUNNER cars can be seen in the distance. Use the Lasso tool with the Feather set to 0 px and make a selection of the part of the Train Middle layer that overlaps onto the Left side layer. The right side of this selection should be placed in the distance through the new train cars (see illustration).
10 MORE CUSTOM LAYER TRIMMING
Make sure that the middle layer—Train Middle—is active and press Delete (PC: Backspace) to delete the selected pixels. (In the illustration we hid the bottom layer—click on its Eye icon—to clearly show what areas were deleted.) Deselect.
Now zoom in for a closer view and make the Train Left layer active. Use the Move tool (V) and the Down and Right Arrow keys to align the layers along the seam in the background where the train cars converge.
11 AUTO-ALIGN LAYERS
In the Layers panel, click on the Train Right layer. Turn this layer’s Eye icon off and on several times and you’ll see how the locomotive isn’t aligning with the same areas on the underlying layer—this is what’s causing the alignment glitch.
Make sure the visibility for all three layers is turned on then select all three layers by clicking on the top one and then Shift-clicking on the bottom one. Choose Edit>Auto-Align Layers. In the dialog that appears, choose Auto for the Projection method and click OK.

12 AUTO-BLEND LAYERS
Now when you turn the top layer off and on, you should see that the locomotive is much more closely aligned with the layer underneath. Make sure that all three layers are still selected in the Layers panel and choose Edit>Auto-Blend Layers. In the small dialog that appears, choose the Panorama option and make sure that the Seamless Tones and Colors box is checked. Click OK. This time, the blend is successful and the alignment glitch on the top of the locomotive is no longer present.

13 RAIL RUNNER DEBRIEFING
As a final step, use the Crop tool (C) to crop the transparent areas surrounding the image.
Most of the time Photomerge works great but for those times when it doesn’t, the techniques that we’ve covered in this tutorial are some things you can try to get a better panorama merge from multiple images. For some images you may need to go even further to touch up alignment problems, for example: using the Clone Stamp (S), the Healing Brush, or creating patch layers. All are good skills and techniques to be aware of when these issues arise.
HOW TO GET GOOD MOVING WATER IN HDR
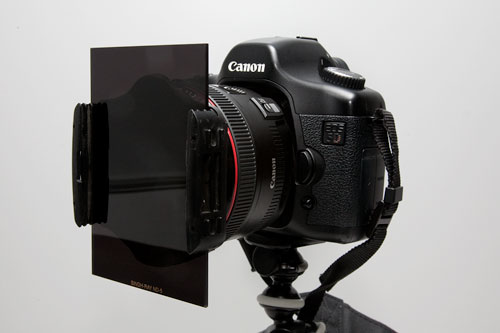
14 A SOLID NEUTRAL-DENSITY FILTER
One of the most common questions I’m asked about HDR photography is how to deal with the strange artifacts that commonly appear in moving water. I use a solid neutral-density (ND) filter to cut back several stops of light: Less light coming through the lens means the camera must use a much slower shutter speed than would normally be feasible in daylight conditions. With long shutter speeds of one second or slower, rushing water is rendered as a smooth, silky blur. Not only does this look cool, it also hides the usual HDR artifacts that often appear in moving water.
15 CREATE THE INTIAL HDR IMAGE
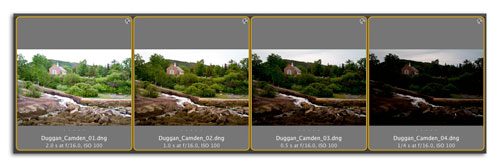
Let’s explore how good water can look with an HDR image made from four exposures taken in Camden, Maine. I shot the images using a 5-stop, solid ND filter with shutter speeds ranging from 1/4 second to 2 seconds.
In Bridge, select the four source exposures and choose Tools>Photoshop>Merge to HDR. When the Merge to HDR dialog appears, make sure that the Bit Depth is set to 32 Bit/Channel and click OK.
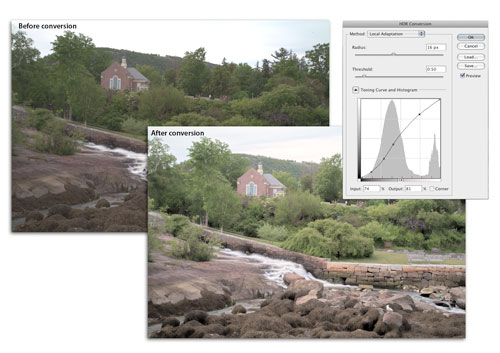
16 CONVERT TO 16 BITS
After the merge is done, choose Image>Mode>16 Bits/Channel to bring up the HDR Conversion dialog. For the Method, choose Local Adaptation from the drop-down menu. Set the Radius to 16 px, the Threshold to 0.50, and adjust the Toning Curve and Histogram curve as shown in the illustration (if you don’t see the curve, click the down-facing triangle to show it). Click OK to apply the conversion.
17 ADD SHADOWS/HIGHLIGHTS SMART FILTER
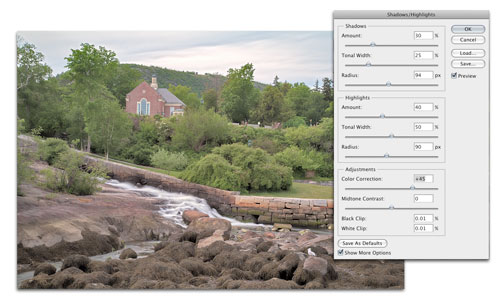
Control-click (PC: Right-click) on the Background layer and choose Convert to Smart Object from the menu. Then choose Image>Adjustments> Shadows/Highlights. In the dialog that appears, click the Show More Options checkbox to reveal all of the sliders and set them as shown in the illustration. This will help to balance out the tones between the bright sky and water and the rest of the image. Click OK when you’re done.
18 FINAL CURVES ADJUSTMENTS
Open the Adjustments panel, click the Create a New Curves Adjustment Layer icon, and slightly increase the contrast as shown in the Overall Contrast illustration. Add a second Curves layer and adjust the curve as in the Darken Sky illustration. Open the Masks panel and click the Invert button to invert the mask to black. With this layer mask active, use the Brush tool (B) to paint with white at 30% Opacity in the sky, trees, and rocks to darken those areas. As you can see from the detail view of the stream, the slow shutter speeds make the water look great with no visible HDR artifacts.

