
Designing with Layers in Dreamweaver 8
So many ways to design a webpage, so much frustration when you can’t get it to look the way you want. If you’re creating a complex design for the Web, consider using Dreamweaver’s layers—one of the easiest, and most precise ways to create a webpage layout. Using the absolute positioning of Dreamweaver’s layers, you can get down-to-the-pixel precision and easily move and align elements on your page. You can even overlap layers.
Before you dive into any Web project, it’s important to first define your main website folder in Dreamweaver. This step is crucial because you need to store all of your site’s resources in one main folder and identify it in Dreamweaver to ensure that the links you set on your computer will work when the site is uploaded to a server. For more detailed instructions on how to define a site and why it’s so important, see the Janine’s other tutorials at www.layersmagazine.com.
STEP 1 Create a Design in an Image Editor
Although you can begin the development process in Dreamweaver, most designers I know prefer to do their creative work in a program such as Adobe Photoshop CS2 and then re-create the design in Dreamweaver for the Web. Although Dreamweaver is ideal for creating HTML, JavaScript, CSS, and other markup code, it’s not the best program for initial design work. Of course, you can do all your design within Dreamweaver if you prefer; the main lessons in this tutorial will work either way.

CREDIT: ©KEN RIDDICK
STEP 2 Create a New HTML Document
To create a new HTML document, select File>New, choose Basic Page from the Category list, and HTML from the Basic Page list. Before you do anything else, save the file into your main site folder. This helps ensure that all of your links and image paths will be set properly. Tip: Don’t use spaces or special characters in file and folder names in your website because many Web servers are Unix systems, which have strict naming conventions. Mac servers don’t have the same restrictions, but it’s good practice in case you ever move your site to a Unix server.

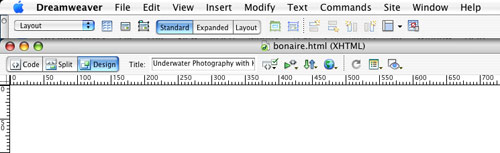
STEP 3 Add a Title to Your Page
The Title area at the top of the page is easily overlooked because these words don’t display on your pages. The title text is important because that’s what appears at the very top of a browser window when a page is displayed, and these same words are used in a bookmark list when the page is saved in a browser. The words in your title deserve special attention because many search engines give the title text extra weight when ranking a site. For example, instead of just writing “homepage” as a title, write something like “Underwater Photography by Ken Riddick.”
STEP 4 Insert a Tracing Image to Guide Your Work
If you created your design in another program, save it as a GIF or JPEG and you can use it as a design guide. Choose Modify>Page Properties and select Tracing Image from the Category list. Use the Browse button to select your image and then use the slider to adjust the Transparency (a 50% setting usually works well). Unlike background images, tracing images don’t display in a browser. You can set the background color in the Appearance Category of the Page Properties dialog. After you finish your design, delete the image name in the Tracing Image dialog to remove it.

STEP 5 Create Layers to Position Elements
To create a layer, choose the Layout category in the Insert bar at the top of the work area and click the Draw Layer icon. Now place your cursor anywhere on your page and click-and-drag to create the layer. To move a layer, click to select the layer, and then click on the box at the top-left corner and drag. To adjust the size of a layer, click-and-drag on any of the adjustment points on the corners or sides. You can also specify the height and width of a layer in the Properties inspector.

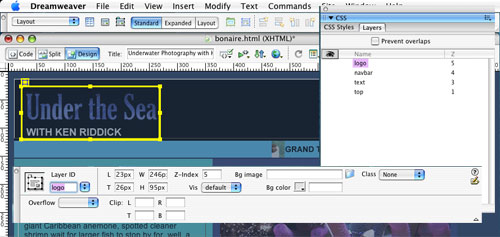
STEP 6 Name Your Layers
You’ll want to name your layers in Dreamweaver much like you name layers in Photoshop because it makes it easier to keep track of them. Open the Layers panel by choosing Window>Layers. You can specify visibility and order in the Layers panel, but you’ll have to use the Properties inspector to change the name. To do so, click to select the layer in the main work area, then replace the automatically generated name by selecting it under Layer ID in the Properties inspector and typing in a new name, such as “logo” (as shown in this example).
STEP 7 Add Text, Images, and More
You can insert anything into a layer that you can insert into a webpage, including images, text, multimedia, and even tables. To insert text, simply click to insert your cursor inside the layer and start typing. To insert an image, click to place your cursor in a layer and use the Image icon (or choose Insert>Image), browse to find the image you want to insert, and click Choose.Note: Placing layers inside tables can lead to misaligned elements.

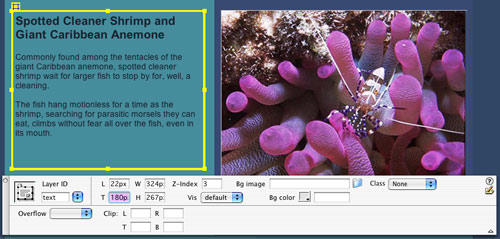
STEP 8 Align Layers Precisely in the Properties Inspector
For precise control, use the Properties inspector to position your layers right down to the pixel. Click to select a layer and then enter pixel values in the L (Left) and T (Top) positioning fields in the Properties inspector to specify the number of pixels the layer will be from the top and left edge of the browser window. You can also use the W and H settings to specify a precise Height and Width of the layer. This is an ideal way to align layers, such as the text and image layers in the middle of this page design.
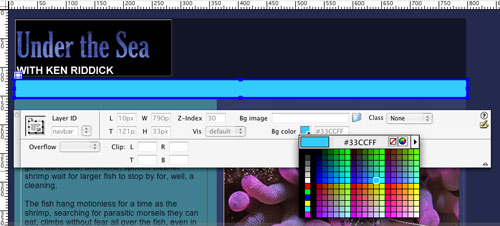
STEP 9 Set Background Colors in Layers
In this design, layers with background colors were used to create the blue, green, and black sections. For example, the blue strip that holds the navigation buttons just below the logo was created as a layer and sized to match the corresponding area in the tracing image. To fill in the background color of a layer, click to select the layer and then use the Background Color well (Bg Color) in the Properties inspector to specify the color. Alternatively, you can create a CSS class style with a background color and then apply the style to the layer.
STEP 10 Set the Z Index to Control Which Layer Is on Top
One of the greatest advantages of layers is the ability to overlap elements, something that wasn’t possible before CSS. The Z index controls which layer appears on top. The higher the number, the higher the layer in the stacking order. Tip: As you set the Z index, set it to 10, 20, 30, not 1, 2, 3, then if you add another layer later and want to squeeze it in between existing layers, you won’t have to renumber all your other layers. You can change the Z index in the Layers panel or the Properties inspector.

STEP 11 Keep Layers Together by Nesting
When you nest one layer inside another, they’re grouped together so that if one layer is moved, the other goes with it. This is handy for keeping elements together, such as the layer that contains the logo and the layer that contains the black box that surrounds it in this example. To create a nested layer, make sure you have Nesting checked in the Layers Category in Dreamweaver’s Preferences. Then, select the Draw Layer icon from the Layout Insert bar, and click-and-drag inside an existing layer to create the new nested layer.

STEP 12 Use Tables to Align Images
Click to place your cursor inside a layer and choose Insert>Table. In the Table dialog, specify the properties for the table and click OK. In this example, we created one cell for each thumbnail by creating 1 row and 9 columns, setting the border to 0 to make it invisible, and setting the width to 100%. After the table is created, insert an image into each cell, select all of the table cells, and click the Align Center icon in the Properties inspector—a quick, easy way to get all of the thumbnails equidistant within the layer.

STEP 13 Create a Style to Add Padding
You can apply CSS styles to layers to control many formatting options. For example, we used a style to add padding to the layer with the table and thumbnails. Here’s how: Click the New CSS Rule button in the CSS Styles panel (the small + sign). In the New CSS Rule dialog, choose Class and enter a name in the Name field. In the Box Category, set Padding to 15 pixels (with the Same for All button checked). Click OK to save the style. Then, select the layer and choose the new style from the Class pull-down in the Properties inspector.

STEP 14 Preview Page in Multiple Browsers
Dreamweaver does a good job of displaying your pages as they should appear in most Web browsers. Unfortunately, not all browsers are the same so it’s good practice to preview your Web designs in a variety of browsers on both the Mac and PC platforms. To preview your page, choose File>Preview in Browser and select a browser from the pull-down list. Alternatively, click on the Preview button at the top of the design window. Note: You can add any browser on your hard drive to Dreamweaver’s browser list to make it easy to preview your page in multiple browsers.

