
Design Great-Looking Forms with Dreamweaver
Design Great-Looking Forms to Thwart Spammers and Impress Visitors
The Internet is all about interactivity, links that guide us to new information, and forms that record orders, trigger search results, and convey messages. Whatever kind of form you want to create, this tutorial is about helping you choose the right form options, setting the properties correctly, and making those boring form tags look good.
One of the most common Internet forms is a user feedback form. While you can include an email address on a website and invite users to contact you, there are a number of advantages to using forms. With a form, you can ask specific questions, collect information, and save yourself some spam.
When you put your email address on a webpage, it’s easy for spammers and their automated bots to lift your email off your website. If you hide your email address in the script behind a form, it’s safe from automated eyes.
[For more on working with FormMail and other CGI scripts, see the tutorials at www.layersmagazine.com/category/dreamweaver.]
STEP 1 Insert a Form Tag
The form tag defines the area of a form and includes instructions for how the form will be processed (something we’ll cover at the end). To insert a form tag, click to insert your cursor wherever you want to create the form on your page, and choose Insert>Form>Form. A box with a red outline appears representing the form tag. Don’t worry, the box won’t display in a browser, but all of your form elements, including text fields, radio buttons, drop-down lists, and submit buttons, must be contained within the opening and closing form tags.

STEP 2 Add Text Fields
In most feedback forms, you’ll want to include text fields to collect names, addresses, and other information that you want a reader to type into the page. To add a text field to your form, click to place your cursor inside the form tag (the red box) and type in some text, such as “Name” or “Email Address.” Click to insert your cursor next to each piece of text and add text fields by choosing Insert>Form>Text Field (or click on the Text Field icon in the Forms Insert bar).

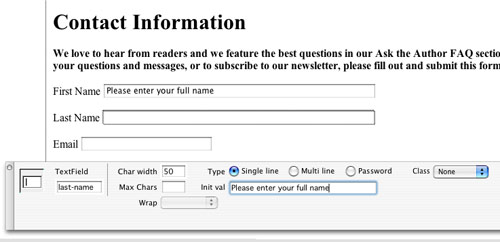
STEP 3 Set Text Field Properties
Click to select the text field and in the Properties inspector at the bottom of the work area, change the name (the word under the heading TextField). The name of any form element serves as an identifier, so use a descriptive name, such as “last-name,” as we’ve done here. You can also specify a character width to control how wide the text field is (we set ours to 50). Max Chars lets you limit the number of characters a user can enter, and Init val enables you to preload text, such as “Please enter your full name.”
STEP 4 Use a Drop-Down List to Save Room
A drop-down list saves room and ensures consistent responses (e.g., abbreviations for states). To add a drop-down list, enter your text on the page and then choose Insert>Form>List/Menu or click on the List/Menu icon in the Forms Insert bar. Click to select the drop-down list on the page and in the Properties inspector click on the List Values button. Enter a label and a value for each item. Use the Tab key to move from field to field, and use the Plus and Minus icons to add or remove items. You can also include an instruction, such as “Choose a State.”

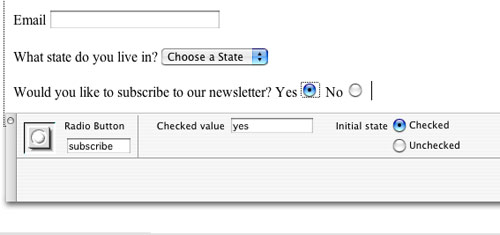
STEP 5 Use Radio Buttons for Yes and No Questions
Radio buttons are ideal for yes or no questions, so choose Insert>Form>Radio Button or click the Radio Button icon in the Forms Insert bar. Select the radio button and use the Properties inspector to give the button a name (use the exact same name for each button in a group to ensure a viewer can only have one button selected at a time). Enter a Checked Value, that is the value you want to equate with the button being checked (we entered “yes” for the Yes button). You also have the option of presetting the button to be Checked or Unchecked.
STEP 6 Use Checkboxes for “Check All That Apply”
If you want to provide a series of options and make it easy for a visitor to “Check all that apply,” checkboxes are your best option. To add a checkbox to your form, choose Insert>Form>Checkbox. Click to select the checkboxes one at a time and use the Properties inspector to name each checkbox, then enter a Checked Value. In the example shown, the checked value is “genealogy” to correspond with that option. Finally, you can choose to preset the box with a checkmark or leave it unchecked.

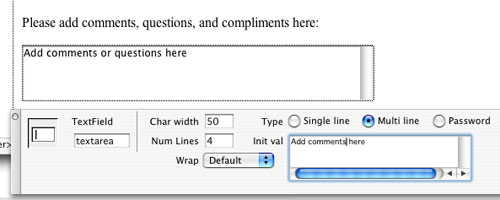
STEP 7 Add a Multiline Text Area for Comments
Most good feedback forms include a multiline text field for comments. To add a text area, choose Insert>Form>Textarea, or click on the Textarea icon in the Forms Insert bar. Click to select the text area and in the Properties inspector give it a name, such as “comments,” specify a character width of 50, set the number of lines to 4, and make sure the Multi line radio button is checked. You can also add an initial value, such as “Add comments here.”
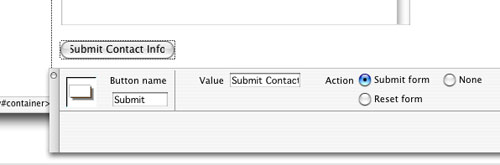
STEP 8 Add a Submit Button; Call It Anything You Like
No form is complete without a Submit button. To add a Submit (or Reset) button, choose Insert>Form>Button or click on the Button icon in the Forms Insert bar. Click to select the button and in the Properties inspector change the text that appears on the button by editing the Value field. In this example, we changed the text to read “Submit Contact Info.”
STEP 9 Preview Your Form in a Browser
Now that all of the form tags are in place, choose File>Preview in Browser and select a browser to display your page. Some features, such as the drop-down list with the state abbreviations, will only work when the page is previewed. Now that we can see our form in action, let’s take a look at what we’ve created. Pretty boring, huh? Notice that the white text boxes blend into the white background, all of the text is styled in the default Times 12, and the elements don’t line up nicely. Let’s add some CSS magic to dress it up.

STEP 10 Background Colors Help Form Elements Stand Out
You can make a dramatic difference in the presentation of a form by simply changing the background color. You can change the entire background color of the page by choosing Modify>Page Properties and clicking on the Background Color well to select a color. In this example, we set the background for the page to a light green, using the Eyedropper to lift a color from the banner at the top of the page. Notice that when we clicked on Apply, the addition of the background color immediately made the form fields more visible.

STEP 11 Create a Text Style for the Page
While we’re still in the Page Properties dialog, let’s change the font of all the text on the page at once. Choose Arial, Helvetica, sans-serif from the drop-down menu next to the Page Font field, and then click the Bold icon. Click OK and the new style is automatically applied to all of the text on the page. If you want to make multiple changes to Page Properties, you can specify background, text, and link options, and then save them all at once by clicking OK.

STEP 12 Create a Style to Align Text Fields
Choose Text>CSS Styles>New. In the New CSS Rule dialog, click to select the Class radio button and enter “.form-text” in the Name field. (Note: All class style names must begin with a period.) Click OK and in the Box category of the CSS Rule Definition dialog, set the Float to Left and the Width to 20%. Click OK. To apply the new style, select the text you want to format, such as “First Name,” and in the Properties inspector, click to open the Style drop-down menu and choose the new style form-text.

STEP 13 Use Tables with Padding for Checkboxes
The easiest way to create two rows of checkboxes is with a table, although you can use styles. Place your cursor to the left of the checkbox for Online Albums and choose Insert>Table. In the Table dialog, specify 2 Rows, 2 Columns, and a Width of 400 pixels. Click OK then cut-and-paste the four checkboxes and their respective text into each of the cells. To add padding, choose Text>CSS Styles>New. Check the Tag radio button, and enter td in the Tag field. Click OK and in the Box Category, set Padding to 10 and check Same for All. Click OK.

STEP 14 Enter the Path to the Form Handler or Script
For the form to do something when a visitor clicks Submit requires a program, usually called a CGI Script. Check with your service provider or system administrator to find out what scripts are available on your server. This final step depends on the script you use and how your server is configured. This form uses one of the most common options for a feedback form, a script called FormMail.pl, which is stored in the cgi-bin folder on the server. Now when someone fills out the form and hits Submit, FormMail.pl will email the contents of the form to the specified address.

