The preflight toolset in Acrobat 9 is easier to use and more customizable than ever before. Version 9 also comes with many built-in preflight profiles from which to choose. These profiles, however, sometimes have checks you don’t need or they don’t have the checks that you do need. Let’s take an in-depth look at how to create and customize Acrobat 9 preflight profiles.
1 OPEN YOUR PDF DOCUMENT
Open the PDF document that you wish to preflight for commercial printing. To preserve the integrity of the original PDF, make a copy of the file by going to File>Save As and renaming it “(filename)_Preflight” (we named ours “ArtShop Flyer_Preflight”).
Note: If you run a preflight profile with fixups (see Step 2), Acrobat automatically gives you the option to save the fixed file as a copy, but I still don’t like to work with the only copy I have of a file.

2 ACTIVATE PREFLIGHT TOOL
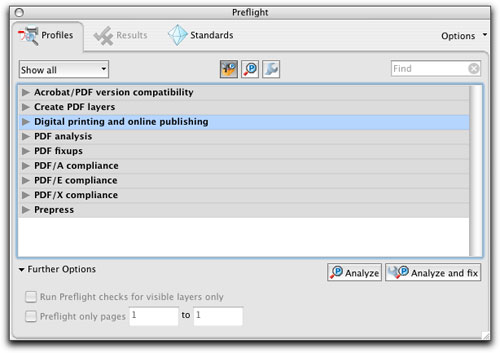
In Acrobat 9, go under the Advanced menu and choose Preflight. In the Preflight dialog, click on the Profiles tab (top left) to display the list of preflight profiles currently available. You’ll see a variety of analyses, fixups, and compliance choices. It may be a bit overwhelming at first, but once you get the hang of this dialog, it gets easier!
Note: A fixup applies an actual change to your PDF, such as converting spot colors to process colors. You have the option to execute these profiles with or without fixups.
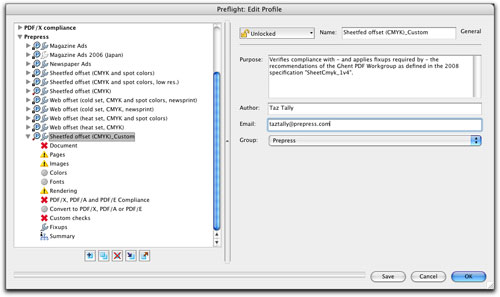
3 CREATE YOUR CUSTOM PREFLIGHT PROFILE
You can choose to create a new profile from scratch or modify an existing one. (If you’re new to the preflight profile game, you might want to start with an existing profile.) Twirl open the Prepress profiles and click on Sheetfed Offset (CMYK). We’re going to use this as our starting profile. Now click on the down-facing arrow beside Options (upper-right corner of the dialog) and choose Duplicate Preflight Profile to activate the Preflight: Edit Profile dialog.
Tip: Don’t edit these default profiles directly; always duplicate one and then edit it.

4 NAME AND DESCRIBE YOUR PROFILE
First assign a name to your preflight profile—ours is “Sheetfed Offset (CMYK)_Custom.” Then type your name and email address in the Author and Email fields and add this profile to the Group you want: Prepress, in our example. You may also want to add notes in the Purpose field to augment or replace the current copy. As an example, you might include info about a specific output device or a customer if this is a customer-specific profile. Lastly, make sure your profile is Unlocked, which it should be if you’ve chosen to duplicate an existing profile.
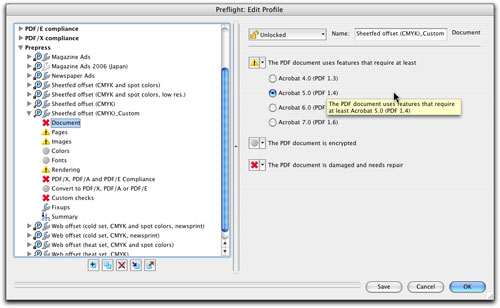
5 DOCUMENT SPECS
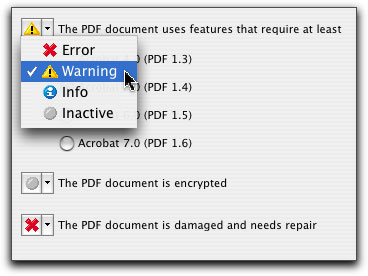
Now, click on Document in the list on the left-hand side of the dialog and the screen at right shows your configurable choices: PDF version, encryption, and damage. Each choice has a drop-down menu where you can set your profile to ignore (Inactive), provide Info only, serve as a Warning, or as an all out Error. (The Damage section is set to Error by default.) For this example, we set the PDF Document Uses Features That Require At Least option to give us a Warning. We then selected Acrobat 5.0 (PDF 1.4) to ensure that the PDF version supports transparency or perhaps as a RIP preference.
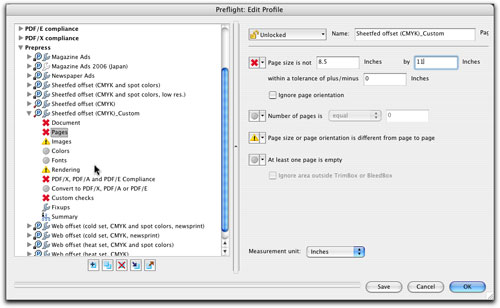
6 PAGES SPECS
Next, click on Pages in the left-hand list. Note that the option Page Size or Page Orientation is Different from Page to Page is indicated as a Warning (circled). If this is a concern, leave it as is or change it to Error. If page size/orientation isn’t an issue, check Inactive.
We’ve chosen Error for Page Size Is Not, entered 8.5 and 11, and chosen Inches as our Measurement Unit at the bottom of the dialog. This, along with the page orientation option, will check for a consistent page size of 8.5×11″ and a single orientation. You can, of course, choose Ignore Page Orientation if you prefer.
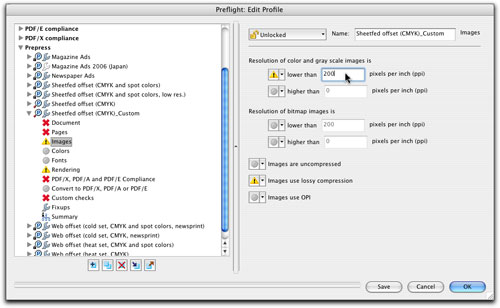
7 IMAGES SPECS
In the Images profile segment, we activated Resolution of Color and Gray Scale Images to indicate that any image lower than 200 ppi should be a Warning. This will let you check on any image with linear resolutions of less than 200, but allow you to review and pass muster on marginally lower images. Note: I don’t place any Higher Than Resolution limits because of the high effective resolution of many of my screen grabs.
We also applied a Warning for Images Use Lossy Compression to indicate the potential of image degradation from too much compression.
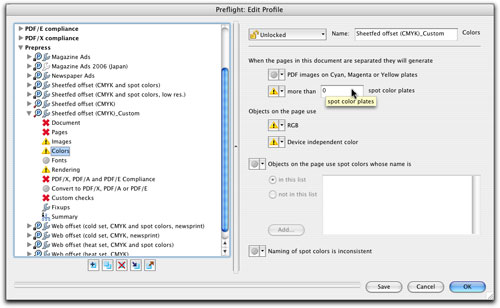
8 COLORS SPECS
In the Colors profile segment, we activated Warning for images that contain any (More Than 0) Spot Colors. We also activated Warnings for Objects on Page [that] Use RGB or Use Device Independent Colors (Lab, for instance).
Note: We designated these as Warnings because I know from looking at the fixups (see Step 14 below) that if I run this profile with fixups, then spot colors and RGB will be automatically converted. By designating these as warnings, I can run this profile without fixups, find these color challenges, and fix them manually, if needed.
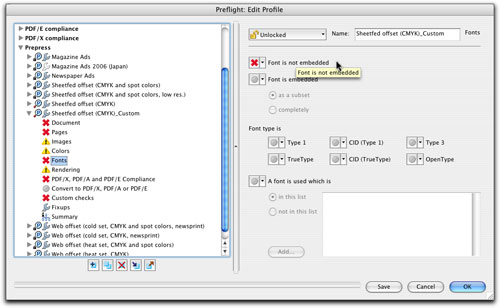
9 FONTS SPECS
Under Fonts, we need to make sure that the font files used to create this document were embedded in the PDF, which protects the PDF’s typesetting integrity and discourages font substitution. So here, we set the profile to indicate an Error if a Font is Not Embedded.
Note: You can designate the profile to look for specific font types, such as CID fonts, and even specific font names that you may want to check prior to printing. Also note that other font checks are and can be included in the Custom Checks (see Step 13 below).
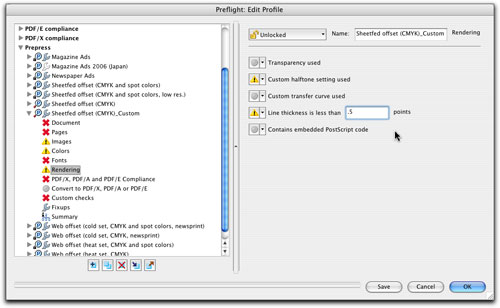
10 RENDERING SPECS
For Rendering, we’ve kept the Warning (included in the original duplicated profile) of finding a Custom Halftone Setting Used. We also added a Warning to find any Line Thickness Less Than 0.5 points in width.
The custom halftone setting is designated to be removed in the fixups in the original profile, and setting a minimum line width can be added to the fixups (see Step 14 below). If you’re concerned about transparent objects in your PDF, you can also activate the Transparency Used check at the top of the Rendering options.
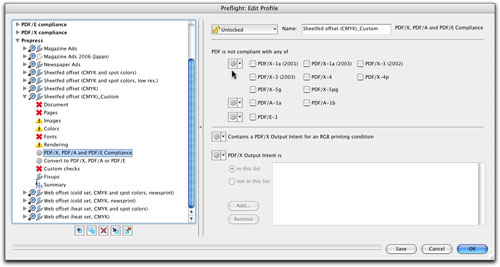
11 PDF/A/X/E SPECS
This section is to let you specify which, if any, PDF standard compliance you may want your PDF to meet. In the Sheetfed Offset (CMYK) profile, by default PDF/X-1a (2001) is active as an Error check. This compliance is not necessary for my printing needs, however, so I’ve made all the PDF standard compliance checks Inactive.
Note: Any profile check you deactivate will reduce the complexity of the preflight report and file you generate, thereby reducing the time required in its evaluation.
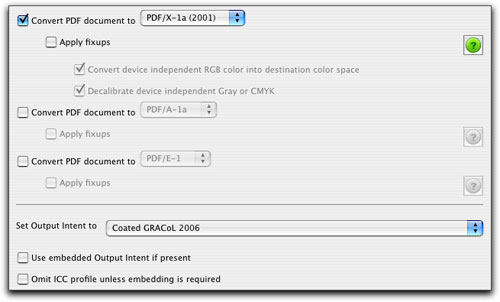
12 CONVERT TO PDF/A/X/E SPECS
If, however, you’re working in a PDF standard-compliant workflow (PDF/X-1a is a common choice), the Convert to PDF options can be very useful.
It’s important if you do convert a PDF to a standard to choose the proper output/destination profile in the Set Output Intent To drop-down menu. If appropriate, check Use Embedded Output Intent If Present, or if embedding isn’t desired, check Omit ICC Profile Unless Embedding is Required.
13 CUSTOM CHECKS
In this section you can add, duplicate, edit, or delete specific profile checks. For instance, the Text is Smaller Than 5 pt check can be removed from the Custom Checks in this Profile list. If you want to add a check, locate it in the All Available Custom Checks list and click the arrow icon below the list. Or you can modify a check by clicking the Edit Check icon (circled) to bring up the Preflight: Edit Check dialog.
Tip: As when creating custom preflight profiles, I suggest duplicating and editing an existing Custom Check when creating a new check.

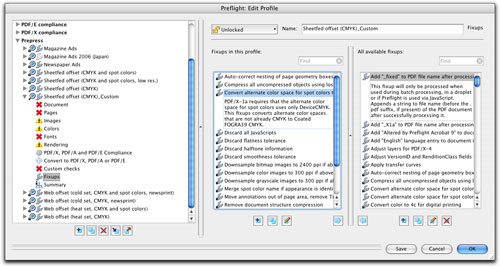
14 FIXUPS
This last setting (before Summary) is a list of edits, known as fixups, that can be applied to a PDF when you choose to execute a preflight with fixups. A common prepress fixup (shown here) is to Convert Alternate Color Space for Spot Colors (conversion of non-CMYK colors to process [CMYK] colors). As with Custom Checks items, each of these fixups can be added, duplicated, edited, or deactivated. Once you’ve completed your profile, use the drop-down menu at the top to Lock it, click the Save button at the bottom, click OK, and then take it for a spin by executing it on a PDF file!