
Creating Lower-Third Graphics with Data Sets in Photoshop
BY RICHARD HARRINGTON & MARCUS GEDULD
Starting with Photoshop CS2, Adobe introduced a new feature called data sets. This allows you to create a set of data that applies variable text, variable visibility settings, or pixel replacement for art layers. This is a great feature for use with templates, especially those for lower-third titles.
By harnessing the power of data sets, you can dramatically speed up the production of repetitive graphics. In fact, by feeding in a text file, hundreds of lower-third graphics can be generated in a few clicks. The advantage of this method is that a producer or production assistant can gather all of the needed names and titles into a single text file (easily created with any word processor). This file can then be loaded to generate as many graphics as needed. While the process is a little tricky at first, it’s pretty easy to get the hang of.
STEP 1 Open or Create a Lower-Third Graphic
In order to use data sets, you’ll need a PSD file. The purpose of this tutorial is to focus on the data sets themselves; therefore, we’re providing a prepared PSD file for you to download at http://layersmagazine.wpengine.com/downloads.html. For future use, all you’ll need is a layered PSD file with each element on its own layer.

CREDIT: ©ISTOCKPHOTO/AJACK13
STEP 2 Define the First Variable
This first step to using data sets is to define variables within the graphic. To get started, open the file Lower_Third_Master.psd that you downloaded. Open the Variables dialog by choosing Image>Variables>Define. From the Layer pop-up list, choose Position. This is the second line of text in the graphic that describes what place each surfer is currently in. Specify that you want to use Text Replacement by checking the box next to it. Name the text replacement value “Position.” You can assign a custom name (using no spaces) to make it easier to identify.

STEP 3 Define the Second Variable
There’s one additional data variable that needs to be defined (for the name of each surfer). Click the Layer pop-up list and choose the Name layer. Specify that you want the Name layer to also use Text Replacement by checking the box. Name the text replacement value “Name.” With both variables defined, you can now click OK to create the variables.

STEP 4 Launch a Text Editor
Now that the variables are defined, we can create a text file to serve as the source for data sets. Each data set corresponds to a variation of our template, which we’ll use to create additional lower-thirds. Creating a data set requires you to have access to a text editor. (A full-featured word processor is not necessary for this. The only requirement is that you can save the file as a plain text [.txt] file.) Launch your text editor and create a new document.

STEP 5 Create Your Data
The first line of the text file needs to be the variables separated by a comma. For our sample it would look like this:
Name, Position
Next you need to press Enter to go to the next line. Type the following data as sample data:
Richard Harrington, Currently in first place
Glen Stephens, Currently in second place
Jayse Hansen, Currently in third place
Mark Spencer, Currently in fourth place
Jeff Greenberg, Currently in fifth place
Marcus Geduld, Currently in sixth place
Save the file as a plain text (.txt) file to your desktop.

STEP 6 Open Data Sets Dialog
Switch back to Photoshop and select the Lower_Third_Master.psd file that should still be open. It’s now time to create the actual data sets for each rider. Photoshop will use the text in the TXT file to serve as the data to populate the template. Open the Data Sets dialog (Image>Variables>Data Sets). Click the Import button to open the Import Data Set dialog.

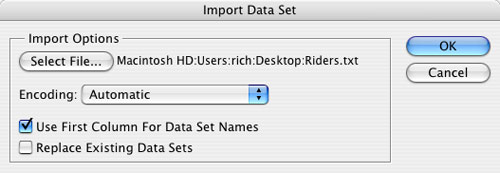
STEP 7 Import Data Sets from the Text File
Under the Import Options, click the Select File button, navigate to the text file you just created, and click the Load button. Check the box next to Use First Column for Data Set Names (this will use the first line of text to map text to the appropriate variable in the template). You can uncheck the box next to the Replace Existing Data Sets option to leave any existing data in the document. Click OK to import the data sets. Don’t close the Variables dialog yet.
STEP 8 Preview Your Data Sets
It’s a good idea to check that the import process worked correctly. To see the different data sets applied, check the Preview box in the Variables dialog. You can then click the Go to the Next (or Previous) Data Set button to advance between each set. Check to make sure that all the text fits into the appropriate fields. When building a template, be sure to use paragraph style text so you can harness the alignment tools. One of the key advantages to using the text file method is that these variables can be reused with a different template.

STEP 9 Putting an Individual Data Set to Use
Click OK in the Variables dialog. Once you’ve created your data sets, you can apply them to your template. There are two distinct ways to use your data sets. First, you can apply any individual data set to your template by choosing Image>Apply Data Set. This will bring up a dialog listing all of the data sets that you’ve created. Choose one and it’s applied to your template. At this point, no files have been saved; you’re just previewing the template with new variables applied.

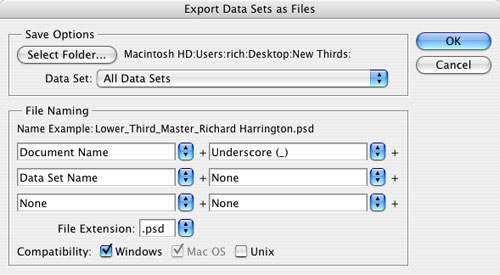
STEP 10 Export Data Sets as Individual Files
If you’d like to create usable individual files to import into an NLE or motion graphics application, use the following steps: Click on the Eye icon to turn off the background layer (Reference) of the surfer. This layer was for reference only when designing the lower third. Be sure that you can see the Photoshop transparency checkerboard; then choose File>Export>Data Sets as Files. This will bring up a dialog that will allow you to choose the set you want to apply, along with options for naming the files and choosing the location where you want them saved.

STEP 11 Set Options for Exporting
You now need to modify a few options to complete the building of all your individual graphics. In the Save Options, click the Select Folder button and specify a destination. Be sure to create a new folder to hold all the images. Then, change the Data Set menu to All Data Sets. Be sure to set the Compatibility switches to both Windows and Mac OS. Click OK and Photoshop will create a new PSD file for each data set.
STEP 12 Make the Files Edit-Ready
The new PSD files need some additional processing to be “edit-ready.” By converting the files to TIFFs, they’ll import as a single layered graphic into the NLE or motion graphics application. Additionally, the use of an alpha channel will ensure that transparency is properly interpreted. Both stages of this process can be automated to save time (as long as you have Photoshop CS2 or later). The Image Processor script can perform both the TIFF conversion and run an action to create the alpha channel.

STEP 13 Access the Alpha Channel Action
The Alpha Channel embeds transparency into the graphic, which allows it to be easily composited over another graphic or video. Call up the Actions palette (Window>Actions), click on the Actions palette flyout menu (the triangle in the upper-right corner), and choose the Video Actions set. In the Actions palette, click the disclosure triangle next to the Video Actions set, then click the triangle next to the Alpha Channel from Visible Layers action. Select the first step in the action (labeled Stop) and click the Delete icon at the bottom of the Actions palette.

STEP 14 Process the Images
Choose File>Scripts>Image Processor. Click the Select Folder button and select the folder that contains the PSD files you created. In section 2, set it to Save in Same Location. In section 3, check the box next to Save as TIFF. In section 4, check the box for Run Action. Choose the Video Actions set and the Alpha Channel from Visible Layers action (Avid users should choose the action with the Inverted option). Click Run. Photoshop will process all of the images in your source folder. You can now import the TIFF files into your NLE or motion graphics application.

