
Create Logos Using Live Trace in Illustrator
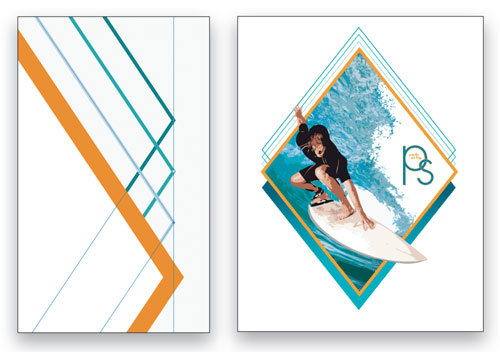
Creating a logo in Adobe Illustrator is easy enough, but here’s a cool technique for taking a couple of photos and using Live Trace to create graphic elements as part of an eye-catching surf logo.
1 CREATE NEW DOCUMENT; PLACE PHOTO
To begin, choose File>New and create a Basic RGB document. Next, choose File>Place and navigate to the first photo you’d like to use in your logo (ours is this photo of a surfer). In the Place dialog, uncheck the Link box and click Place.

2 TRACE PHOTO
With the photo selected, go to the Control panel, click the down-facing arrow between the Live Trace and Mask buttons, and choose Tracing Options from the list. In the Adjustments section, set the Mode to Color, then set Max Colors to 14. This determines the level of detail the image will retain once it’s traced. Turn on the Preview checkbox to see the effect. If it looks good, then click Trace; otherwise, feel free to play with these settings to tweak the overall appearance.

3 CLEAN UP BACKGROUND
We need to remove the white background areas of the image, so click the Expand button in the Control panel to convert the image to regular path shapes. Choose Object>Ungroup and then Select>Deselect. Choose the Selection tool (V), and zoom into your photo. Click to select the white background areas and press the Delete (PC: Backspace) key to delete them one by one. Don’t forget the white areas between the legs and arm. We also removed some of the nonwhite areas around the edge of the board.

4 GROUP IMAGE; PLACE BACKGROUND
Select the entire image graphic and choose Object>Group. Now, choose File>Place and navigate to the image you want to use for the background (we’re using a wave). Click Place and then click-and-drag the image so it’s not covering the other image. Click the down-facing arrow in the Control panel again and choose Tracing Options from the list. In the Tracing Options dialog, set the Mode to Color and Max Colors to 15. This will give us just enough detail in the water with some additional colors. When done, click Trace.

5 CHANGE BACKGROUND ELEMENTS TO WHITE
We need to fill a couple of background elements with white, so let’s Expand, Ungroup, and Deselect this graphic as we did in Step 3. Select the various sky elements on the right side of the image, and change their Fill to white in the Control panel. Fill any other scattered elements around this area with white that you feel may be in the way, such as the center and top-right portion of the wave. This will make a space for the logo, which will be added to the final design. When finished, use the Selection tool to select the entire object, and choose Object>Group.

6 CREATE DIAMOND SHAPE
Choose the Rectangle tool (M), hold down the Shift key, and drag out a square shape away from the other images. Open the Swatches panel (Window>Swatches) and fill it with gray. Select the Rotate tool (R) and hold down the Shift as you click-and-drag to rotate the box 45°, making a diamond shape. Illustrator still sees this as a square, so open the Pathfinder panel (Window>Pathfinder) and click the Unite icon, the first icon at the top left. Because there are no other shapes, it won’t combine with anything; however, it will reset the transform edges to make it an editable diamond shape.

7 EXPAND AND POSITION DIAMOND
With the Selection tool, hold down the Option (PC: Alt) key and click-and-drag the top-middle control handle upward. The bottom will expand proportionately, resulting in a taller diamond shape. We’ll build our logo inside this shape. Drag this diamond shape above the wave graphic. Choose Window>Transparency and set the Opacity to 60%. This will allow you to see the graphic below to better adjust its position. We selected the wave image and then used the Rotate tool to slightly rotate it for a better composition inside the shape.

8 MAKE CLIPPING MASK
With the diamond shape and background graphic in place, select both objects and choose Object>Clipping Mask>Make. This will clip the wave inside of the diamond shape.

9 ADD STROKE TO SHAPE
Deselect and choose the Direct Selection tool (A). Click on any paths of the diamond shape to select just the shape (you can’t see the path but it will appear when you hover the cursor over it). Click the Stroke icon at the bottom of the Toolbox, then open the Swatches panel (Window>Swatches). Choose a yellow-orange color to apply it to the stroke of the shape. Open the Stroke panel (Window>Stroke) and set the Weight to 5 pt.

10 COPY-AND-PASTE STROKE
Now use the Selection tool to move the graphic of the surfer on the wave in a way so that it appears as though he is riding the wave. Choose Object>Arrange>Bring to Front, and scale the object as necessary to get the best composition. Deselect and choose the Direct Selection tool. Shift-click each of the four corner points of the diamond shape to select them (they should all be a dark blue and not white). Press Command-C (PC: Ctrl-C) to copy the shape to the clipboard. Choose Edit>Paste in Place, then choose Object>Arrange>Send to Back.

11 POSITION STROKE; APPLY COLOR
With the shape still selected, hold down the Shift key and press the Down Arrow key three times to move the shape straight down. Choose the Eyedropper tool (I) and click on the teal color in the water background to apply the color to the shape.

12 ADD GRADIENT
Open the Appearance panel (Window>Appearance), and drag the Fill item to the Duplicate Selected Item icon at the bottom of the panel. Click on the top Fill item to make it active, and then click on the swatch to open the swatches menu. Click the Swatch Libraries Menu icon at the bottom left of the swatches menu, and choose Gradients>Fades. In the Fades panel that appears, click Fade to Black 1. Then, click-and-drag with the Gradient tool (G) to redraw the gradient vertically within the shape, as shown here.

13 DUPLICATE DIAMOND SHAPE
Let’s add another interesting element to the shape, similar to the way we just did with the diamond shape. Choose the Selection tool, and without anything selected, hold down Shift-Option (PC: Shift-Alt), and click-and-drag the diamond shape up to create a duplicate. Position it just above the original diamond shape. Drag the Fade to Black gradient Fill in the Appearance panel to the Delete icon to delete it. Set the Fill to None. Click the Stroke icon at the bottom of the Toolbox, switch to the Eyedropper tool, hold the Shift key, and click the same teal color we used Step 11 to apply it to the stroke.

14 ONE MORE DUPLICATE
Make another duplicate of this stroked diamond shape and position it below the last one so that it’s closer to the main shape. Set the Stroke to a lighter blue. Here, we sampled the lighter blue in the water graphic. Double-click the Blend tool (W) and set the Spacing to Specified Steps with the amount set to 1, then click OK. Select both stroked objects and press Option-Command-B (PC: Alt-Ctrl-B) to apply the blend. The blend will create a third stroked object between the original two objects, average the colors of the two strokes, and apply that to the new shape.

