
Showing your artwork framed—without framing!
Have you ever wished you could show your clients framed versions of your work without going to the expense of physically framing your images? If so, here’s a method using real frames, a digital camera, Photoshop, Bridge, and Acrobat that allows you to create digitally framed versions of your images.
1 PHOTOGRAPH YOUR FRAMES
Place one of the frames you want to use on a neutral background that provides good contrast with the edge of the frame. A large piece of white foam core works nicely. Photograph your frames under 5000–6500° Kelvin lamps and capture a crop-out grayscale target if the frame color is important. Set your camera so the middle of the lens is equidistant from all four corners of the frame with the camera back perpendicular to the plane of the frame. Use a bit of side lighting to enhance the 3D appearance in the final image. Repeat for any other frames you want to use.

2 CORRECT THE FRAME IMAGE
If you’ve used 5000–6500º Kelvin lamps, color correction should be minimal. If you’ve captured a grayscale target, use it to confirm or color correct the image. Then set Brightness and Contrast to suit the look your want for your frame. You can perform this correction either in the Camera Raw dialog or in Photoshop. Select the maximum image dimension (Image>Image Size) at which you’ll be displaying or printing your framed images. Save this image as a PSD file.

3 SQUARE UP THE FRAME
Choose Filter>Distort>Lens Correction. Using the Move Grid tool (M), align the Lens Correction grid system so an intersecting pair of vertical and horizontal grid lines are aligned with the top and left edges of the frame. Use the Angle field to rotate the image until the top of the frame is parallel to a horizontal grid line. With the Move Grid tool, fine-tune the placement of the grid lines. Use the Vertical and Horizontal Perspective sliders to align the left, right, and bottom edges of the frame so they are perfectly parallel with the grid lines. Zoom in on frame edges to check for “squareness.” Click OK.

4 ADD GUIDES TO CHECK SQUARENESS
After applying your lens correction adjustment, and with your Photoshop Rulers active (Command-R [PC: Ctrl-R]), click on the top ruler and drag a horizontal guide down to the top edge of your frame. Check to make sure the top edge of the frame fits perfectly along the guideline. It’s worth the time to make sure this top edge is perfect. Having the top edge perfect makes squaring up the rest of the frame easier. Add guides onto the bottom and side edges of the frame. Choose View>Lock guides so you don’t inadvertently move your Guides.

5 FREE TRANSFORM TO FINE-TUNE FRAME
No matter how careful you are with your photography and your Lens Correction, you may still have some frame distortion. Use the Rectangular Marquee tool (M) to draw a selection around the outside of the frame. Choose Edit>Free Transform. Zoom into a corner of your frame that needs adjusting. Press Command (PC: Ctrl) and drag the corner of the bounding box until the edges of the frame fit perfectly along the vertical and horizontal guides so there isn’t even one pixel deviation along the edges of the frame. Repeat for each corner, then press Return (PC: Enter) to commit the transformation. Press Command-D (PC: Ctrl-D) to deselect.

6 CROP THE FRAME
Go to View>Show>Guides to hide your guides. Activate your Crop tool (C) and click the Clear button in the Options Bar to empty all the fields. Click on the top-left corner of your frame and drag down to the lower-right corner. Now, starting in the upper left, zoom into each corner and fine-tune the placement of the bounding box until you’ve cropped out all the distracting edge pixels. You often have light, anti-aliased background pixels along the edge that you’ll want to remove. Press Return (PC: Enter) to apply the crop. This becomes your background frame layer.

7 DELETE IMAGE IN FRAME
Using your Rectangular Marquee tool, draw a selection around the contents inside the frame. Go to Select>Transform selection, zoom into the inside corners of the frame, and fine-tune the placement of the bounding box along the inner edges of the frame until you’ve cropped out all the distracting edge pixels. Press Return (PC: Enter) to commit the transformation of the selection. Press Delete (PC: Backspace) to remove the contents of the frame. You should now have the frame on a transparent background. Press Command-D (PC: Ctrl-D) to deselect.

8 ADD IMAGES OF LAYERS
Using your Move tool (V), drag your photographs into your frame image. Each image will be added on its own layer. Double-click each layer’s name and rename it to coincide with each image. You can drag layers into a specific order after you add them. If you have both portrait and landscape oriented images you might want to Image>Duplicate, Image>Image Rotation>90˚ CW, and then add your landscape oriented images to this frame base. In the Layers panel, drag the frame layer to the top of the layer stack. Click the Eye icon next to each layer to hide them except for the frame layer and one of the image layers.

9 FINE-TUNE IMAGE PLACEMENT
Click on the visible image layer to make it active. Choose Edit>Free Transform. Press your Shift key and drag a corner of your image to resize it to fill the frame. You can click-and-drag inside the bounding box to reposition the image. Press Return (PC: Enter) to commit the transformation. Repeat this for each image layer, hiding and revealing layers as needed. Click on the Frame layer to make it active, and then click on the Add a Layer Style icon at the bottom of the Layers panel and choose Drop Shadow. Experiment with the settings to create a natural shadow along the inside edges of the frame, and click OK.

10 CREATE LAYER COMPS
Choose Window>Layer Comps to activate the Layer Comps panel. With the base frame layer constantly visible, sequentially make the individual image layers visible and create layer comps of each image layer placed inside of the frame. To create a new layer comp, simply click the Create New Layer Comp icon at the bottom of the panel, name your comp in the resulting dialog, and click OK. You’ll use these Layer Comps to create your individual framed images without having to manually create separate images.

11 EXPORT LAYER COMPS TO CREATE FRAMED IMAGES
Choose File>Scripts>Layer Comps to Files. Select a Destination and File Type (here, high-quality JPEGs with Quality of 10–12) and provide a File Name Prefix. If you have multiple frames, orientations, and mattes you may find it useful to base your naming scheme on those, for example: Matte Horizontal, Matte Vertical, No Matte Horizontal, and No Matte Vertical. Click the Run button to create a sequence of framed images for each image and frame combination.

12 CREATE PDFS OF FRAMED IMAGES
In Adobe Bridge, navigate to your files, activate the Output panel (Window>Workspace>Output), and choose PDF at the top. Configure the Output panel to place a single, full-quality image on each page. Choose a Background color that complements your images (you’ll rarely go wrong with neutrals). Add header or footer copy to suit. Use the Refresh Preview button as you change settings. If you prefer, choose Open in Full Screen Mode in the Playback section and assign a Transition to have your framed images appear in a dynamic slide show. Select the thumbnails of all the images that you want to include in the PDF, and click the Save button to create your PDF.

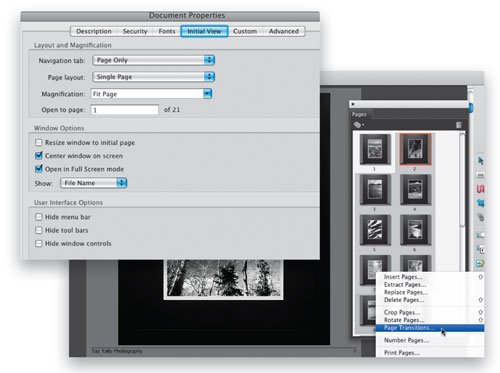
13 COMBINE PDFS
Repeat Step 12 for each series of photos containing your various orientations and frames. With Acrobat, open the PDF containing the series of images you want to be at the beginning of your image sequence. Choose Document>Insert Pages to add your other PDFs of framed images to this document. You can change display mode (using File>Properties and clicking Initial View) and assign or change transitions by Right-clicking your PDF pages in the Pages panel and choosing Page Transitions from the context-sensitive pop-up menu.

14 Final Image

ALL IMAGES BY TAZ TALLY UNLESS OTHERWISE NOTED
