
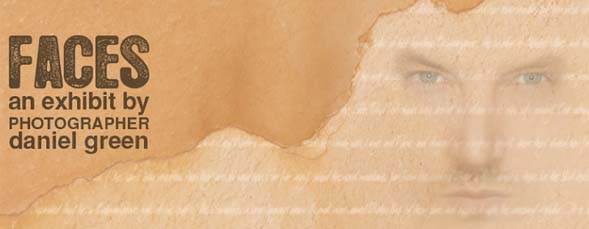
When you’re trying to create something with more of a fine art feel to it, sometimes that means you have to explore functions you don’t normally use, or use standard functions in different ways. In this tutorial we’ll use both of those approaches to create something a little different.
1 CHOOSE A PHOTOGRAPH
As with most projects, picking the right photo is key. Here we chose an image of someone face on, with a serious look on his face. Find an applicable photo and open it in Photoshop.

2 SELECT KEY ELEMENTS
Select the Lasso tool (L) and make a rough selection around the first eye. Hold down the Shift key and make additional selections around the other eye, and the lips and part of the nose. It’s not important to be accurate, in fact, it’s better not to be too detailed in this case.

3 USE REFINE EDGE TO FINALIZE
Rather than just feather the selection, we’ll experiment with the refine edge settings. Click on the Refine Edge button in the Options Bar and play with the settings. Rather than aim for an accurate result, try to get something unusual. Move sliders and see the results, trying different combinations. (Tip: Change the View to On Layers to see the best representation of the results.) In our example, we enabled the Smart Radius checkbox, chose 30.8 px for Radius, and 27.5 px for Feather. When you’ve obtained the desired settings, select New Layer with Layer Mask from the Output To drop-down menu and click OK.

4 ADD A LAYER AND FILL WITH COLOR
Command-click (PC: Ctrl-click) on the Create a New Layer icon at the bottom of the Layers panel to add a layer (Layer 1) below the Background copy layer created in the last step. Select the Eyedropper tool (I), click the empty square to the left of the Background layer thumbnail to turn on its visibility, click to sample a color from the face, then click the Eye icon to turn off the Background layer’s visibility. Now press Option-Delete (PC: Alt-Backspace) to fill Layer 1 with the new color.

5 TURN RESULTS INTO A BRUSH
Click the Eye icon of Layer 1 to hide it, and click on the Background copy layer to activate it. Select the Elliptical Marquee tool (nested with the Rectangle Marquee tool [M]) and make a loose selection around the face. Choose Edit>Define Brush Preset, name the brush, and click OK. (Note: By hiding the visibility of Layer 1, you ensure that the brush will be very subtle, with no background.) Click the Eye icon of Layer 1 to turn its visibility on, and press Command-D (PC: Ctrl-D) to deselect.

6 PAINT WITH THE NEW BRUSH
Click the Create a New Layer and click-and-drag Layer 2 above Layer 1. Click on the Foreground color swatch in the Toolbox and choose a darker version of the current color. Select the Brush tool (B) and choose the custom brush you created in the last step from the Brush Preset Picker in the Options Bar (it should be the last brush). Press the Right Bracket key repeatedly to make the brush about the size of your document, position it in the middle, and click once. Select the Move tool (V), click on the Background copy layer to activate it, and move it into a better position.

7 ADD A TEXTURE
Open a photo of a texture (that’s slightly larger than your document and that has a visual dividing line) and click-and-drag it onto your photo. Use Free Transform (Command-T [PC: Ctrl-T]) to scale and rotate the texture. Set the blend mode to Overlay and the opacity to 60%. (Note: In our example, the colors of the texture were similar to the colors in our composition, so no color change was necessary. If your texture is altering your artwork color, consider using Image>Adjustments>Desaturate to remove the color from the texture.) Drag Layer 3 below the Layer 2.

8 MASK THE FACE WITH A TEXTURE LAYER
Temporarily change Layer 3’s blend mode back to Normal and the Opacity to 100%. Choose the Quick Selection tool (W) and make a selection around a defining area of the texture. In our example, we selected the top-left portion of the texture, using the crack as the dividing line. Once your selection is done, click on Layer 2 to activate it and then click the Add Layer Mask icon at the bottom of the Layers panel to add a layer mask. Change Layer 3’s blend mode and Opacity back to the previous settings.

9 ADD SOME TEXT
Add some random text that will blend into the composition. There are a number of websites that generate text—I use www.blindtextgenerator.com. Copy some text (Command-C [PC: Ctrl-C]) from the website, use the Type tool (T) to click-and-drag a textbox that’s the size of your document, and paste in the text (Command-V [PC: Ctrl-V]). Select a handwriting-style font, a text color, and alter the size and spacing to get the look you want. When finished, click the Commit icon (checkmark) in the Options Bar.

10 MASK THE TEXT
Now we’re going to mask the text so it only appears on the opposite side of the crack from the brushed face. To do this, hold down Option (PC: Alt) and click-and-drag the layer mask from Layer 2 onto the text layer—this will copy the layer mask. With the mask still active on the text layer, press Command-I (PC: Ctrl-I) to invert the mask.

11 MAKE SMART OBJECT AND APPLY FILTER
Right-click on the text layer in the Layers panel and choose Convert to Smart Object. Choose Filter>Blur>Gaussian Blur, use a fairly low Radius number, and click OK. With the filter is applied, double-click on the symbol to the right of the words “Gaussian Blur” in the Layers panel to open the Blending Options (Gaussian Blur) dialog. Lower the Opacity to 50% and click OK.

12 CHANGE BLEND MODE AND OPACITY
Change the blend mode to Soft Light and lower the Opacity of the Smart Object layer. Remember that if you want to adjust the text of the Smart Object layer, double-click on the Smart Object thumbnail in the Layers panel to open the editable contents in a new window.

13 ADD TEXT
Add some text more text. Select the Type tool and enter a few lines of text on different text layers. In our example, after entering the word “FACES” on its own text layer, we added guides to each end of the word and sized each additional text layer to fit within those guides. Note: Choose View>Rulers and drag guides out from the vertical ruler to create your guides.

14 LOWER OPACITY OF TEXT LAYERS
Click on the first text layer created in the last step, hold down the Shift key, and click on the last text layer created in the last step to select all the text layers. Lower the Opacity of all the selected layers (this function is new in Photoshop CS5) to finish the composition.

