Art of Type: Power of the Ballot Box
In honor of this election year, I would like to dedicate a column to a humble bit player in the typographic repertoire: the ballot box. A linchpin of democracy, it doesn’t get the respect it deserves, and learning to use it well teaches some important typographic lessons.
The problem starts with finding one at all. It’s not in any standard character set, and fonts including Symbol, Monotype Sorts, and Zapf Dingbats don’t include one either. Of the popular pi fonts, only Webdings and Wingdings offer them. The Webdings ballot box is a full em square, meaning that it reaches from above a typeface’s ascenders to below its descenders. That’s big, for a ballot box. Wingdings offers three models, which range in weight from normal to horsy to even horsier. These sit on the baseline and are more or less cap-height.
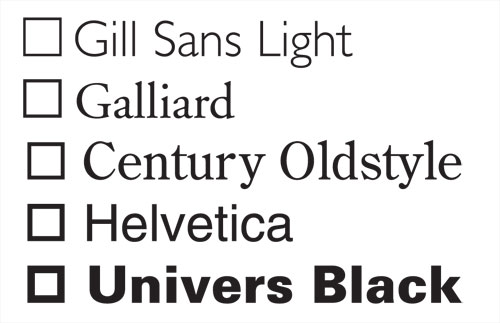
Ideally, you want the weight of the stroke of a ballot box to have some relationship to the weight of the type you’re using it with. Right away we’re in trouble. If you scale down the em-square Webdings ballot box to a reasonable size—two-thirds of its normal size—and raise it up to sit on the baseline, as a ballot box should, it gets pretty thin, as you can see here in the top example. All in all, a lot of folderol for a result of limited utility.

The thinnest of the Wingdings’ ballot boxes will work with heavier seriffed text faces (it’s the middle example), but it’s too bulky for most of the finer ones. The heavier models should be reserved for use with heftier sans-serif faces and bold and extra bold faces, as seen in the bottom two examples in the illustration.
Taking matters into your own hands
But how about that second ballot box in the list? The one that sits perfectly flush left and whose weight is balanced harmoniously with the type next to it. Well, I drew it myself, and indeed, the best ballot boxes are ones you make by hand. To do this, choose the Rectangle tool from the Toolbox in InDesign and click on your page to open a dialog where you can define the size of your ballot box—try about 80% of the size of your type.
In the Stroke panel, you can specify its weight and preview just how well various weights relate to the weight of your type. Once you’ve drawn it, you can cut-and-paste it into your text, where as an anchored graphic, it will act like part of your text. By default, it will sit neatly on the baseline. Once anchored in place, you can still select it with the Selection tool and change its size or weight.
Because you’ve drawn it yourself, this ballot box doesn’t have side bearings like most typeset characters, so it sits perfectly flush against the margin. This is a characteristic it shares with the Webdings em-square box, as you can see in the illustration. One disadvantage that custom ballot boxes have is that they can’t be used with the Bullets and Numbering controls in InDesign (found in the Paragraph panel’s flyout menu), which can automatically add symbols at the beginnings of listed items. To use a ballot box in a list, you have to use a symbol found in a font.
The spacing between a ballot box and the text that follows it is dependent on your layout, but the norm is a single word space (as with other items that qualify generically as “bullets”). If your setting has justified margins, you’ll want to make that a fixed space. InDesign gives you two options here: the Quarter Space, which is slightly narrower than a word space in most fonts, or what InDesign calls a Nonbreaking Space (Fixed Width). This latter is the same width as a word space, but it can’t be stretched or squeezed during justification like a regular word space. (It can’t be used as a line-breaking point either—hence its name—but that doesn’t matter in this case.) Both of these spaces are available from Insert White Space in the Type menu in InDesign.

Giving credit
Another common use for ballot boxes is in coupons that call for credit card numbers. If you’re satisfied with its weight, you can use the Webdings em-square box in this role. Just set a series of boxes with no spaces between them and tighten their tracking to a value of 60 (that is, minus 60 thousandths of an em) in the Control panel. This causes them to overlap precisely so there’s no doubling of the vertical strokes where they coincide. Don’t set these in a justified line, though, because their spacing will shift unless you’ve specified a value of 0% each for Minimum, Desired, and Maximum in the Justification dialog. The 0 settings assure that the spaces between the boxes can’t be flexed to justify the line.
If you prefer to use custom-drawn ballot boxes for your credit-card grids, create the series using Step and Repeat from the Edit menu. First select a single box, then open the Step and Repeat dialog from the Edit menu. Here, select the number of boxes you want to make, and set the Horizontal Offset value to the width of the box minus its stroke weight. Set the Vertical Offset to 0. Click OK, and InDesign will create a series of boxes that overlap by exactly the weight of their strokes, so there’s no thickening of the vertical, overlapping lines. Select the whole line of boxes and Group them (Object>Group), so they’re easier to handle. This array, too, can be inserted into text as an anchored graphic.
Because boxes for credit card numbers are often divided into clumps of four (like the card numbers themselves), you may want to create gaps in this array. If you’ve use the Webdings ballot box, select the ones you want to become gaps and use the Swatches panel to give them a color of None. If you used custom-drawn boxes, you can use this same device or use the Direct Selection tool to select individual boxes and delete them. Since they’re graphics and not typeset characters, the line of boxes won’t collapse to close up the space.
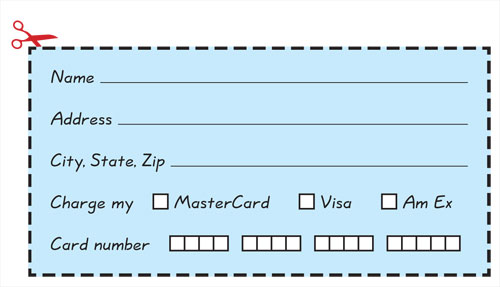
Keep in mind that if you need to typeset an “x” or a checkmark inside a ballot box, as shown here, all you have to do is set the character to the right of the box and kern it back to the left to superimpose it over the box. This works whether your box is itself a typeset character or a hand-drawn box of your own creation.