
Acrobat 9 brings file organization to a whole new level with its newest portfolio feature, which allows users to share their files in a fixed layout that transcends technical variables. Acrobat portfolios support PDF, JPG, TIFF, GIFF, BMP, PNG, and Text files on Windows and Macintosh.
Professionals from all sectors will find this feature useful. For educators, using the portfolio feature will be a great way to follow class records and achievements. Legal professionals will be able to use it to organize criminal dossiers, documents, and judgments; add security; and collect electronic signatures. And graphic artists and photographers will love the way they’ll be able to present their work to new clients, keep current clients up to date with project status, and create marketing strategies to further advance their careers.
STEP 1 Create a Portfolio
Start creating your portfolio by choosing File>Create PDF Portfolio. This launches the Portfolio window.
STEP 2 Or Open a Portfolio and Edit
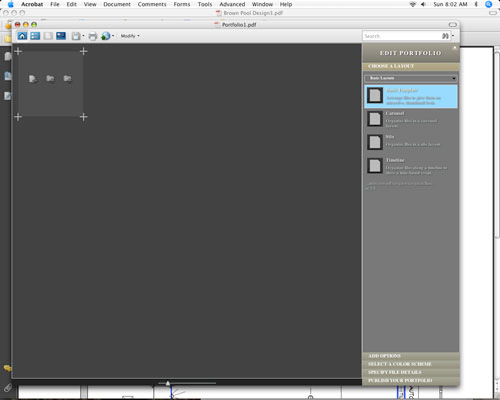
If you already have a portfolio started and want to edit it, open it by choosing File>Open, then navigate to the PDF portfolio file. If you want to make more modifications to your portfolio file, click the Modify button at the top of the window and choose Modify>Edit Portfolio from the drop-down menu to access the Edit PDF Portfolio panel options.
STEP 3 Populate Portfolio
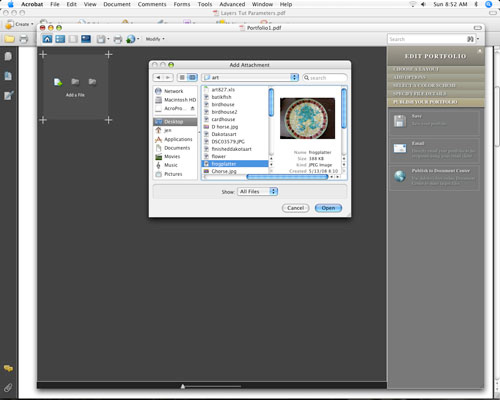
You have three options to start adding your files to your portfolio by way of three buttons at the bottom-left corner of the window: Add Files, Add Existing Folder, or Create New Folder. Clicking on Add Files launches the Add Files menu, where you can then navigate to your files. Continue to add more files by clicking on the buttons to fill your portfolio. You can preview PDF, Text, JPG, TIFF, GIF, PNG, and BMP files. Once you have added the files you want, enhance the look of the portfolio using the Edit PDF Portfolio panel on the right side of your screen.
STEP 4 Populate En Mass
Add a bunch of files at once by clicking the Add Existing Folder button or by selecting Modify>Add Existing Folder. The icon shows a folder, but double-click on the folder to see all of your files.

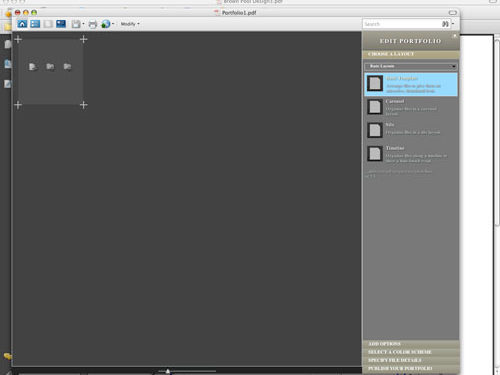
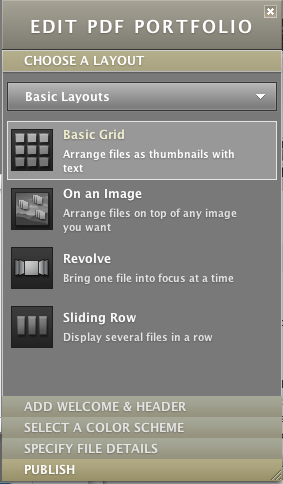
STEP 5 Choose a Layout
The Edit Portfolio panel of the Portfolio window allows you to choose the look of your portfolio layout. Select from four layouts: Basic Grid, On an Image, Revolve, and Sliding Row. Basic Grid gives you—well, just that—a basic grid of your images/documents. On an Image allows you to add a background image. Revolve provides a carousel effect that ushers your selected file to the forefront of your screen and cycles through them in round robin fashion. And Sliding Row allows you see a few files at a time and rotate through them linearly.
STEP 6 Spice Up Your Portfolio
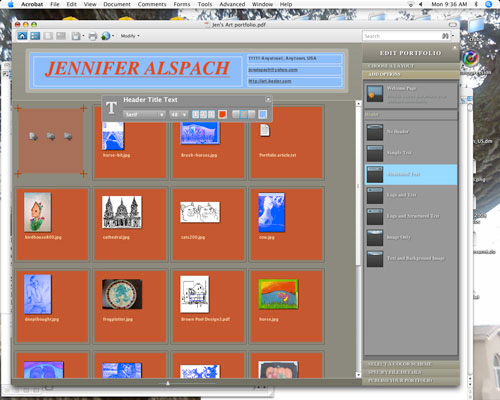
You can also add eye candy to your portfolio with options like a welcome page or header. Add a header by choosing Add Welcome & Header from the Edit PDF Portfolio panel. When you click on the Header style in the panel, a window pops up that you add your text and/or image to. This window also allows you to do some basic text and image editing. When you’re finished, simply click the X in the top-right corner of the window to close it.
STEP 7 Get in the Weeds
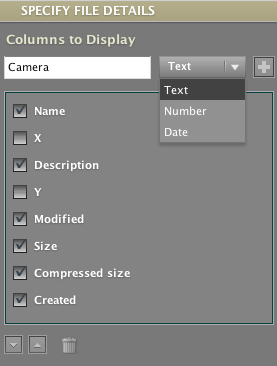
Metadata’s the name of the game these days. And you have the option of choosing what file data you want to be accessible to viewers. To access the metadata, click Specify File Details in the Edit PDF Portfolio panel. To choose the details you want, simply check those options. You can also add a custom column by entering the name of the column in the Add a Column text field, choosing the type of data you’ll be filling that column with from the drop-down menu to the right (Text, Number, or Date), and clicking the button with the plus sign to add it. If you want to delete it later, just click on its name under Columns to Display (not the checkbox) and click the Trash icon below.
STEP 8 Publish Your Portfolio
When you’re finished pulling your portfolio together, click on the Publish tab in the Edit PDF Portfolio panel. You can choose to either save it, email it, or share it on Acrobat.com. The Save and Email options are intuitive to use. But to learn more about how to use Acrobat.com, visit our Acrobat 9: Live Collaboration with ConnectNow article.
STEP 9 Review Portfolios
Another great feature of Portfolio is the ability to use existing Acrobat commenting functionality just as you would any other PDF. Simply click the Comment button at the top of the window and choose Show Comment & Markup Toolbar from the drop-down menu. On this floating menu are a plethora of Comments and Markup tools for you to choose from.

Of course, a PDF portfolio enjoys all of the capabilities of any other PDF document. This means that not only can your portfolio be easily shared and accessed across the globe via one of the most ubiquitous file types out there, you can also determine how you want it to look regardless of operating system, browser, and sundry other settings.
