
The key to successfully using Lightroom is organization. By planning ahead and keeping things simple, you'll spend less time sorting through your catalog trying to locate photos.
1. Choose a Good Folder Structure
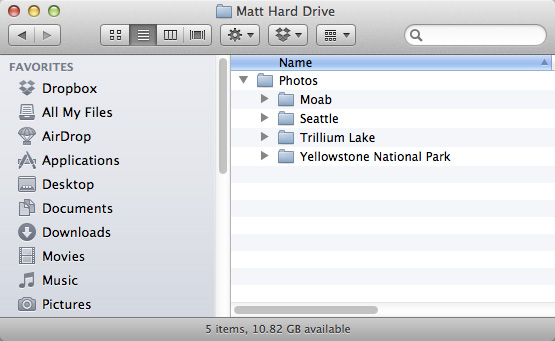
Part of the Lightroom organization process begins before you ever get into Lightroom. See, Lightroom doesn't have an internal, locked, managed, or hidden file structure; it organizes photos into folders the same way you would if you weren't using Lightroom. So when you create a folder in Lightroom, you're really creating a folder on your hard drive, too. This means you need a good folder structure plan before you even start using Lightroom. The best advice is to keep it simple. Here's what mine looks like.

When you choose File>Import Photos and Videos to add photo shoots to the Lightroom library, choose the Copy option at the top of the dialog and check the Into Subfolder option in the Destination panel of the Import dialog. Then, give that subfolder a descriptive name to help keep track of your shoots. This way, what you see in Lightroom is the same as what's on your hard drive.
2. Don't Organize By Date
This is blasphemous to some people. Many of you organize by date and organizing that way is near and dear to your heart. You should reconsider this for two reasons. First, most people don't remember things by date. When looking back at a folder named 2010_10_28, you really have no idea what's in that folder. Sure, it signifies that the photos were taken on October 28, 2010, but if you're like most people you won't remember what happened that day.

Second, if you go to the Library module and look at the Filter Bar (View>Show Filter Bar), you'll see one of the options to filter photos by is Date. In fact, Lightroom automatically organizes everything by date right here for you. So if you ever really need to find photos by date, then you can to do it right here.

By the way, if you're going to ignore this step (and many of you will) and organize by date, don't set the Organize drop-down menu to By Date in the Destination panel of the Import dialog. It creates a really weird date-structured folder and gets pretty hard to manage in the long run. So if you do store images by date, choose the Into Subfolder option and set Organize to Into One Folder in the Import dialog. Then name the folder using whatever date format you like.

3. Use Flags Instead of Stars or Color Labels
Part of getting organized means identifying your favorite photos in some way so you can do something with them. If you look in the Photo menu, you'll see Lightroom has three ways of labeling your favorites: Set Flag, Set Rating, and Set Color Label.

In my opinion, ratings and color labels are really difficult to work with. Most people are familiar with the 1-5-star rating system but the main drawback is that it has too many choices. Five stars is a keeper, right? A 4-star rating probably means the photo is pretty good, 3 means it's decent, 2 is bad, and 1 star is a reject that you throw away. What happens when you go through your photos and come across something that isn't a throwaway and isn't a definite keeper? You debate whether it's a 2-, 3-, or 4-star photo. Either way, it's not your favorite, so you'll probably never do anything with it, yet you're giving it too much time in the rating process. Inevitably, when something takes too long, we stop doing it.
So look through your photos once to find the good ones. It's a really important process in photo editing, but don't spend a long time doing it. Instead of using ratings or color labels, try using the flagging system. Basically, you have two choices: Flagged (P) means you like it; Rejected (X) means you want to delete it. If you don't flag or reject it, then it stays unflagged, which is that area in between where you're not sure whether you like a photo (probably similar to a 3-star photo). You don't even have to press a key to be indecisive; Lightroom assumes you're indecisive about the photo by leaving it unflagged, so your job becomes really easy. Flag it if you like it and think there's a chance you'll do something with it one day, and reject it if you don't. Then, press the Right Arrow key to move on to the next photo. Be quick about it.
4. Delete the Bad Stuff (and An Easy Way to Do It)
Another way to stay organized is to get rid of the bad stuff. You may even want to get rid of some of the good stuff so that you're keeping only the great stuff. If you followed the previous step and are using the flag system, then when you're done going through photos from a shoot, you should have some rejects that you marked with an X. A really simple way to delete them is to go up to the Photo menu and choose Delete Rejected Photos. Lightroom will delete all the rejects at once so you don't have to go back and get rid of them later.

Tip: When you try to delete a photo, Lightroom will ask you if you want to delete it from the hard drive or just remove it from the Lightroom library. I want my rejects gone forever, so I delete them from the hard drive instead of just removing them from Lightroom.

5. Use Collections
Using collections in Lightroom is more important than ever; in fact, I use collections so often now that the Folders panel has become the place where I go when I want to see not-so-good photos. Why? Because collections are the tool I use to get to my best photos. The photos that should only be one click away and the photos that I want to see most often.
To put it simply, think of a collection as a photo album. Let's say you went on a vacation and took 850 photos. Then you came home and wanted to invite some friends over to see those photos. What would you do? You'd never sit down and show them all 850 photos, right? (Okay, some of you would but your friends wouldn't be happy about it.) You'd print the best photos from the trip and put them into an album that people could flip through in a few minutes. That album would be ready to hand over to someone any time you want to show off your favorite photos. That's what a collection is; it's an album. It's a way for you to get to your favorite photos in just one click.
Look at your photos in the Folders panel and go through them one by one. Flag (P) the photos you like as favorites. Now you can click on Attribute in the Filter Bar and click on the first of the three flag icons to quickly see your picks.

When you've figured out what your favorites are, select them (Edit>Select All), go to the Collections panel, click the New Collection icon (+), and choose Create Collection. Give it a descriptive name. Now, no matter what you do in the Folders panel, and no matter what folder you're looking at, you have a one-click way to get to your favorite photos from that shoot from any module.


6. Use Collection Sets, Too
Collections have an extra level of organization called collection sets. Think of a collection set as a group of nested folders. The easiest way to envision a collection set is to use a travel example. Let's say you took a trip to Italy and you put your picks into a collection that has all the best photos from all the locations you visited (Rome, Naples, Venice, Florence, and any other cities). The problem is that this collection could be huge—probably hundreds of photos. You could break each city down into its own collection, but that gets messy. Some people will even create folders, such as "Italy Day 1" and "Italy Day 2," which makes things even worse. That's where collection sets come in handy. Here's how you do it. First, click the New Collection icon and choose Create Collection Set. In the Create Collection Set dialog, give the set a name (such as Italy), then set Placement to Top Level. Now create collections within the set for each city. Here's an example of what a collection set would look like.

7. Smart Collections
Collections can also be smart (click the New Collection icon and choose Create Smart Collection). They can organize themselves automatically as you import photos into Lightroom. One example of this could be a smart collection that's used for HDR photography. For example, when you create an HDR image, put the letters "HDR" into the name of the photo. Now when Lightroom sees this photo, it will detect HDR in the name and place it into an HDR collection for you. So without even thinking about it (or doing anything extra), you have a one-click way to get to all of your HDR photos, and Lightroom does it automatically once you set up the smart collection.


This article originally appeared in Lightroom Magazine published by KelbyOne.com.
